Set Up Submetering in Strata Master
This article will assist you to set up Submetering for your Strata Plans in providing the steps involved. It is particularly helpful to those who have not used submetering for some time and just need a reminder. Alternatively, for those who are experienced with processing in Strata master and can follow brief information.
Links to more detailed information will be provided where available.
Basic Steps
1. Check that your Strata Master Licence allows submetering. Select Configure in your top toolbar > Agency > Licensing tab

On that screen, check to see that you have a tick beside 'submetering'. If not ticked, then contact Strata Master Support to organise a quote for this extra feature. If you do have this tick, proceed to step 2.

2. Configure the type of meters you which to use. In the Configure menu, select Submetering. Click the Add button.

Enter details of the type of meter, usually power/electricity or water. Add the General Ledger Expense Account number that relates to the type of expense.
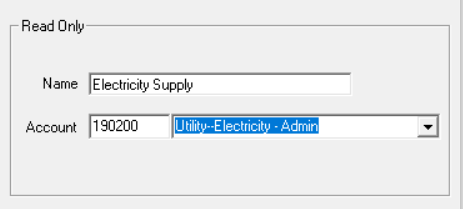
Once added, your list of submeter service types should appear as below. When you enter the meter details as in step 3 below, you will need to select a meter type from this list created in step 2.

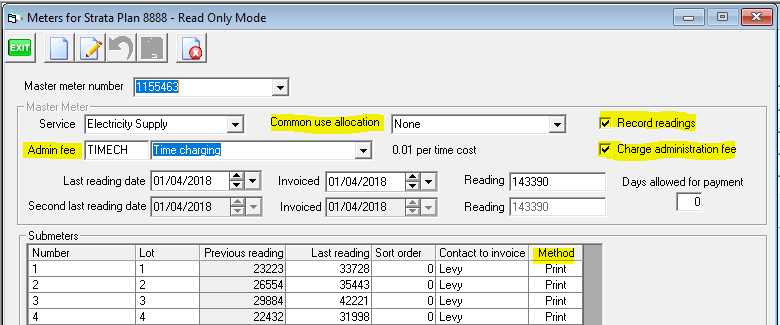
3. Set up the meter numbers in the Corp screen of the relevant Plans.
Click on the Corp icon in your icon toolbar, and enter the Plan number. Then click on the light bulb icon.
This section creates the template for the entering of information when you are processing the invoices. Click Add -
- Note that the Lots are all listed. At this stage only, can you delete a Lot by clicking into the Lot and backspacing
- Common use allocation refers to how to split the common use charges
- Select an Admin Fee from the Management Fee list if you are charging for submeter processing - https://kb.rockend.com/help/strata-master-top-tip-23---quantity-management-fees
- Set the method of invoicing for each Lot, either Print or email. Click into the field and select form the drop down list.
- You can add Lots if necessary, for example for an additional debtor not listed, by clicking the green '+' sign.

- Tick the record readings box if the meter readings for the master meter and submeters are to be recorded and the units used are to be calculated automatically. The alternative is to not record readings but to just enter the units used directly.


4. Process sub meter invoices. Select Accounting from the top toolbar, then select Submeter Invoicing from the menu. When information and figures are all entered, you should click preview, print and then process. If you click Save, the invoices will be saved to the Lot owners ledgers but not printed or emailed. Step 5 shows how to reprint.

As this is a brief view of the steps, full details of this section are not included in this article.
Printing Invoices
If a reprint of invoices is required, refer to this link -
https://kb.rockend.com/help/print-or-email-a-miscellaneous-owner-invoice-or-sub-meter-invoice
Cancelling Invoices
https://kb.rockend.com/help/cancelling-levy-by-owner in the levy journal
Other Useful Links
https://kb.rockend.com/help/submetering-changing-the-lots-listed-on-a-meter
https://kb.rockend.com/help/strata-master-top-tip-23---quantity-management-fees