Enhanced Rockend SMS Integration in Strata Master
Strata Master Version 12 introduces Rockend Enhanced SMS Integration which allows single and bulk SMS messages to be sent via an online service for Strata Master customers who use Rockend SMS with Edgility.
Rockend Enhanced SMS provides a range of advanced features to assist in optimising SMS communication with your portfolio:
- A history of messages sent and received is available for single SMS messages.
- You can now schedule your SMS to be sent at a future date and time. These messages can also be setup as a recurring campaign.
- You have the ability to manage an Opt-Out list of contacts who do not wish to receive SMS messages
- You can now dynamically change your Sender ID and reply options per SMS.
- Increased message length means you have the freedom to say more when you need to.
- Rockend SMS Online administrators can configure global templates for your agency which can include a range of different merge fields.
Prerequisites for Enhanced Rockend SMS Integration
Strata Master customers not currently using Rockend SMS with Edgility will require a new account. To set up an account click here
If you are already using the current SMS functionality contact Edgility to upgrade to Enhanced Rockend SMS on 1300 764 451 or outside Australia on +61 2 95185955
Enhanced Rockend SMS Configuration
To use Rockend SMS Online Integration, each Strata Master user must have the email address in their Configure >User > General Details, registered with Edgility on your Rockend SMS account.
To register users to your account, login to your Rockend SMS Online Portal at https://rockendsms.edgility.com.au/rockend-sms-for-strata-master/ or contact Edgility on +61 2 9518 5955 or support@edgility.com.au . You may have as few or as many users registered for Rockend SMS at no additional cost.
Rockend SMS Third Party Service Configuration
A new screen has been added in Strata Master Version 12 to allow individual users to be configured for Rockend Enhanced SMS. All active Strata Master users will be listed on this configuration screen.
Rockend Enhanced SMS Configuration must be completed by a user with an access level of Configuration > Write
Activate Rockend SMS Online Integration and configure users
1. Navigate to Configure > Third Party Services
2. Enable Edit mode by selecting the  button and check the box labelled Rockend SMS Online
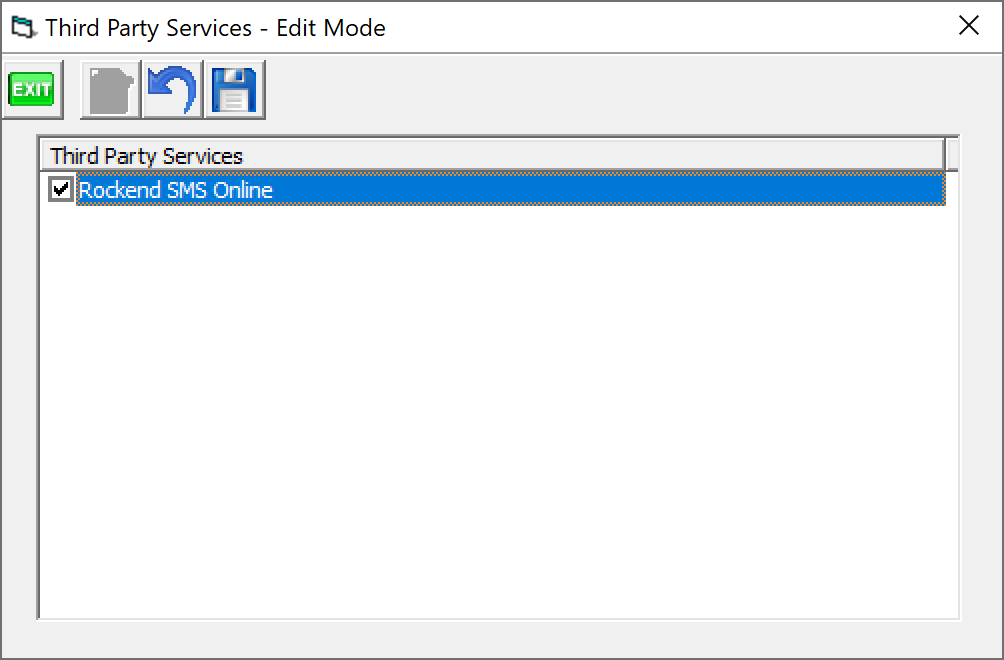
3. Save activation by selecting  button
4. Double click on the Rockend SMS Online from the list to start configuration
5. A list of Strata Master users will appear in the Rockend SMS Configuration screen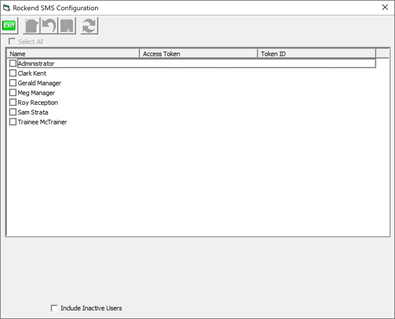
6. Select yourself from the list to reveal the Access Token and Token ID area at the bottom of the screen – enable Edit mode by selecting  button to populate these details.
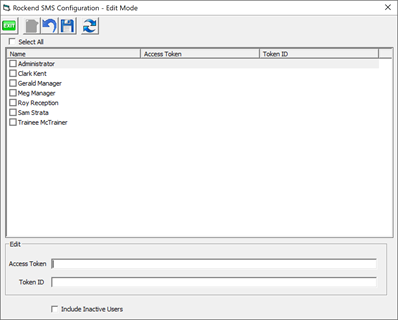
7. Copy and paste your Access Token and Token ID provided to you in your Rockend SMS Welcome email, into the corresponding fields.
Note: To resend your Rockend SMS Welcome email, head to https://rockendsms.edgility.com.au/rockend-sms-for-strata-master/ and click login. Use the “Lost Password” link to have your details resent via email.
8. Save settings by selecting  button
9. To complete setup for other users, select yourself form the list and enable Edit Mode by selecting the  button.
10. Import all user settings by selecting  button Access Token and Token ID details for each user with an email address registered with Rockend SMS, will populate automatically during synchronisation.
11. Once prompted that synchronisation is complete, select  to save the configuration.
When user Configuration and Rockend SMS Third Party Configuration are completed successfully, registered users will be ready to use Rockend SMS Enhanced Integration.
Note: If you disable Rockend SMS Third Party Configuration, you will need to configure your SMS integration again starting from step 1 of the above instructions.
SMS from Contact Screens
When sending SMS messages to a contact, the new Rockend SMS browser screen will load for all Strata Master users configured for Rockend Enhanced SMS.
SMS messages can be sent from the following contact screens in Strata Master:
- Owner
- Original Owner
- Tenant
- Agent
- Notice Contact
- Levy Contact
- Creditor (Work order screen & Creditor contact screen)

To send SMS from a Contact Screen
- Select the mobile phone icon (to the right of the email icon) on the contact card.
- A preview screen will load displaying the contacts, including any additional contacts associated with the primary contact.
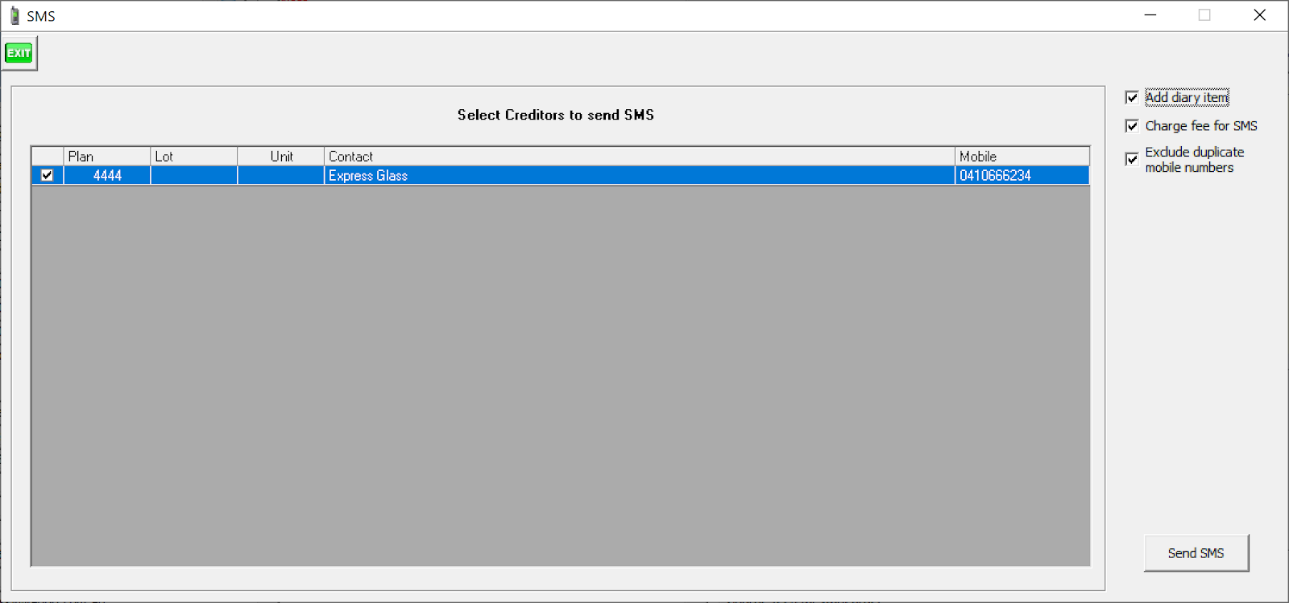
Add diary item will be selected by default, and when selected the message is recorded in the Owners Corporation diary as a closed entry.
Exclude duplicate mobile numbers will be selected by default.
The Charge fee for SMS selection is dependent upon your configuration in Configure > Agency > Management Fees.
The displaying of additional contacts is dependent upon your configuration in Configure > Agency > Option #3
Note : Contacts with no mobile phone number or an invalid mobile phone number will be displayed in red.
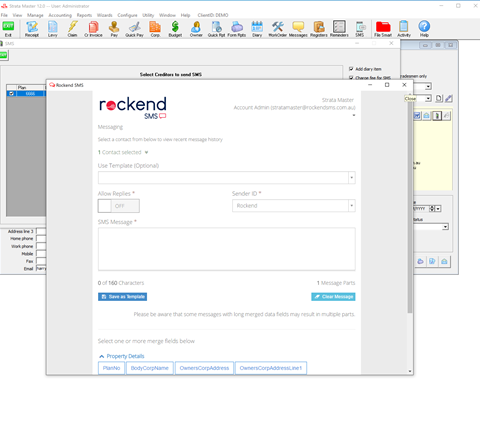
3. Review the contacts selected then click Send SMS.
4. The Rockend SMS message browser will load.
5. In order to view message history for selected contact(s), click to expand the “Contacts Selected” toggle and click on a recipient number. The “History” window will appear on the right, with recent SMS communication to this contact. Select the Show team Communication box to display previous contact by all Strata Master users.
Note: Contacts who previously opted out of receiving SMS notifications will display in red text and will not receive the message.
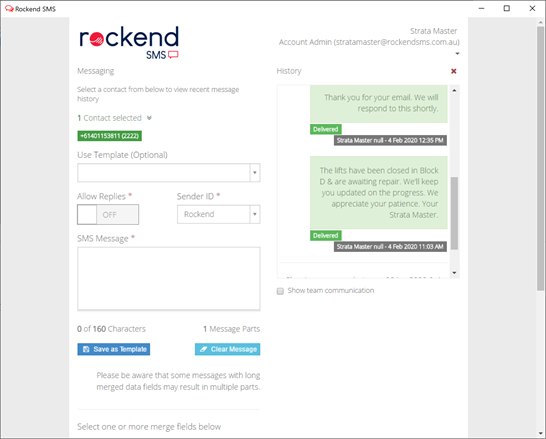
6. Set Allow Replies to ON if you want to allow the contact to reply to the SMS message. Replies can be sent to your email and are logged in your Web Inbox (accessed via Rockend SMS Online via the Strata Master toolbar), or to your verified mobile number.
7.Type a message in the SMS Message text box or select a template from the template list. If a template is selected, the Sender ID and text can be modified before the SMS message is sent. To include merge fields in the SMS message, select the required fields form the available merge fields. A space will automatically be added after each merge field.
8. When the message is ready to be sent, scroll down to select Send SMS to send now or selected Schedule Options to send at a later date/time. The confirmation screen will load.
9. Select the checkbox for I agree to the above. It is highly recommended that all Rockend SMS users read the 2003 Spam Act and Consent, Identification and Unsubscribe notes on this screen when using Enhanced Rockend SMS for the first time.
10. Select the Send Message button. A confirmation message will display, and applicable diary entries and charges will be updated.
Bulk SMS Messages – Communications Wizard
When sending SMS messages to multiple contacts from the Communications Wizard, the new Rockend SMS browser screen will load for all Strata Maser users configured for Enhanced Rockend SMS.
The Communications Wizard allows you to Bulk SMS to individual owners corporations or multiple owners corporations. For multiple owners corporations you are able to filter by managers, and plan numbers.
The contact groups available to send a Bulk SMS are:
- Owners
- Tenants
- Agents
- Residents
- Committee Members
- Notice Contacts
- Levy Contacts
To send a Bulk SMS in Strata Master:
- Select the Messages icon from the Strata Master toolbar.
- Select the Bulk SMS option.
- Select either Individual Owners Corporation or Multiple Owners Corporations > Next.
- Select the group you wish to receive bulk SMS > Next.
- A preview screen will display with all the selected contacts, including any additional contacts associated with the primary contact.
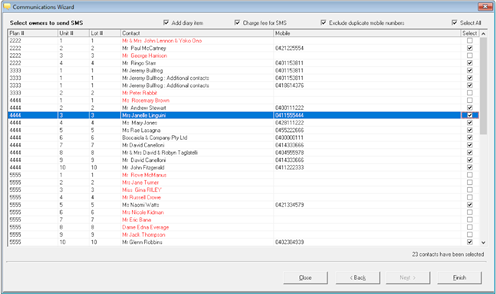
Add diary item will be selected by default, when selected the message is recorded in the Owners Corporation diary as a closed entry.
Exclude duplicate mobile numbers will be selected by default.
The Charge fee for SMS selection is dependent upon your configuration in Configure > Agency > Management Fees.
The displaying of additional contacts is dependent upon your configuration in Configure > Agency > Option #3
The total number of contacts that have been selected is displayed in the bottom right hand corner below the preview screen.
Note: Contacts with no mobile phone number or an invalid mobile phone number will be displayed in red.
6. Review the list of contacts > Finish
7. The Rockend SMS Bulk message browser will load.
8. In order to view message history for a selected contact(s), click to expand the “Contacts Selected” toggle and click on a recipient number. The “History” window will appear with recent SMS communication to this contact. Select the Show team Communication box to display previous contact by all Strata Master users.
Note: Contacts who previously opted out of receiving SMS notifications will display in red text and will not receive the message.
9. Set Allow Replies to ON if you want to allow the contact to reply to the SMS message. Replies can be sent to your email and are logged in your Web Inbox (accessed via Rockend SMS Online), or to your verified mobile number.
Set Allow Replies to OFF to send your message from a verified Sender ID ie, your office name.
Note: Sender ID’s are limited to 11 characters and must exclude spaces and symbols. Select New Sender ID in the Sender ID dropdown list to create and verify a new one.
10. Type a message in the SMS Message text box or select a template from the template list. If a template is selected, the Sender ID and text can be modified before the SMS message is sent. To include merge fields in the SMS message, select the required fields from the available merge fields. A space will automatically be added after each merge field.
11. When the message is ready to be sent, scroll down to select Send SMS to send now or select Schedule Options to send at a later date/time. The confirmation screen will load.
12. Select the checkbox for I agree to the above. It is highly recommended that all Rockend SMS users read the 2003 Spam Act and Consent, Identification and Unsubscribe notes on this screen when using Rockend SMS Enhanced Integration for the first time.
13. Select the Send Message button. A confirmation message will display, and applicable diary entries and charges will be updated.
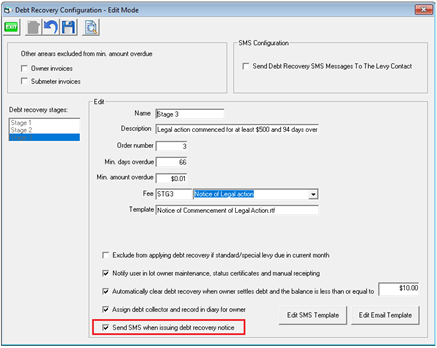
Bulk SMS – Debt Recovery
SMS messages can be configured to be sent to owners to advise them of the debt recovery notices at the time they are distributed via email or post.
You can configure a SMS message to be sent for each stage of Debt Recovery.
To configure:
- Navigate to Configure > Debt Recovery.
- Select the Edit button
- Select the Send SMS when issuing debt recovery notice option for each stage of Debt Recovery where you would like an SMS message to be sent.
- Save your changes.

To send an SMS when running Debt Recovery:
1. Navigate to the Levy Wizard > Debt Recovery.
2. Select the stage of Debt Recovery.
3. The SMS option will be selected by default.
4. After the Debt Recovery notices have been sent, a preview screen will display with all the contacts for that stage of Debt Recovery, including any additional contacts associated with the primary contact.
The displaying of additional contacts is dependent upon your configuration in Configure > Agency > Option #3Add diary item will be selected by default, when selected the message is recorded in the Owners Corporation diary as a closed entry.
Note: Contacts with no mobile phone number or an invalid mobile phone number will be displayed in red.
5.The total number of contacts that have been selected is displayed in the bottom right hand corner below the preview screen.
6. Review the list of contacts > Next.
7. The Rockend SMS Bulk Message browser will load.
8. The predefined Debt Recovery template for that stage of Debt Recovery will be pre-loaded within Rockend SMS Online.
9. Set Allow Replies to ON if you want to allow the contact to reply to the SMS message. Replies can be sent to your email and are logged in your Web Inbox (accessed via Rockend SMS Online), or to your verified mobile number. Set Allow Replies to OFF to send your message from a verified Sender ID i.e., your agency name.
Note: Sender ID’s are limited to 11 characters and must exclude spaces and symbols. Select New Sender ID in the Sender ID dropdown list to create and verify a new one.
10. When the message is ready to be sent, scroll down to select Send SMS to send now or select Schedule Options to send at a later date/time. The confirmation screen will load.
11. Select the checkbox for I agree to the above. It is highly recommended that all Rockend SMS users read the 2003 Spam Act and Consent, Identification and Unsubscribe notes on this screen when using Rockend SMS Enhanced Integration for the first time.
12. Select the Send Message button. A confirmation message will display, and applicable diary entries and charges will be updated.
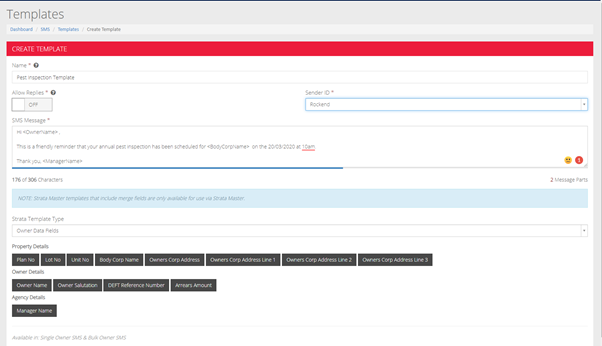
Debt Recovery Templates
The following predefined Debt Recovery templates have been preloaded into Rockend SMS Online for you.
- Manual Debt Recovery
- Stage 1 Debt Recovery
- Stage 2 Debt Recovery
- Stage 3 Debt Recovery
Only Rockend SMS users with Administrator permissions can create/edit the above Debt Recovery templates in the Rockend SMS Online Platform. You can do this by selecting the SMS icon from the Strata Master toolbar or by opening a SMS sending screen in Strata Master, scrolling to the bottom and clicking on the Login to Rockend SMS button.
Once logged in, navigate to SMS > Templates using the left side menu. A list of current templates will be listed. Select a template name to open, view or edit the existing list or click Create Strata Master Template button to create a new one.
Merge fields will appear in toggle categories at the bottom of the screen – click any merge button to insert the merge field into your message.
When a template is selected during the sending process, the Sender ID and message text can be changed before sending the message.
Bulk SMS – Meeting Wizard
Meeting reminders can be sent via SMS to all, or un-financial lot owners via the Meeting Wizard.
Issue a reminder to un-financial lot owners:
To send a meeting reminder via SMS to un-financial lot owners:
- Select the SMS button from the ‘Issue a reminder to un-financial lot owners’ option on the Meeting Wizard checklist.
- A preview screen will display with all owners that are un-financial based upon the arrears-cut off date, including any additional contacts associated with the primary contact.
The displaying of additional contacts is dependent upon your configuration in Configure > Agency > Option #3
The Charge fee for SMS selection is dependent upon your configuration in Configure > Agency > Management Fees.
Add diary item will be selected by default, when selected the message is recorded in the Owners Corporation diary as a closed entry.
Contacts with no mobile phone number or an invalid mobile phone number will be displayed in red.
3. Review the list of contacts > Send SMS.
4. The Rockend SMS Bulk Message browser will load.
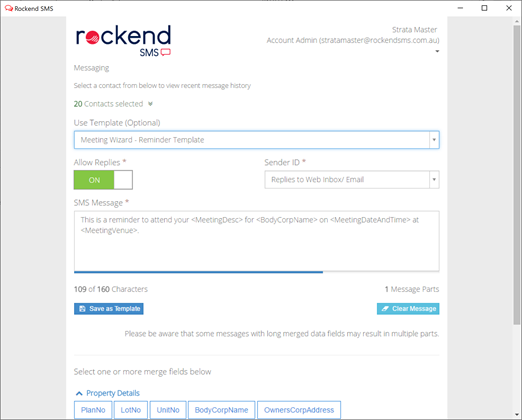
5. The Meeting Wizard Unfinancial Lots Template will be pre-loaded within Rockend SMS Online (To edit this template a Rockend SMS user security level of Administrator is required).
6. Set Allow Replies to ON if you want to allow the contact to reply to the SMS message. Replies can be sent to your email and are logged in your Web Inbox (accessed via Rockend SMS Online), or to your verified mobile number.
Set Allow Replies to OFF to send your message from a verified Sender ID i.e., your agency name.
Note: Sender ID’s are limited to 11 characters and must exclude spaces and symbols. Select New Sender ID in the Sender ID dropdown list to create and verify a new one.
7. When the message is ready to be sent, scroll down to select Send SMS to send now or select Schedule Options to send at a later date/time. The confirmation screen will load.
8. Select the checkbox for I agree to the above. It is highly recommended that all Rockend SMS users read the 2003 Spam Act and Consent, Identification and Unsubscribe notes on this screen when using Rockend SMS Enhanced Integration for the first time.
9. Select the Send Message button. A confirmation message will display, and applicable diary entries and charges will be updated.
Issue a reminder to all owners:
To send a meeting reminder via SMS to all owners:
- Select the SMS button from the ‘Send a meeting reminder to owners’ option on the Meeting Wizard checklist.
- A preview screen will display all owners, including any additional contacts associated with the primary contact.
The displaying of additional contacts is dependent upon your configuration in Configure > Agency > Option #3
The Charge fee for SMS selection is dependent upon your configuration in Configure > Agency > Management Fees.
Add diary item will be selected by default, when selected the message is recorded in the Owners Corporation diary as a closed entry.
Contacts with no mobile phone number or an invalid mobile phone number will be displayed in red.
3. Review the list of contacts > Send SMS.
4. The Rockend SMS Bulk Message browser will load.
5. The Meeting Wizard Reminder Template will be pre-loaded within Rockend SMS Online (To edit this template a Rockend SMS user security level of Administrator is required).
6. Set Allow Replies to ON if you want to allow the contact to reply to the SMS message. Replies can be sent to your email and are logged in your Web Inbox (accessed via Rockend SMS Online), or to your verified mobile number.
Set Allow Replies to OFF to send your message from a verified Sender ID ie, your office name.
Note: Sender ID’s are limited to 11 characters and must exclude spaces and symbols. Select New Sender ID in the Sender ID dropdown list to create and verify a new one.
7. When the message is ready to be sent, scroll down to select Send SMS to send now or select Schedule Options to send at a later date/time. The confirmation screen will load.
8. Select the checkbox for I agree to the above. It is highly recommended that all Rockend SMS users read the 2003 Spam Act and Consent, Identification and Unsubscribe notes on this screen when using Rockend SMS Enhanced Integration for the first time.
9. Select the Send Message button. A confirmation message will display, and applicable diary entries and charges will be updated.
Rockend Enhanced SMS Sending Options
Messages Templates
To create additional templates or edit existing ones, you will need to login to your Rockend SMS Online Platform. You can do this by selecting the SMS icon from the Strata Master toolbar or by opening a SMS sending screen in Strata Master, scrolling to the bottom and clicking on the Login to Rockend SMS button.
Once logged in, navigate to SMS > Templates using the left side menu. A list of current templates will be listed. Select a template name to open, view or edit the existing list or click Create Rockend SMS Template button to create a new one.
Merge fields will appear in toggle categories at the bottom of the screen – click any merge button to insert the merge field into your message.
Only Rockend SMS users with Administrator permissions can create/edit global templates that are accessible to all users on the account. Rockend SMS users with Standard permission can create/edit personal templates that are only visible to them.
When a template is selected during the sending process, the Sender ID and message text can be changed before sending the message.
Note: An SMS message can include up to 160 characters. If more than 160 characters are used per message, the character count and message parts will be updated as the message is being typed. Messages with multiple parts will be delivered to the recipient’s handset as a single message on most modern devices. SMS message are charged per part. Please be aware that messages with merge fields can result in multiple part messages depending on the merged data.
Schedule Options
Messages can be scheduled to be sent as a Once Off message at a later date/time or on a regular repeat basis. Scheduled messages will continue to be delivered until the schedule is cancelled via Rockend SMS Online.
Note: When messages are scheduled to be sent a later stage, a record of the message will not be saved to Strata Master but can be accessed via the Reporting option in Rockend SMS Online.
Opt-Outs
With the introduction of Rockend SMS Enhanced Integration, your contacts will have the ability to opt out of receiving further SMS notifications from your office, in compliance with legislation. To do this automatically, simply add “reply STOP to optout” at the end of your message – messages must be sent using the Allow Replies set to ON to enable this feature. The Opt Out list will be updated automatically, if any recipient replies STOP. Rockend SMS will automatically exclude the recipients number from further SMS communication.
The Opt-Out list can be managed in Rockend SMS Online and can also be updated manually. You can do this by selecting the SMS icon from the Strata Master toolbar or by opening an SMS sending screen in Strata Master, scrolling to the bottom and clicking on the Login to Rockend SMS button.
Once logged in, navigate to SMS > Opt Outs using the left side menu.
Note: you are required by law to include an opt-out option for all advertising and marketing communications. Operational notifications do not require this.
General Notes
- Diary entries will be created when Save to diary option is selected for Single SMS messages except for messages sent from the Creditor Contact screen, as these messages are not linked to an owners corporation.
- Charges will be applied when the Charge fee for SMS option is selected for Single SMS message, except for messages sent from the Creditor Contact screen, as these messages are not linked to an owners corporation.
- An SMS message can include up to 160 characters. If more than 160 characters are used per message, the character count and message parts will be updated as the message is being typed. Messages with multiple parts will be delivered to the recipient’s handset as a single message on most modern devices. SMS messages are charged per part.