Setting up Scanning to fileSMART
Users must be correctly configured to a scanner to allow the importation of documents for subsequent processing by fileSMART. However, the process of scanning documents between a scanner and workstation or server is a physical connection unrelated to fileSMART functionality. In other words if your scanned documents are not appearing in your designated drive on your PC, this is not a fileSMART issue but a communication or configuration problem that will require the assistance of your IT service agent.
Multifunction Device
A multifunction device (MFD) can be used for scanning if it supports scanning to PC and it is capable of being configured with multiple user profiles each of which can send scans to a specific shared folder on a server or workstation..
The scanner must be able to create a file with the following specifications:
- Black and white
- TIFF image file format
- 300 dpi (dots per inch resolution)
- A4 paper size
The default set up for scanning to fileSMART is to set up each individual profile to scan to the user's workstation. The configuration for this would be:
- File path on the MFD: \\COMPUTERNAME\AS_Files\QUEUE\(windows username)
- SCAN_DOCUMENTS Environment Variable: C:\AS_Files\QUEUE
NOTE: You can find the SCAN_DOCUMENTS environment variable on each user's PC by going to Windows Control Panel > System > Advanced System Settings > Environment Variables > System Variables. You do not need to add the windows username to the environment variable.
If you would like to set the scans up to go to a centralised server or you have a terminal server, the configuration for this would be:
- File Path on the MDF: \\SERVERNAME\AS_Files\QUEUE\(windows username)
- SCAN_DOCUMENTS Environment Variable: \\SERVERNAME\AS_Files\QUEUE
Network Diagram for MFD Scan Paths

The diagram shows how the scan paths should be set up on an MFD at a site that has the fileSMART Archive software installed on individual computers and/or a terminal server. When fileSMART Archive is open on a user’s workstation or terminal services session, it continually looks at the scan documents folder and moves any files it detects to the correct place on the fileSMART Server. It also updates the database with the name of the file and the identity of the user in whose pending queue it belongs.
USB Desktop Scanner
Some users make use of a dedicated USB Scanner connected directly to a PC. We recommend the use of one or more dedicated USB 2.0 scanners with a document feeder and duplexing capability similar to the Kodak i2400, Kodak i2600, Canon DR-3010C, Canon DR-4010C, or Epson GT-S80 for use with fileSMART.
The scanner must also have TWAIN driver software. For a dedicated USB scanner, the designated scanning workstation/s will need at least the following specifications:
- Intel Pentium D 2.4Ghz or faster
- 2GB RAM or more
- 500MB free Hard Disk space
- 100Mbps or faster Microsoft TCP/IP Networking (Unix/Linux, Novell not supported)
- USB 2.0 (or higher) support
- Operating System
- Windows Vista
- Windows 7
- Windows 8
- fileSMART Archive Client
To attach the scanner to a workstation and configure it to scan into fileSMART, follow the steps below.
1. Ensure the scanner drivers are installed and the scanner works properly by following the manufacturer’s instructions. In most cases the instructions will tell you that the scanner should not be connected to the computer until after the drivers have been installed.
2. Log into fileSMART Archive and ensure the scanner is turned on.
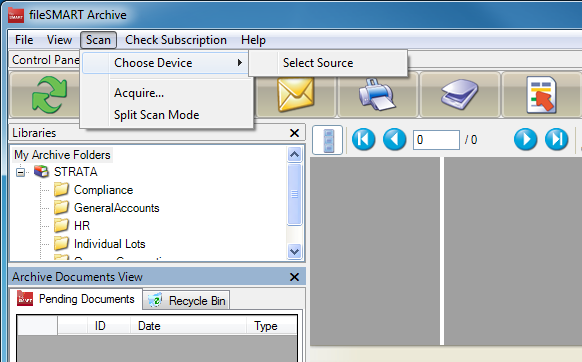
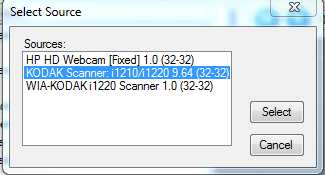
3. From the “Scan” menu, select “Choose Device” and “Select Source”
4. From the displayed list, choose the TWAIN driver of the scanner you installed and Click the “Select” button (don’t choose the ISIS driver if that has also been installed). Tam : The following sources are shown.
5. Click on the “Scan Documents” button in the main Control Panel Toolbar.

6. The scanner interface for the brand of scanner you are using should appear. If not, check that the correct scanner driver has been selected in the ‘Scan’ menu and that the scanner has been installed correctly as per the manufacturer’s instructions.
Scanner Preferences
1. Most scanner interfaces allow you to save customised scanning settings into a ‘User Preferences’ list. Depending on the brand of scanner, this may be called ‘Custom Settings’ or ‘User Profiles’ or similar. These lists allow users to quickly choose all the correct scan settings for common scanning jobs without having to understand all the individual controls.
2. To start off, choose settings for Black and White, 300dpi, Single-sided (this option may be called ‘Simplex’) and save this as a User Preference called ‘B&W single-sided’. 300dpi resolution gives a good quality scan and a relatively small file size. Higher resolution settings are not required.
3. Then choose settings for Black and White, 300dpi, double-sided (or ‘Duplex’) and save this as a User Preference called ‘B&W double-sided’
4. As you use the software and find modifications to the settings that give better results, modify the User Preferences already saved. And as you find new setting combinations that work well for particular scanning jobs, add those settings to the list with a suitable description.