How to Add a New Property Card in Rest Professional
Overview
This document will take you through the steps to create a new Property Master File
From the Property Card you can enquire on property details, access the property's owner and tenant details, enter advertising details and photos. You can also display, print, e-mail or export the property ledger by clicking on the Printer icon on the Toolbar.
This document will cover:
- How to Create a Property Card
- General Tab
- Financial Tab
- Advert Tab
- Notes Tab
- Commercial Tab
- Strata Tab
- Insurance Tab
- Regular Payments Tab
- Reminders Tab
- Gained/Lost Tab
- Maintenance Tab
- Inspection Tab
- Information Tab
How to Create a Property Card
To create a Property Card, you must firstly have an owner card created to attach the property card to.
- Go to Files > Property or click on the property icon

- Click on Add Mode–F4 ensure the blue “Add Mode” box comes up before you begin entering data:

General Tab
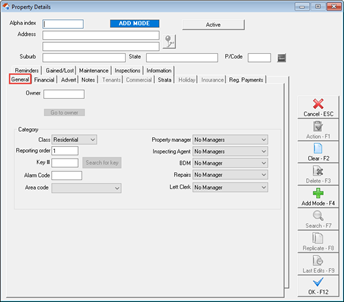
Alpha Index – This can be up to 10 characters of the property address. This field must start with a letter, not a number, and should not contain any punctuation or embedded blank spaces.
Address – This can be up to 40 characters on each of the 2 lines to enter the property address.
Suburb, State & Postcode – Enter the suburb, state and postcode as required.
Owner – Enter the owners’ alpha code and press Enter to link the property to the owner. If the alpha code is not unique, the Owner Alpha Lookup screen displays the owners that match the entered Alpha. Double click on the required owner to select.
Class – Select the class of the property Residential, Commercial, Industrial, Holiday or Common. If a commercial tenant of a property is paying GST on Rent collected, the class must be set as commercial.
Reporting Order – If an owner has more than one property attached, this will allow you to select what order the properties appear in when printing reports. Enter 1 on the property you would like to print first on the statement, 2 on the second property etc. If no reporting numbers are entered, the properties will print in the order they were entered into REST.
Key Number – Enter the key number for the property.
Search for Key – To find the property a key number is attached to, enter the key number and press “Search for Key”
Alarm Code – Enter the alarm code for the property.
Area Code – The property may be attached to an area code, which is used for reporting purposes i.e. inspection report, vacancy counter report. The areas are definable by you and can be setup as areas, postcodes or suburbs.
Property Manager – Select the required property manager.
Other Managers 2, 3 & 4 – These may be used for additional managers such as Business Development Manager, Leasing Manager etc. The other managers are definable by you, and can be setup as required. These are used to run property and tenant reports as well as the existing property managers.
Financial Tab

Base Commission – This amount will be pre-filled with the base commission (management fee excluding GST). If the amount for this property is different, you can change it as required
Supervision Fee – enter supervision fee if applicable, this is a fee charged per disbursement on the property.
Charge Fee as % - tick this box if you wish to charge the supervision fee as a % of the disbursement. If left unticked, it will charge a fixed amount.
Disbursement Fee – Enter the disbursement fee if applicable. This is a fixed $ amount
GST Chargeable from – This field will be pre-filled automatically and controls the collection of GST on Postage & Sundries, BADT, and Bank Charges.
Tenant Invoice Commission – Enter the amount if required.
Base Rent Amount – Enter the amount of rent for the property. This is the amount that will be shown on any advertising or vacancy reports.
Payment Period – Enter the period of rent i.e. D1 = daily, W1 = weekly, W2 = fortnightly, M1 monthly.
Expenditure Limit – Enter the amount that can be spent by the owner prior to approval. If the amount is $0, this indicates no expenditure limit. When posting disbursements, if the amount is larger than the limit you will receive a warning message.
Charge Letting Fee – Tick this box if you would like to charge a letting fee for this owner
Charge Letting Fee by – Select from one of the following:
Number of Weeks – Enter the rate as the number of weeks you would like to charge for the letting fee. To charge half a week, select .5
% Annual rental – Enter the % amount of annual rent you would like to charge for the letting fee.
$ amount - Enter the fixed amount GST exclusive to be charged as a letting fee.
OK to re-let – This box needs to be ticked to add new tenant, or to show on Web Advertising.
Application Taken – This field will be populated when you receipt a holding deposit, and will be removed when the holding deposit is applied.
Property being Renovated – When this is selected you will not be able to add a new tenant to the property and the property will not show on vacancy reports.
Advert Tab

Advert Copy Tab -
- Headline – Enter up to 80 characters for the advertisement headline.
- Description – Enter up to 3000 characters for the advertisement description
Images Tab – Add up to 9 photos plus a floor plan if required by pressing the plus (+) icon on the left of the photo and browsing to where the photo is saved. If you wish to remove the photo press the minus (-).
Details Tab -
- Property Type – Select the property type from the drop down list. This list cannot be amended as they are based on what is allowable on the advertising sites.
- Rooms – Enter the number of bedrooms, bathrooms and ensuite.
- Parking – Enter the number of garage spaces or carport spaces.
- Area (Sq. Metres) – Enter the area of the building and land.
- Notes – The notes here are not used by Internet sites such as realestate.com.au or domain.com.au but may be uploaded to your own internet site.
Features Tab – Select the features for this property. These features may publish to the internet sites, and can also be included in your window cards.
General Tab -
- Street Number and Name – Enter the street number and name. These are entered separately so that you can decide if you would like to show the full address or just the street name on the advertising. New Zealand databases will also have a unit number to enter when you are uploading to trademe.co.nz
- Address Display – Select street name only, full address or no address from the drop down list.
- Street Directory – Select the street directory you use along with the map page and reference.
- Internet Links – Enter the details for any internet links you may wish to upload along with the property details. For example a link to a virtual tour of the property.
Advertise Tab -
- Open Days – Enter any dates the property will be open for inspection. These will be uploaded to the internet and may be printed on the window cards.
- Advertise – Each Web Advertising Service you have setup will be displayed here as a checkbox option. Select the checkbox to which websites you wish to upload the property to.
- Date Available – Enter the date the property will become available. This will be uploaded to the internet and may be printed on the window cards.
- Contact – select the contact for this property. These users can be setup in the User Screen by going to Files > User > User Profile > tick the box Web Advertising Contact
Notes Tab

Property File Notes – Enter any details about this property that you wish to record for internal use.
Details – Enter descriptive details for the property. This description displays on the Property Vacancy Counter Report. You can use this description or the advertising description on the Property Vacancy Counter Report.
- Property Descriptions – There are 6 user defined property descriptions, these are shown on the Property Vacancy Report and selected descriptors are used in the Property Vacancy Display and the Property Counter Vacancy Report. The descriptors are used to determine which order the vacant properties are printed on the Property Counter Vacancy Report.
Commercial Tab (if applicable)
If the property you are adding is a Commercial property, the Commercial Tab will be highlighted and you can complete the details:

Building - enter the alpha code of the building and press enter to populate the field. If the Building is unknown, you can press enter and search through the list of buildings.
NOTE:Buildings need to be set up prior to this step by going to Files > Building (see document How to Setup Buildings in REST).
Building area used in % - Enter the percentage of the building used by this property
Floor number – enter the building floor number for this property.
Shop/Suite – enter the shop or suite number. This is used in the Commercial Statement or Income report, Commercial Tenancy Schedule and the Critical Information report.
CPI rent increase – tick this box if the standard lease agreement for this property allows for a rent increase according to the CPI (Consumer Price Index).
Non CPI increase % - if you left the above unticked, enter the percentage rate by which the rent will increase.
Option term – enter the term of the lease option e.g. 2 years.
Option review – enter the type of rental review for the lease option e.g. market, stepped etc.
Floor Area sq metres & sq feet – enter the dimensions as required
Price per sq. metres & feet $ - this will be automatically calculated for you.
Strata Tab (if applicable)
A Strata Plan will be required to be set up first.Go to Files > Strata Plan (see document How to Attach a Strata Plan to a Property in REST). You can enter the Strata plan number on the Strata Tab by entering the number and then press enter to populate the field. If the Strata Number is unknown, you can press enter to search through the list.

Insurance Tab
The insurance tab will be greyed out when you are adding a new property card. To add insurance details, this must be done first through the Insurance Details section in REST by going to Files > Insurance Details (see document “How to Setup and Use Insurance Policies in REST”)

Regular Payments Tab
- The Regular Payments Tab holds the creditors and the reference number of the invoices that you pay regularly on behalf of the owner. When you pay creditors, you have the option Save Reference Numbers checked on the creditor file, the reference number or CRN is saved here for each type of payment.
- You may either enter the details here or Rest will automatically save them when you enter a creditor disbursement for the bill for the first time. This works best for utility and strata levy invoices, as the reference number is the same each time.

- To manually create a regular payment you can complete this as follows:
Click Add
Creditor Alpha – select the creditor alpha or press enter to find the creditor
Creditor Name – this will show you the creditor’s name
Pay Method – this will display the Creditors Payment Method
Reference Number – Enter the Invoice or Reference number for this invoice. For BPAY payments, this will be the BPAY reference number (CRN) that is found next to the biller code on the invoice
Notes – enter any notes you may wish to record.
- The regular payments can be removed by highlighting the required payment and pressing Remove.
You can also report on Regular Property Payments. Visit the Property Regular Payments Report Knowledge Base article for more information.
Reminders Tab

- These options can be setup by going to Other > Utilities > System Options > Reminders tab. When this is setup, you can tick the box to select which ones you wish to use and then enter the next due date. This can then be setup to appear on your portfolio check.
Gained/Lost Tab
- Complete the details on Gained/Lost Tab

Property Status – This will default as Active, which is correct and can be changed to Inactive when you are archiving the property.
Pending Archive - From version 19 a new checkbox has been added to the Property Gained/Lost tab, to identify if a property is ‘Pending Archive’. A comment box has also been included to provide you with the ability to reference why the property is Pending Archive. You can report on Pending Archive by filtering the Property Status Summary.
Gained Details:
Authority Start Date – This will default as the date you are adding the property card. This can be altered to reflect the authority start date.
Management Gained Date – This date could be when you commenced earning fees, when you start marketing the property or when the managing agency agreement started.
Gained Reason - This field will be greyed out until you enter a management gained date. Select the gained reason from the drop down list. This list can be setup by going to Files > Descriptors and Comments > Property Gained/Lost Comments > Gained Reason Tab.
Gained Comment – This field allows you to type specific text regarding the management gained.
Referred by – Select where this management was referred by from the drop down list. This list can be setup by going to Files > Descriptors and Comments > Property Gained/Lost Comments > Referred by Tab.
Referral Comment – This field allows you to type specific text regarding the referral of the property.
Lost Details:
- Authority Expiry Date - This field is used to record the date your authority to manage the property ends. The Authority Date Report can be run to report on the starting and expiry dates of the managing agency authority.
- Management Lost Date - The Management Lost Date is used to record the date a property is no longer under your management. This date is used to display properties as lost on the Gained/Lost Management Report.
- Lost Reason - This field allows you to record how the Management was lost. The values for the list can be defined by you in Property Gained/Lost Comments.
- Lost Comment - This field allows you to enter specific text regarding the management lost.
- Lost to Competitor - This field allows you to record when a management has been lost to a competitor. The values for the list can be defined by you in Property Gained/Lost Comments.
Go to the Knowledgebase article on Managements Gained and Lost Tracking and Reporting for additional information. Click Here
Maintenance Tab
This tab will display a grid of all current maintenance jobs for the Property. A current job is a job that doesn’t have the status set to Completed of Rejected.

- Show all Maintenance Jobs – When this box is ticked, all jobs for the property including Completed or Rejected items will display in the grid.
- Print List – Displays the Property Maintenance Jobs by Property report selected to print a list of jobs for the selected property.
- Add new Job – Click Add new Job to display the Property Maintenance Job screen to create a new Job for this property. The screen will be pre-populated with the selected property and tenant criteria.
- Go to Job – Click Go to Job to load the selected Maintenance Job.
Inspection Tab

- Inspection fee - Enter the amount to charge per inspection. The fee is entered as GST exclusive. Inspection Fees are charged using the new Inspection Follow Up screen or the and Inspection Update Wizard.
- Frequency - Enter the frequency the property will be inspected. This should be entered as M for month followed by the number of months between inspections E.g. 6 Monthly is entered as M6, 12 monthly as M12. The frequency is used in the Inspection Update Wizard to calculate the next inspection date for the tenant. When you enter a new tenant for this property, the frequency will be copied to the tenant details. To set the default inspection frequency for all new properties, select Other > Utilities > Company Details > Defaults > Owner, Property. Tenant Defaults > Inspection Frequency.
- Last Inspection date - Enter the date when the property was last inspected. This date is updated automatically when the Tenant Next Inspection Date is updated. For Example: If the Tenant's Next Inspection Date is updated from 15/08/13 to 15/02/14, the property date is updated with 15/08/13 as the last date the property was inspected.
- Exclude from Inspections - Select this option if the property should not be included in inspection planning. This option could apply to eg. a storage shed, garage or an owner managed property.
- Last Inspection Fee - The most recently charged inspection fee will display here as an inclusive amount with the charged date. If no inspection fees have yet been charged to a property, the field will not display.
- Inspection History - Property inspections scheduled through Inspection Planner and completed through Inspection Follow Up will automatically create entries in the Property Inspection History grid.
Information Tab

- Water Usage - When using Water Invoicing to create a tenant water invoice, REST stores the water meter reading details for the tenant here. When the next water invoice is created, the previous readings are used to calculate the new water invoice amount. When the water usage details are changed manually, REST will display a prompt to update the property.

- Charge Tenant Water - The option records whether a property's tenants are liable for water charges and the selection will automatically be defaulted to new tenants added to the property.
- Water Efficiency - Property Water Efficiency allows identification and reporting on properties that are water efficient. The tenant Invoice Entry and Water Invoicing screens display the property's Water Efficiency status.
- To complete a property's water efficiency status select the appropriate water efficiency status from the Water Efficient drop down list and enter the Last Inspection Date.
- Also see Water Efficiency Report.
- Sub-metering - Sub-metering is only available in the Advanced Commercial Module. Please see the Advanced Commercial Module for more details.
- EER (Energy Efficiency Rating) - Select the EER for the property from the the drop-down list.


- Smoke Alarm - Enter the smoke alarm Quantity, type, comments and the Last Inspection Date. Also see Smoke Alarm Report.

- Other - Pool and Pet details can be recorded here. When these details are entered REST will display a prompt to update the Property Advert > Features tab with these details.

- Asbestos Management - Asbestos details can be recorded here. When these details are saved, an Asbestos Inspection Report can be generated from Reports > Property > Property Information Reports > Asbestos Report. Click on link to video Click Here

Press OK-F12 to save the property card