How to Search
Searching for Archived Documents
Documents must first be archived in fileSMART Archive before performing a search to locate them. The search is made using the Search Labels which are the same as the Archive Labels used for archiving.
When your documents have been archived you will be able to search for them at any time.
Follow these steps to search for archived documents in fileSMART:
- Click the Mode button to switch to search mode:
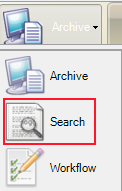
2. Choose the Archive Folder you wish to search from.
3. Enter information into at least one of the Search Labels:
- Select a Prop Code if you are looking for documents just for a particular property.
- Select a Doc Type if you are searching for a specific type of document – Tenancy Agreement in this example.
- Select a Date From and a Date To if you are looking for documents from a specific date or date range.
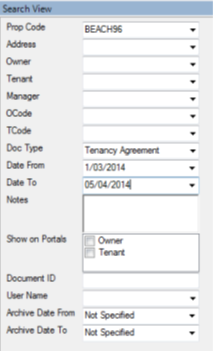
 Note: The more labels that are used in the search the more specific the search is and the fewer documents will be returned. Use fewer labels to broaden your search
4. Select the Search Archived Documents button or press Enter. 
This will produce a Found Documents list, which may contain the specific document sought, or a number of similar documents containing the same information supplied in the search criteria.
5. Click on any document in the Found Documents list to display it in the Document View panel

- Multiple items can be selected in the Found Documents list by holding down the shift key and clicking on the desired items.
- Or use the control key to select multiple items that are not touching each other.
6. To clear all search labels press 'F5'.
Sorting the Found Documents List
You can sort the Found Documents list by any one of the columns – click on the column heading and it will be sorted in ascending order – click again and it will be sorted in descending order.

In this example, the list is sorted by ascending Date order.
Retrieving an Archived Email
You can search for archived emails in fileSMART Archive as you would any other document. The email is displayed in HTML format without any embedded graphics using the built-in viewer.
Follow these steps to retrieve an archived email:
- Search for the email by entering your search criteria in the search labels:
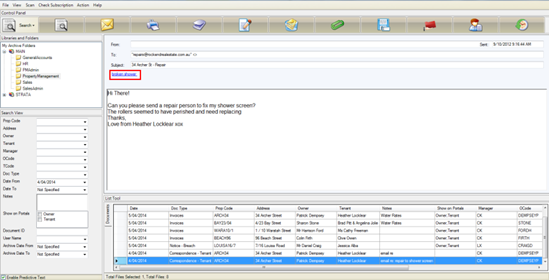
The email displays in the found documents list.
Clicking on the attachment link (as shown in the picture above) will open the attachment using the default program to open it.
2. You can also open the email in its native format (provided you have Microsoft Outlook installed) by clicking the Email Documents button. 
The email in an Outlook message window, complete with any attachments will open. The message can then be forwarded on to email recipients and a copy will be saved to your Outlook sent items folder.
 Note: To print the email, you will need to open it in Outlook format and use the File -> Print option. At this stage you cannot print the email from within fileSMART Archive using the Print Documents button
Functions within Search Mode
When you have located the document(s) you require, you can then use the following functions:
Email Documents
Follow these steps to Email a found document:
1. Click on the required document in the Found Documents list.
2. To select multiple documents use the Shift key or the CTRL keys on your keyboard.
3. Click the Email Document(s) button in the Control Panel. 
Print Documents
Follow these steps to print a found document:
- Click on the required document in the Found Documents list.
- To select multiple documents use the Shift key or the CTRL keys on your keyboard.
- Click the Print Documents button in the Control Panel (This printer prints out ALL pages of the document)

- Or click the print button in the Document View Toolbar

- Only one document can be printed at a time with this button.
- You can select which pages are to be printed.
- Annotations will be printed. If you do not want the annotations to print, turn them off before clicking on the print button.
5. Select the required printer and click Print.
Edit Archive Labels
Follow these steps to Edit Archive Labels:
1. Click on the required document in the Found Documents List
2. Click the Edit Button.
3. Change the Archive Labels as required e.g., by selecting a different Address or Property Code:

4. Click the OK button to save the changes or click the Cancel button to ignore the changes.
Bulk Edit Multiple Documents
If you have Bulk Edit permission then you will be able to edit multiple documents at the same time. This is useful if you need to change labels for many documents from one criteria to another.
For example, you might like to publish all Owner Invoices currently archived in fileSMART to the Owners Portals
Follow these steps to Bulk Edit Multiple Documents:
1. Click on the required document in the Found Documents List.
2. Select multiple documents using the Shift key or the CTRL keys on your keyboard.
3. Click the Edit button. The bulk edit screen displays:

4. Select the boxes for the labels you need to edit.
5. Edit the required labels, e.g. Show on Portals.
6. Select OK.
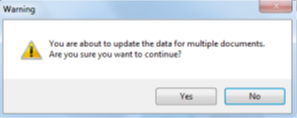
A prompt will display confirming the update of data for multiple documents:
Delete Archived Documents
Only users set with a delete security level can delete archived documents.
Follow these steps to Delete an Archived Document:
- Click on the required document in the Found Documents list.
- Select multiple documents using the Shift key or the CTRL keys on your keyboard.
- Select the Delete button.

 Note: Deleted documents can only be recovered by Rockend fileSMART Support (1300 365 788)
Attach Pages to Archived Documents
TIFF documents that have already been archived can have other TIFF documents attached to them if required.
This function will only work for files that are in a TIFF format.
Follow these steps to Attach Pages to an Archived Document:
- Click on the required document in the Found Documents list.
- Click the Attach button.

- The documents in your Pending Queue will appear in a separate window:
 4. Select the documents you wish to attach by clicking in the box to their left.
5. Select the Remove Originals checkbox to delete the selected items from your Pending Queue after they are attached, or deselect it to leave copies of the attached documents in your Pending Queue.
6. Click OK and the selected documents will attach after the last page of the archived document.
Copy Documents
Archived documents can be copied to any desired location on your computer or network.
Follow these steps to Copy Archived Documents:
- Click on the required document in the Found Documents list.
- Select multiple documents using the Shift key or the CTRL keys on your keyboard.
- Click the Copy button.

- Choose the location for saving the copied document(s).
- Click OK.
Share Documents
fileSMART Share allows you to export found documents to a portable media (CD/DVD/USB).
The documents are contained on the portable media within a ‘lite’ version of fileSMART which the recipient can then use to search for then view or print the documents.
Follow these steps to Share Documents:
- Click on the required document in the Found Documents list.
- Select multiple documents using the Shift key or the CTRL keys on your keyboard.
To select ALL the documents, click in the top-left cell of the Found Documents panel:
- Click the Share button on the toolbar.

- The Export Wizard will display.
- Select Next.
- Select the location you would like to export to:
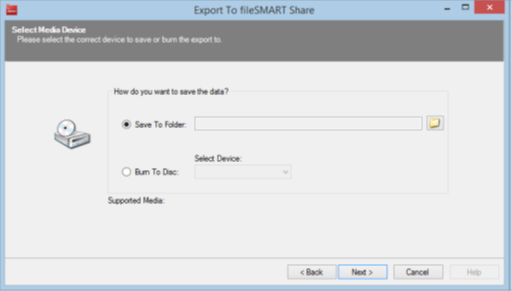
- Select Next.
- Confirm you wish to create the file by clicking Create fileSMART Share:
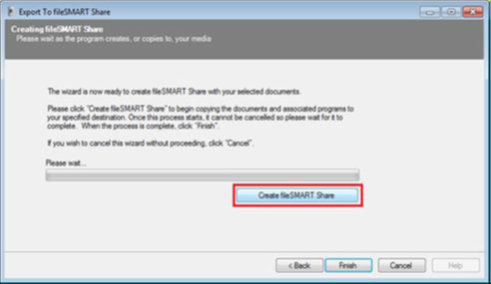
- Select Finish to exit the wizard.
- You can now use the fileSMART Share CD/DVD/USB to distribute documents to other parties.


