Providing Rent Relief, Rescheduling Inspections and Communicating During COVID-19
Overview
The Coronavirus (COVID-19) pandemic has now become a global crisis, affecting the lives of many. Loss of jobs or reduced income as a result may be cause to make changes to tenancy rents or applying of rent free periods in line with Government advice or requests by the Landlord.
This article has been prepared to assist you to deal with some of the issues and processes that you may need to undertake during this time.
This document will cover the following:
- Rent Free Periods and Rent Reductions
- Holiday Booking Refund Information
- Bulk Scheduling and Rescheduling Inspections
- Adding a Global Owner Statement Comment
Rent Free Periods and Rent Reductions
Before making changes to rent amounts or entering rent reductions, please contact your states Office of Fair Trading and REI equivalent, for relevant legislation advice in these circumstances. Also consider how your method of rent free period or reduction will affect the owners Income and Expenditure Report.
Option 1 - Debit the Owner and Receipt the Funds to the Tenant
By creating a disbursement, debiting the Owner and receipting the funds to the tenant, a rent reimbursement or credit can be applied.
This option allows you to keep the tenants rent as is, without making permanent rent changes, whilst providing the tenant with the required reduction, credit or rent free period. To proceed with this option, the owner must have enough available funds to process the transaction and will charge management frees on all monies receipted.
1. Create the disbursement the for the reimbursement amount. Go to Transactions > Quick Disbursements and enter the details:
- Property – Alpha of the Property to be debited
- Amount – Enter amount of the disbursement and zero out the GST field
- Cheque Number – Ensure that you use the self presenting cheque number 999999
- Pay to – Tenant’s name
- Description – Include any relevant information
- Account Code – Enter relevant account code, (such as 101 for rent)
2. Click OK-F12

3. Do a Rent Receipt to the Tenant for the amount of the reimbursement:
- Go to Transactions > Rent Receipts
- Tenant Alpha - Enter the appropriate tenant
- Rent - Receipt the exact same amount from the disbursement to rent
- Comment F4 - Enter a comment to the receipt; this is clearly recorded on the tenant ledger against this receipt

- Click OK-F12
- Enter the Banking Details with the Received and Banked Date as the date of transaction
- Select the Banking Details Method as Direct Deposit
- Click OK-F12 to save
Option 2 - Advance the Paid To Date or Apply a Manual Credit
This option allows you to advance the tenants paid to date without having to transfer funds from the owner to the tenant.
You don't need to have available funds to proceed with advancing the tenant paid to date or applying a manual credit, however, this option will not reflect on the owners Income and Expenditure Report for the rent credit that was applied. It will appear on the Owner Statement that the tenant has not paid any rent, yet the paid to date has changed or an In Hand Amount has appeared.
To charge management fees on the credit, you will be required to process a manual journal. Management fees will not be charged automatically.
Note: It is important to ensure that your Management Agreement with the Landlord allows for you to charge management fees on any credited amount, if unsure, please check with your relevant legislative body
1. Change the paid to date to reflect the rent free period:
- Go to Tenant Details > Rental Tab
- Change the Paid to Date field (i.e. advance the date by 2 weeks)
- Click OK-F12
- Enter a reason which will appear on the tenant ledger

2. If it is only a part payment of the rent period, enter the credit:
- Go to Tenant Details > Rental Tab
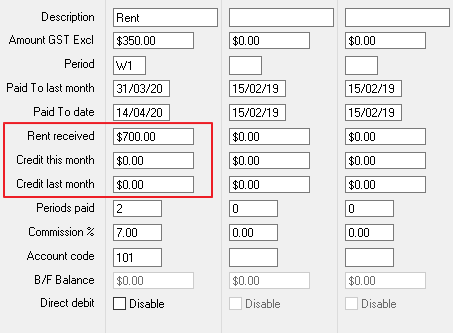
There are three important fields to take note of when altering credits under the rental tab of a tenant card and they are:
- Rent Received
- Credit this month
- Credit last month
Credit last month can be altered or deleted as required. Any change to Credit this month field will affect the rent received field. The credit this month and the rent received fields must always equal the funds received for the current accounting period.
For this example you need to apply a $300 rent credit:
- Currently the tenant has $700 in Rent Received, $0.00 in Credit This Month and $0.00 Credit Last Month.
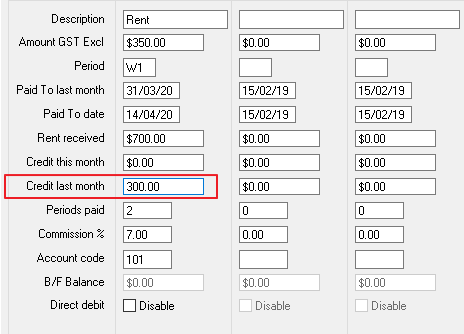
- As there is $0.00 Credit this Month and $0.00 Credit Last Month, add the $300 rent credit to Credit Last Month.
For more examples on how to adjust rent credits visit: https://kb.rockend.com/help/how-to-manually-adjust-a-tenant-ledger
Option 3 - Enter a Rent Renegotiation
Rest allows you to enter a rent increase or decrease and record it against Tenant Details, that will take effect on a future date. This option allows you to schedule a formal rent renegotiation in the tenant Renegotiation Tab, that will automatically update the tenants rent once the renegotiation date is reached.
Please note, you cannot backdate a rent renegotiation or add multiple rent renegotiation's for the same tenant. If you need to backdate the renegotiation, you will be required to manually adjust the tenant paid to date and credits.
1. Go to Files > Tenant > Renegotiation Tab and enter the details of the rent increase as follows:
- New Amount – Enter the new rent amount that the rent will increase to
- Change Date – Enter the date that the rent increase will take effect. If this is not the anniversary date of the tenant you will receive
- New Period – Enter the frequency of the rental payment (i.e. Weekly W1, Fortnightly W2, Monthly M1)
- Reneg Approved – This is an optional field. You may wish to enter a date in this field to keep a record of when you received approval from the owner to increase the rent
- Last Amount – Do not enter anything in this field. This self populates once the rent increase takes effect. It will populate with the amount previously on the rental tab (The old rent rate prior to the increase)
- Click OK-F12 to save
- If the rent adjustment is taking effect immediately, you will be prompted to enter a reason for applying the change, enter reason and press OK.

2. When entering the change date, if this does not fall on the anniversary date for the tenant the following message will appear. Click OK to the message, Rest will change the rent increase on the next anniversary date; however will provide you with an option to invoice the tenant for the rent between the change date and the anniversary date.
Holiday Booking Refund Information
For instructions on processing refunds for the Holiday Booking Module please check out these articles:
Bulk Scheduling and Rescheduling Inspections
Upon instruction, you may be required to reschedule routine inspections. You can bulk update through Inspection Planner and the Inspection Follow Up, to another date or inspection status. If you want to send out communications regarding the rescheduled inspections, it is recommended to setup your mail merge template prior to proceeding.
Inspection Planner
Inspection Planner will help assist you with the inspection process from reviewing and scheduling to sending notices, inviting owners, updating tenant ledgers, updating property and tenant diaries and creating inspection history of scheduled property inspections.
If you have previously been using the Inspection Update Wizard, it is imperative that you discontinue using this completely prior to using Inspection Planner.
If you are not already using the Inspection Planner, you will need to review and edit the Inspection Planner Configuration before using the new Inspection Planner and Inspection Follow Up for the first time. The Inspection Planner Configuration screen stores some of the default settings for the Inspection Planner, as well as the templates for sending out notifications to owners and tenants.
For Information on how to Setup and Use the Inspection Planner and Inspection Follow Up visit: https://kb.rockend.com/help/how-to-setup-and-use-the-inspection-planner
- To access the Inspection Planner Configuration go to: Files > Inspection > Inspection Planner Configuration
- To access the Inspection Planner go to: Files > Inspections > Inspection Planner

Inspection Follow Up
To use Inspection Follow Up for the first time, inspections must have been previously scheduled using the Inspection Planner or the inspection would have been set to a Status of Complete in the Tenant Inspection Tab.
Inspection Follow Up will allow you to review, update and finalise completed property inspections, send follow up notifications to owners and tenants, view edit and create maintenance jobs for completed inspections, reschedule, charge inspection fees, and create inspection history for completed inspection.
- To access the Inspection Follow up go to: Files > Inspections > Inspection Follow Up

Adding a Global Owner Statement Comment
In Rest Professional you have the ability to add a global comment onto an Owner Statement. This will print and preview with the comment on the bottom of the statement whether printed or emailed to the Landlord.
Setting Up and Printing the Global Comment
- Go to Files > Descriptors and Comments > Master File and Transaction Comments
- Click on the Other Tab
- From the options, select Global Statement Comment
- A notepad file will open and allow you to enter the comment that you would like to print on the owner statement (example below). Text must start from the left hand margin and not be more than 400 characters in length and a maximum of 5 lines (please note this does not ‘word wrap’).
- If this is your first time entering a global comment in Rest Professional, it will prompt you to create a new file. Click YES to this prompt.
- Go to File > Save and exit notepad.

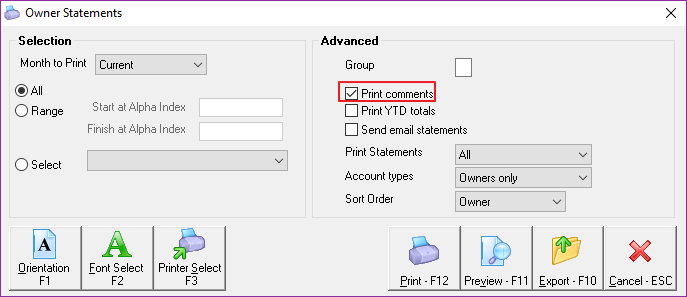
2. At the time of printing or emailing your Owner Statements, you must tick the Print Comments on the Statement Printing Screen
- Go to Reports > Owner >Statement Printing
- Before printing, tick the checkbox "Print comments"; the “print comments” tick box defaults to not being ticked, so it is important that you ensure this is ticked prior to printing and emailing.
- Click Print-F12
Example of the Global Comment on an Owner Statement
The Global Comment will appears at the bottom and in the center of all the owner statements.
Example:
