How to Use the Inspection Update Wizard in REST Professional
Overview
The Inspection Update Wizard calculates and updates the next inspection date of a property, based on the last inspection date and inspection frequency entered in the property master file. Using the Inspection Update Wizard, REST will display a list of properties that were due to be inspected within a selected month, as long as the Last and Next Inspection Dates are entered in the Property and Tenant Details screens in REST.
From version 12.5+ planning and scheduling inspections has become easier with the Inspection Planner feature. It is highly recommended you use this feature. For more information see “How to Setup and Use the Inspection Planner” document.
Accessing the Wizard
NOTE: It is recommended you conduct a backup of your current data via Files > Archive > Backup named before.inspection.update.dat.zip before commencing the Inspection Update Wizard.
The Inspection Update Wizard can be accessed via Files > Inspection Update or the Wizard Icon  located at the top of the REST screen.
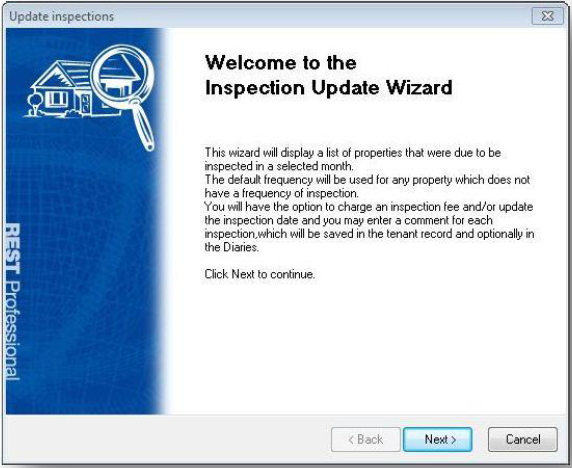 Click on Next to continue.
Determine Inspection Criteria
At this point, REST must determine whether you wish to:
- Update Inspections and Charge Fees - Charge inspection fees as well as update property inspection dates
- Update Inspections Only - Select this option if you wish to update property inspection dates only
- Charge Inspection Fees Only - Select this option if you wish to charge inspection fees only
Setting Update Options (Not Selecting ‘Charge Fees Only’)
This screen allows you to customize the options available to display the correct properties to update.
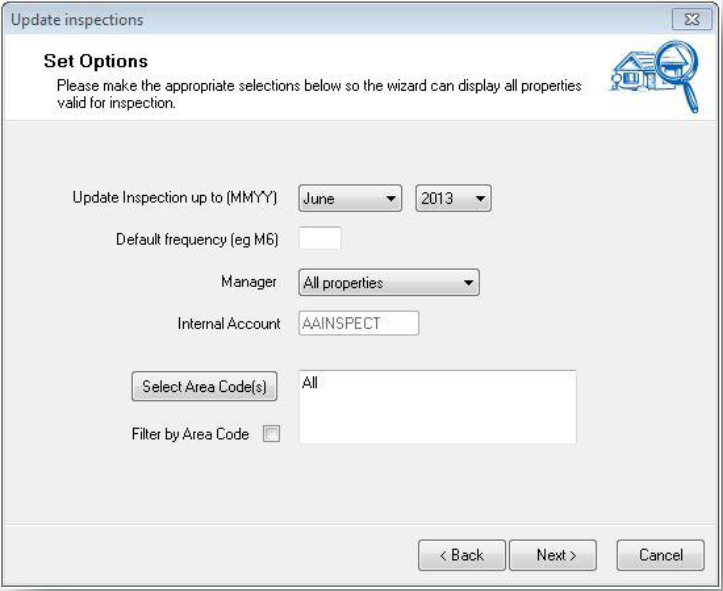
Update Inspection Up To
Enter the month for which you are processing the inspections. The wizard displays tenants with a next inspection date equal or prior to this date, based on the last inspection date on the General Tab of the Property Details screen.
Default Frequency
If there is no frequency entered on the General Tab of the Property Details screen, REST uses this data to calculate the next inspection date.
Manager – choose all or select a property manager
Internal Account – If fees are charged this will show the internal owner account that the fees will go in
Select Area Code - If you wish to organise your inspections by area, select the area code. You can also filter by area code.
When you have customized these options, click on Next to continue.
Setting Update Options (Selecting ‘Charge Fees Only’)
In order to charge the fees only, REST must know whether you have already updated the inspection dates for the period selected. This screen allows you to select whether to use the Property or Tenant inspection dates to find the properties for which fees are due. When charges are made from the wizard, the fees are charged as Outstanding Disbursements, and are ready to be applied once the owner has sufficient funds.
Property Inspection Date - Select if you have already updated the inspection dates for the selected period. For example, you would like to charge fees for any inspections conducted in June 2013. Therefore, REST would use that entered date to find any properties inspected within that period to charge inspection fees.
Tenant Inspection Date- Select this option if you have not updated the inspections for the period for which you are charging fees.
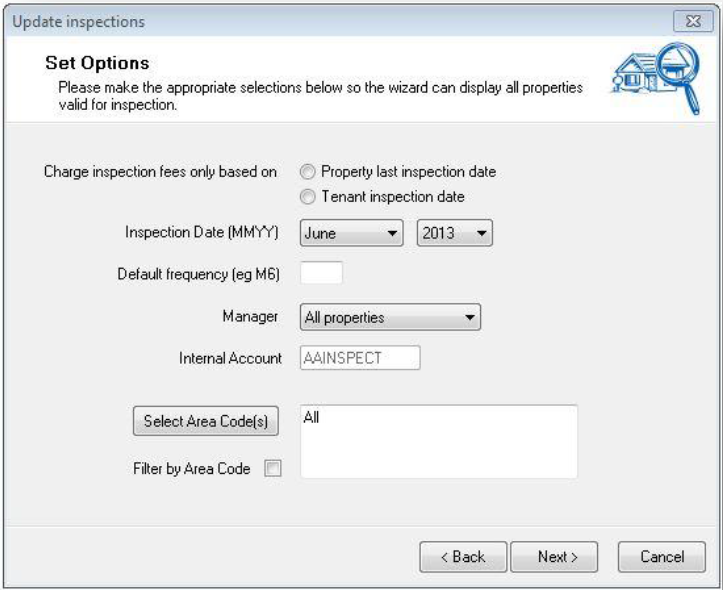
Update Inspection Up To
Enter the month for which you are processing the inspections. The wizard displays tenants with a next inspection date equal or prior to this date, based on the last inspection date on the General Tab of the Property Details screen.
Default Frequency
If there is no frequency entered on the General Tab of the Property Details screen, REST uses this data to calculate the next inspection date.
Manager
The user may process inspections for all properties in the REST database, or only those allocated to a specific property manager.
When you have customized these options, click on Next to continue.
Update Inspections
Based on the criteria selected in the previous Set Options screen, REST will display a list of properties with inspection dates to be updated. You can sort order by clicking on the heading in any of the columns.
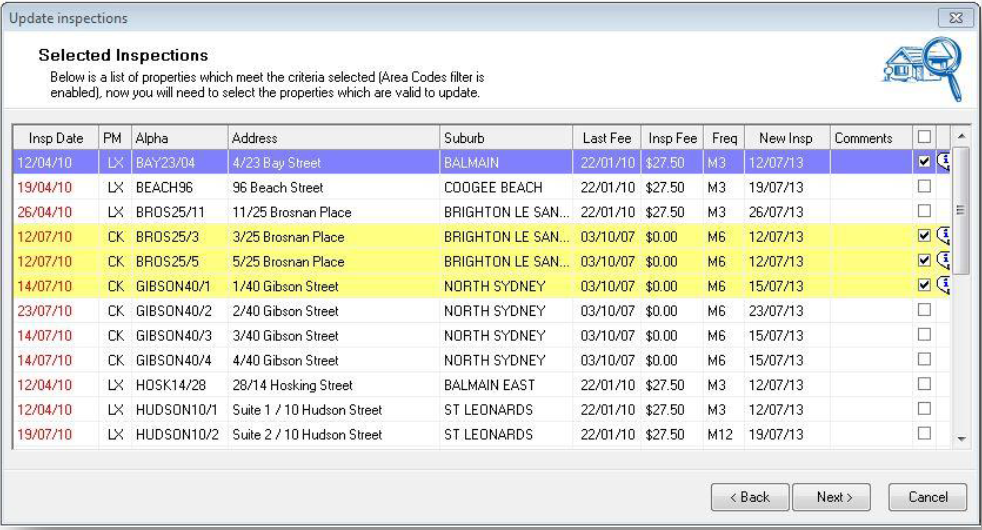
Inspection Date - This is most recent inspection date, sourced from the Tenant Details > Inspection tab. Once the update is complete, this date then becomes the Last Inspection Date on the General Tab on the Property Details screen. The date will appear in red if the inspect date is prior to the Inspection date month selected.
If the Inspection Date differs to what is reflected in REST, it is recommended to enter the correct date at this point before commencing the update process.
Last Fee (If Applicable) - This shows the date the last inspection fee was charged. If the last inspection fee was charged within the last inspection frequency, such as a property having an inspection frequency of six months (M6) and the last inspection fee was charged less than six months ago, REST will insert an ‘X’ in the last column of this table and will warn the user to review this property to confirm the accuracy of the information.
Inspection Fee (If Applicable) - This is the fee that will be charged and is generated from the Property Details > Financial Tab) – You have the ability to change this fee at this point.
New Inspection Date - The new inspection date is calculated by taking the last inspection date and adding on the number of months determined by the frequency and then changing the date to the nearest weekday. Resting the mouse cursor on the next inspection date displays that particular day of the week. If the inspection date is shown in red, this indicates the inspection is prior to the selected month. REST will calculate this new inspection date different by adding the number of months onto the current month as opposed to the last inspection date.
Comments - Double-clicking on this cell or single-clicking on the Ellipsis (…) button allows the user to add additional comments in relation to this inspection. These comments will be saved on the property and tenant Action & Conversation Diaries with the user initials and inspection date, only if the user selects the ‘Add to Diary’ option on the following ‘Completing the Inspection Update Wizard’ screen.
Tick box to Select/Deselect Property – If information is accurate, clicking on this check-box will select that particular property to be updated and will highlight the property in yellow. To select or deselect all properties listed, click on the top check-box in the title bar.
Note: Items that are not selected and highlighted will not be updated, and will appear the next time this wizard is run.
Click on Next to complete the wizard and view a summary of the changes made.
Completing the Inspection Wizard
This final screen indicates REST has all the required information to update the property inspection dates and/or charge inspection fees.
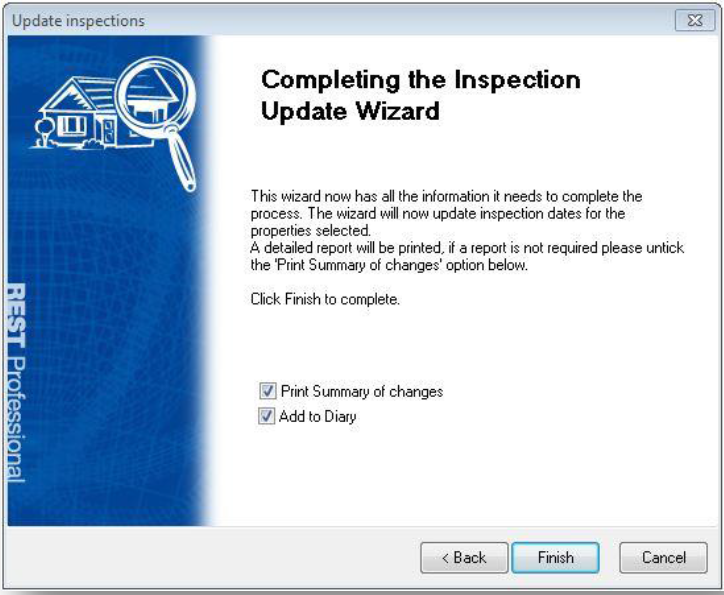
Print Summary of Changes
Select this option to print out a summary of changes made
It is recommended to keep a record of changes made as this record cannot be retrieved.
Add to Diary
When selecting this option, REST will automatically transfer the inspection date, user who completed the wizard and any additional comments entered onto the property and tenant Action & Conversation Diaries.
Click on Finish to continue.
REST will now:
- Update the tenants with new inspection dates;
- Update the properties with the last inspection dates;
- Update the tenant and property Action & Conversation Diaries (if selected); and
- Will post the inspection fees (if selected) as Outstanding Disbursements.
Processing Outstanding Disbursements (If Applicable)
The outstanding disbursements that have been created from the inspection fees can be processed via Transactions > Outstanding Disbursements > Process Outstanding Disbursements. This can be processed at any time, and will only process that particular outstanding disbursement if there are sufficient funds against an owner.