How to Disable User Account Control (UAC) Settings
Overview
User Account Control (UAC) is a Windows security setting that is normally enabled on your PC by default.
UAC is designed to warn you about potentially unsafe software by providing a Yes/No prompt. Unfortunately UAC has also been observed to cause needless errors and crashes in other software running on your PC, including Rest Professional.
When troubleshooting errors or problems in Rest Professional we may ask you to temporarily disable UAC
In the event that disabling UAC corrects or improves these problems, you may need to consider leaving UAC disabled, we recommend to consult with your IT Provider for support and guidance
This document will assist you to disable UAC
It is your responsibility to Enable UAC if and when required
Steps to Disable User Account Control
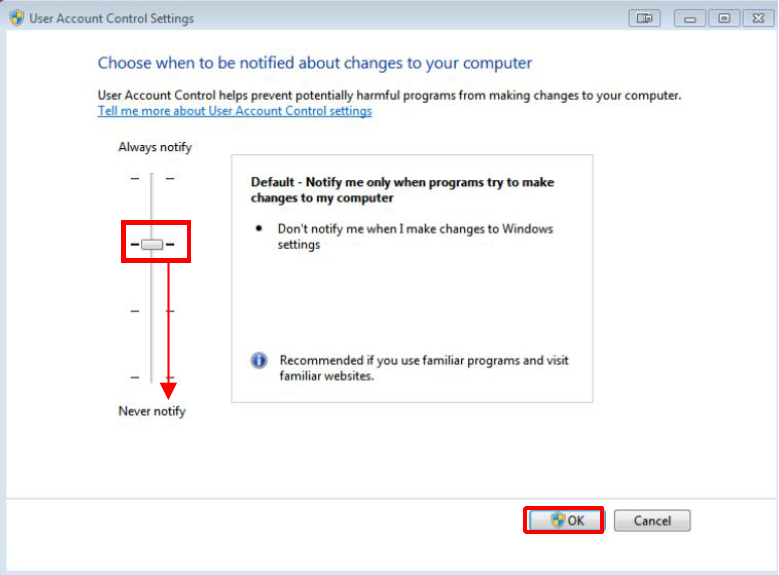
- Click on your windows Start button, type in UAC and click on 'Change User Account Control'
- Slide the bar down to the bottom (Never Notify), click OK
- To completely disable UAC in Windows 10, you will also need to make a change in the registry
- Click on your Start button, type in regedit and click on Regedit run command
- Navigate to the following location: HKEY_LOCAL_MACHINE\SOFTWARE\Microsoft\Windows\CurrentVersion\Policies\System
- In the right pane, modify EnableLUA DWORD value and set it to 0 (if this key does not exist, you will need to create it)
- Restart the computer
