Issue Owner Portal Log In through Web Access Wizard
This article will assist you to issue web access number and temporary password to a Lot Owner, Committee Member, Building Manager. We will use the one term 'Lot Owner'.
This article will also guide you in resetting passwords.
Note that once the temporary password is issued, management of password is taken by the Lot Owner. They will automatically be required to create a new password, which they must remember. If they cannot remember their password, they will click 'forgot password' and reset it, or they can ask your office to send them a reset password email. They also will need to periodically change their password. Passwords are no longer visible to Users of Strata Master or Support.
This instruction can be used for Issuing Access to all Lots of a New Plan, or individual selected Lots.
Locating the Web Access Wizard
Select 'Configure' in your top toolbar
Click on 'Web Access Wizard' toward the bottom of the menu list
On that screen you will see a section for 'Issue Usernames and Passwords'
Difference Between the 3 Options
- All Plans/contacts is literally a list of all plans and contacts. You will be able to see who has access allowed and a web access number already issued.
- Individual Plan/contact allows you to select one Plan and is most commonly used for issuance of access for a New Plan.
- Manage Notifications will provide a list of all Lots that have not been provided with access.
You are able to provide Web Access from Individual Plan/contact, which gives more opportunity to select, and Manage notifications.
Please read through the instructions below to plan your options, before commencing.
Issuing Log in Access Details to a New Plan
Once you have the Web Access screen open, select Individual Plan/contact.
1. Select Plan number from drop down list and click the binoculars (search). Screen opens as below.

2. If you click the 'Allow access for all' button you will get a message warning that this is only for use when no owners have yet received access. Select ok, if this is a new plan and no owners have been provided with portal access. Otherwise click 'cancel' and go to step 3.
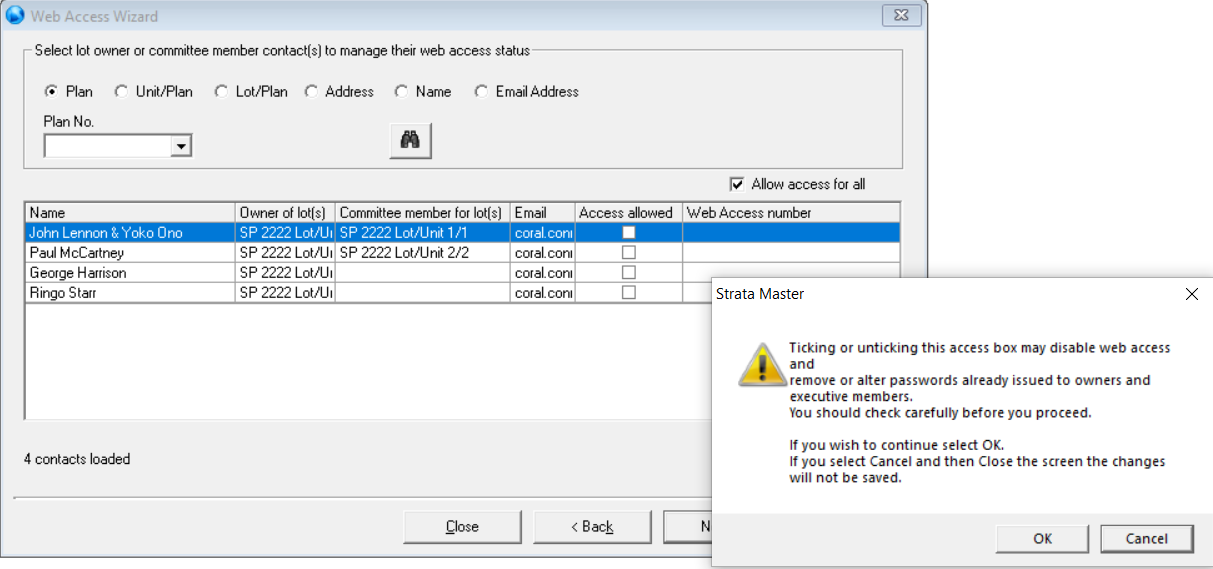
3. Tick 'access allowed' button beside each owner you wish to issue web access.
4. Click Next, the screen shows a list of the selected Lot Owners. Check the list carefully and if correct, click Next again.
5. A pop up box will ask if you want to save the changes, click 'yes'. Click 'no' if unsure or you have made a mistake.
6. The next screen appears as below. From here you can -
- View the Email template or Letter template to ensure you are linked to the correct Template. You can also make minor text edits to the Template. You cannot add pictures or diagrams.
- You can untick the Notification method if you wish to print all of the Letters.

7. Check that your printer and Outlook is all working correctly prior to clicking Finish on this screen.
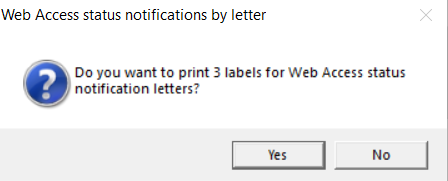
8. Click Finish. Pop ups will confirm your selection. In this case, we unticked Email and will print all letters.
9. A message then shows asking if you want to print labels for envelopes, and if you select yes, a Word screen will open which you can print to your label printer.
10. You will receive confirmation pop ups that you read carefully and click Yes for printed letters and the below message shows for emailed access letters.

11. If you make an error, prior to any emails being sent, you can go back to steps 2 or 3, untick all boxes and retick the boxes and start again.
Note that - In the future, if you go to step 4, the only Lot Owners that will show, will be the ones not previously sent access letters or emails.
Resetting a Password
1. At step 2 or 3 above in instruction to "Issuing Log in Access Details to a New Plan", highlight the owner who wants the password reset, then click the 'Reset Web Access password' button
2. Click 'Yes' if you wish to proceed, 'No' if you have selected the wrong Lot Owner.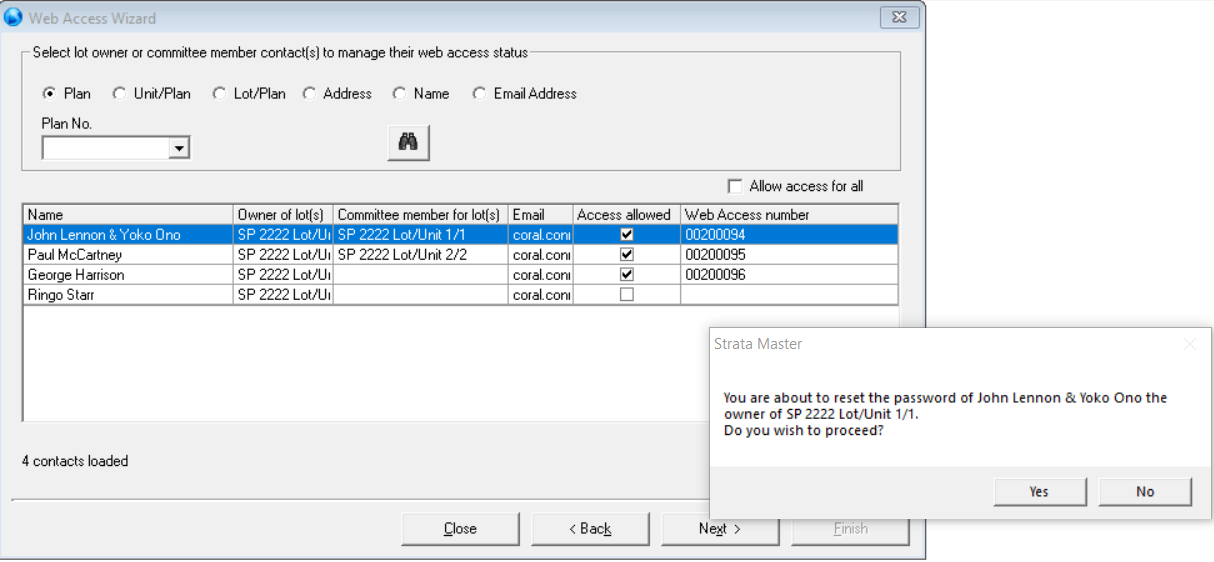
3. Click Next and screen shows as in step 4 above. Check again that you have the correct Lot Owner, click Next. Otherwise click Back or Cancel.
4. From here, screens continue as in above instruction to "Issuing Log in Access Details to a New Plan"