How to Add a New User in fileSMART
The Manage Users function in fileSMART allows you to add, disable and edit the users who are able to log into fileSMART. This can only be performed by a user with administrator rights. To avoid accidental changes and deletions, we recommend that only one designated fileSMART administrator be given these rights.
Adding a User
- Log in to fileSMART Archive as the administrator
- Click on the Manage fileSMART Archive Users button. The Manage Users screen will appear.


- In the blank row at the bottom, enter a User Name, Password, Email Address, First Name and Surname.
- Ticking the Admin box will give the user full administrator rights and is not recommended for anyone except the administrator.
- The Backup tick box gives a user who is not an administrator the ability to perform backups.
- The Disable tick box hides the user from the list of available users and the user will not be able to log in. Other users will not be able to forward documents to a disabled user.
- If the user is selected as a Publisher in the User Groups they will have access to the Show on Portals tick box when archiving documents.
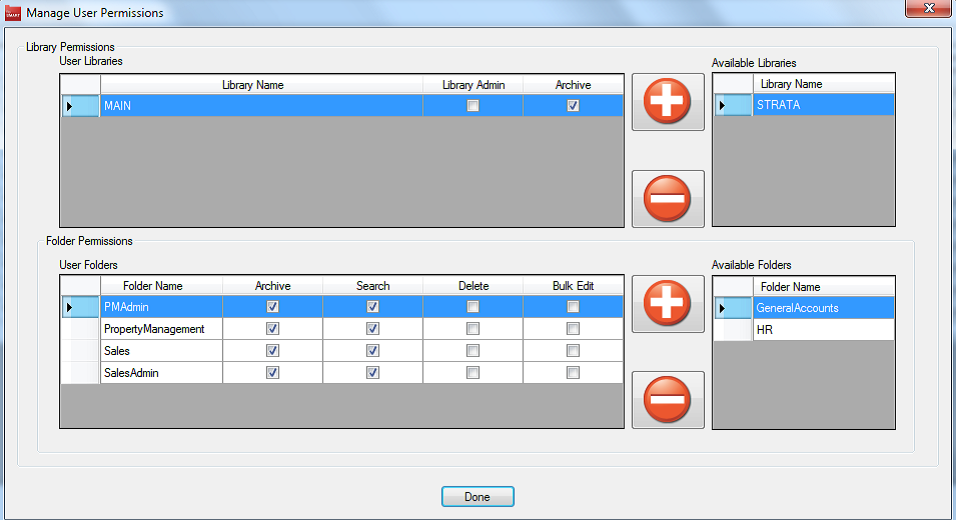
- Click on the Manage User button to change the access privileges of the user. Please note that as an administrator you will not have a Manage User Permission grid. Administrators are automatically set up to be able to access every folder and function.

- Select the library from the Available Libraries Panel (usually MAIN) and click the Add(+) symbol.
- Leave Library Admin un-ticked, and make sure that Archive is activated for all users.
- Individually select each of the available folders that the user needs access to and click the Add (+) symbol. This will make the folder appear in the left hand panel of the grid.
- Tick the Archive, Search Only, Bulk Edit and/or Delete to give the user permission to do these tasks within each specific folder.
- Finish by clicking Done to apply any changes.
