How to Setup and Use the Inspection Planner in Rest Professional
Overview
Inspection Planner will help assist you with the inspection process from reviewing and scheduling to sending notices, inviting owners, updating tenant ledgers, updating property and tenant diaries and creating inspection history of scheduled property inspections.
The logged in user must have the security level of Receipts/Invoices/Banking/Repairs/Wizards & above to use the Inspection Planner.
NOTE: If you have previously been using the Inspection Update Wizard, it is imperative that you discontinue using this completely prior to using inspection planner.
This document will cover:
- How to Configure the Inspection Planner
- How to Use the Inspection Planner
- How to Use the Inspection Follow Up
How to Configure the Inspection Planner
You will need to review and edit this screen before using the new Inspection Planner and Inspection Follow Up for the first time. The Inspection Planner Configuration screen stores some of the default load settings for the Inspection Planner, as well as the templates for sending out notifications to owners and tenants.
Inspection Planner Configuration must be completed by a user with the highest security level of Statistics/Company Details/Passwords & above.
- Go to Files > Inspection > Inspection Planner Configuration
- Inspections - This will default to being ticked to Include Inspections with blank Frequency or blank Next Inspection Dates. If you deselect this it will not load any inspections with a blank frequency or blank next inspection date
- Next Inspection Dates - The default load setting for Next Inspection Dates will be set to Next 30 days when the Inspection Planner Configuration screen loads for the first time, which means the Inspection Planner will load all inspections due between the REST Professional system date and the next 30 days. You may change this setting to load the Inspection Planner with upcoming inspections due between the REST Professional system date and the next 60 or 90 days.
- Default Communication Methods and Templates – Click on each field and select the Browse button to search for a document template for each communication method. All the required templates will already be in the REST\Word folder. Templates should be added to each field that will be used in the inspection planner:
- Inspection Invitation to Owner – letter, email and SMS
- Inspection Notification to Tenant – letter, email and SMS
- Inspection Follow up to Owner – letter, email and SMS
- Inspection Follow up to Tenant – letter, email and SMS
NOTE: These templates may require tweaking and can be done to personalise to your agency requirements
Select the Save button when you have reviewed and completed all the settings in Inspection Planner Configuration.
NOTE: Inspection Notification to Tenant must have at least one communication method selected. When you’ve successfully reviewed and saved the default settings for loading the new inspections screens you are ready to start using Inspection Planner.

How to Use the Inspection Planner
The logged in user must have the security level of Receipts/Invoices/Banking/Repairs/Wizards & above to use the Inspection Planner.
- Go to Files > Inspection > Inspection Planner
NOTE: When Inspection Planner loads, the default filters will be set according to the logged in REST user and the defaults
- Select the criteria for the filter settings at the top right of the screen:
- Next Inspection From -This filter will default to the selection saved in the Inspection Planner Configuration screen to determine the date range i.e. Next 30 Days. You may change the date range after the Inspection Planner has loaded, and use the Refresh button to reload the grid.
- Area Code - The Area Code selection will default to All. You may select specific Area Codes after the Inspection Planner has loaded, and use the Refresh button to reload the grid.
- Property Manager and Inspecting Agent - When Inspection Planner loads, the inspections that display in the grid will be determined by the user logged into REST Professional. You may change the selections and use the Refresh button to reload the grid. Defaults will be as follows:
- Property Managers - Property Manager will default to the logged in Property Manager, Inspecting Agent will default to All
- Other Managers (i.e. BDO) - Property Manager will default to All, Inspecting Agent will default to the logged in user
- Non Managers (General Users) - Property Manager will default to All, Inspecting Agent will default to All
- Class - The Class section will default to All. You may select a different class i.e. Residential and use the Refresh button to reload the grid.

Inspections loaded in the Inspection Planner will be filtered according to the following defaults:
- Type - The default inspection type will be Routine for all inspections that have not previously been updated with a different type.
- Status - Property inspections due within the filtered date range with a status of Pending, Send Notice and Reschedule will display in the grid.
- Next Inspection Date - Next Inspection Date will default to the date saved in Files > Tenant > Inspections. Inspections with a due date prior to the REST Professional system date will display in red to indicate that they are overdue. Inspections with blank Frequency and blank Next Inspection Date will be included or excluded based on the setting saved in the Inspection Planner Configuration screen.
- Time From and To - The times will default to 12:00AM for all upcoming inspections that have not previously been updated with times. This can be changed in this grid or by going to each individual tenant and changing the inspection times.
Schedule - The first step in the Inspection Planner is the Schedule tab, which allows you to review and edit information for upcoming inspections and select the inspections you wish to schedule or reschedule. Inspection Comments, Property Manager, Inspecting Agent, Last Inspection Date cannot be updated from the grid and must be done on the Property/Tenant card prior to running inspection planner.
Select the criteria within the schedule tab:
- Adjust the filters if necessary and select the Refresh button to reload the grid
- Identify the inspections you wish to schedule now, and change the Type if necessary. Select the Save button to update Tenant Details
Change the status of inspections you wish to schedule now to Send Notice or Reschedule. Select the Save button to update Tenant Details.
NOTE: Use the Bulk update Status function to change the status of all inspections in the grid
- Review the Next Inspection Date and times of inspections you wish to schedule now and make changes if necessary. Select the Save button to update Tenant Details
- Review all the inspections you wish to schedule now and ensure the Frequency and Next Inspection Date are entered and the status has been set to Send Notice or Reschedule. Select the Save button to update Tenant Details
Notify Tenant - The Notify Tenant tab will become active when at least one inspection on the Schedule tab with a Frequency and a Next Inspection date has a status of Send Notice or Reschedule.
- Select any additional communication methods you wish to use for the inspections in the grid. Each tenant must have at least one communication method selected to proceed to the Merge & Send tab of the Inspection Planner.
- Select the Invite Owner checkbox for inspections where the owner will be sent an invitation to attend the upcoming inspection. This is an optional field.
Note: When the Electronic Consent System Option is enabled:
- There is no change to existing functionality if the tenant has consented to the electronic service of notices.
- If the tenant has not consented to the electronic service of notices, a prompt will display when selecting the Email checkbox screen against the tenant in Inspection Planner and Inspection Follow Up.
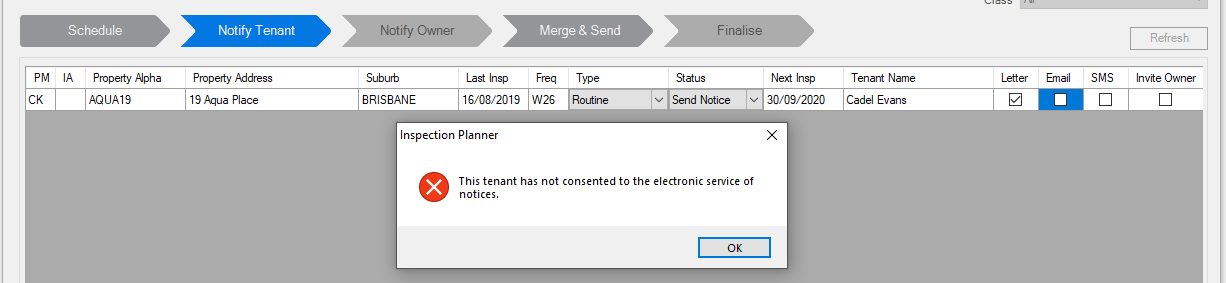
For more information click on to this link Consent for the Electronic Services of Notices and Documents

Notify Owner - The Notify Owner tab will become active when Invite Owner has been selected for at least one inspection in the previous tab.
- Select communication methods for owners to be invited to inspections.
Merge & Send - When you select the Merge & Send tab you will be prompted to save all the changes you made on the previous screens. The Merge & Send screen will display a summary of notifications that have been set up in the Notify Tenant and Notify Owner tabs, and allow you to send out Letter, Email and SMS messages for owners and tenants.
- If you use ADL Forms, Forms Live or Realworks you will have an option select the output type when merging Letters.
- If templates have been saved in Inspection Planner Configuration, the template names will display for each configured communication method. If no templates were saved, the document path will be blank.
- Review the number of owners and tenants for each communication method to ensure all the notifications you wish to send out now are included. Return to the previous tabs to make changes if necessary
- When you are ready to start the merge process, select the Merge/Send button for the first notification. The Inspection Notification screen will display. This is a simplified version of the Letter Writing screen in Rest
NOTE: After starting the Merge & Send process on this tab, you will no longer be able to return to the previous tabs of Inspection Planner, so it is important to ensure that the summary is correct before selecting the Merge/Send button to start the first merge
- If you are printing letters to tenants, the Mail merge will prompt, and you will need to merge with the required Inspection Planner Tenant notification letter, this should be pre-populated already.Click on Start-F12 this will then open the template in Word. You can then check the documents if required. To finish go to Finish & Merge > Print documents as required to print.
- Select the Preview button to review the records that will be included in the merge
- Complete the merge process by selecting the Start button for letters, or the Preview > Proceed button for Emails and SMS messages
- When all Tenant Notifications have been merged and sent you may proceed to the final step of the Inspection Planner. Owner Invitations are optional and may be skipped. You will be able to return to the Merge & Send tab after viewing the Finalise tab and before closing the Inspection Planner
NOTE: If no templates have been saved in the Inspection Planner Configuration screen, the document field will be blank and you will have an option to select a template for merging after you select the Merge/Send button

- If you have Document Management configured in REST, you may be prompted to save to document management as the final step of the merge process
- When the merge process is complete, the Inspection Notification screen will close and you will be returned to the Merge & Send tab of Inspection Planner
- Merges that were completed successfully will display a status of Complete, and the Merge/Send button will be inactive
- Merges that were started but not completed will display a status of Incomplete, and the Merge/Send button will be active to allow you to reprocess the step
NOTE: Merges that failed (for technical reasons) will display a status of Error in Sending, and the Merge/Send button will be active to allow you to reprocess the step
- Finalise - The Finalise tab will display a summary of the steps completed during your inspection planning sessions. You will be able to return to the Merge & Send tab until you finalise and close the Inspection Planner.
- Select the Print List button. The Schedule of Inspections report can to be previewed, printed or emailed
- Review the Add to Diary checkbox. Ensure the checkbox is selected if you wish to update all Tenant and Property diaries with details of the inspections scheduled during this session
- Click the Finalise button – This will now update with notifications sent Tenant ledgers will be updated with notifications sent, diary entries will be created of the scheduled inspections for Property and Tenant diaries if the Add to Diary checkbox is selected on the Finalise tab. The inspection status of all scheduled and rescheduled inspections will be set to Scheduled in the Tenant Details > Inspections tab. An entry will be added to the Property Inspection History and Tenant Inspection History table for inspections scheduled during this session.
NOTE: When you have successfully finalised all the steps of the Inspection Planner, the inspections that were scheduled will become available to be completed using Inspection Follow Up
How to Use the Inspection Follow Up
To use Inspection Follow Up for the first time, inspections must have been previously scheduled using the Inspection Planner or the inspection would have been set to a Status of Complete in the Tenant Inspection Tab.
Inspection Planner will allow you to review, update and finalise completed property inspections, send follow up notifications to owners and tenants, view edit and create maintenance jobs for completed inspections, reschedule, charge inspection fees, and create inspection history for completed inspection.
The logged in user must have the security level of Receipts/Invoices/Banking/Repairs/Wizards & above to use the Inspection Planner.
The View Maintenance button (at bottom of screen) will load the Maintenance tab of the Property to allow you to view, edit or create property maintenance jobs for the selected property without closing Inspection Follow Up. The View Property and View Tenant buttons will load the Property Details screen for the selected record in Read-Only mode to allow you to review details. Closing the record will return you to Inspection Follow Up.
Go to Files > Inspection > Inspection Follow Up
Select criteria for the filter settings at the top right of the screen:
- Update Inspections From - The date filter will default to 30 days before the REST system date. You may change the date range after Inspection Follow Up has loaded, and use the Refresh button to reload the grid
- Area Code - The Area Code selection will default to All. You may select specific Area Codes after the Inspection Follow Up has loaded, and use the Refresh button to reload the grid.
- Property Manager and Inspecting Agent - When Inspection Follow Up loads, the inspections that display in the grid will be determined by the user logged into REST. You may change the selections and use the Refresh button to reload the grid. Defaults will be as follows:
- Property Managers - Property Manager will default to the logged in Property Manager, Inspecting Agent will default to All
- Other Managers (i.e. BDO) - Property Manager will default to All, Inspecting Agent will default to the logged in user
- Non Managers (General Users) - Property Manager will default to All, Inspecting Agent will default to All
- Class - The Class section will default to All. You may select a different Class i.e. Residential and use the Refresh button to reload the grid.
Review & Update - The first step in Inspection Follow Up is the Review & Update tab, which allows you to review and edit information for completed inspections, review and edit Inspection Fees to the owner, and select the inspections you wish to finalise.

To start the process of finalising your completed inspections in Inspection Follow Up:
- Identify the inspections you wish to mark as completed now, and edit information like date and time if necessary. Select the Save button to update the changes you have made
- Change the status of inspections you wish to finalise now to Complete. This can be done on an individual basis or by using the bulk update status button at the bottom of the grid. You may also select the status of Reschedule for inspections that were not carried out on the scheduled date. Select the Save button to update Tenant Details
- Review the Fees for inspections you wish to finalise now. If changes are made to fees, select the Save button to update Property Details
- Review all the inspections you wish to finalise now. Inspections with a status of Complete will display on the Advise Owner tab to allow you to set communication methods for owner notifications
NOTE: The Review & Update tab can also be used as a bulk update method to save modified information back to the Property and the Tenant without completing all the Inspection Follow Up steps. Selecting the Save button will immediately update the modified information on the Property and the Tenant
- Advise Owner - The Advise Owner tab will become active when at least one inspection on the Review & Update tab has a status of Complete. This is an optional step which allows you to specify communication methods for owners who will be sent follow up notifications of completed inspections.
NOTE: Inspection Comments entered here will be added to the Property and Tenant Diary at the Finalise step of Inspection
- Advise Tenant - The Advise Tenant tab will become active when Advise Tenant has been selected for at least one inspection in the previous tab When you have set all the communication methods for tenants to be sent follow up notifications you are ready to proceed to the Merge & Send tab. Consent for Electronic Service of Notices and Documents if selected in System Options. For more information click on to this link Consent for the Electronic Services of Notices and Documents
Merge & Send - When you select the Merge & Send tab you will be prompted to save all the changes you made on the previous screens. You can review the summary of notifications that have been set up in the Advise Owner and Advise Tenant tabs before starting the process of sending out Letter, Email and SMS messages for owners and tenants. This is an optional step and may be skipped if you wish to proceed directly to the Finalise tab without sending notifications
NOTE: If you use ADL Forms or Forms Live you will have an option change the output type when merging Letters.
- Click the Merge/Send button for the first notification. The Inspection Notification screen will display. This is a simplified version of the Letter Writing screen in REST
Select the Preview button to review the records that will be included in the merge. Complete the merge process by selecting the Start button for letters, or the Preview > Proceed button for Emails and SMS messages.
If you have Document Management configured in REST, you may be prompted to save to document management as the final step of the merge process
When the merge process is complete, the Inspection Notification screen will close and you will be returned to the Merge & Send tab of Inspection Follow Up.
Merges that were completed successfully will display a status of Complete, and the Merge/Send button will be inactive
Merges that were started but not completed will display a status of Incomplete, and the Merge/Send button will be active to allow you to reprocess the step
Merges that failed (for technical reasons) will display a status of Error in Sending, and the Merge/Send button will be active to allow you to reprocess the step
When you are ready you may proceed to the final step of Inspection Follow Up. You will be able to return to the Merge & Send screen after you select the Finalise tab and before you close Inspection Follow Up
- FInalise - The Finalise tab will display a summary of the steps completed during your inspection follow up session. To process the final steps of completing your inspections:
- Select the Print List button. The Completed Inspections report can to be previewed, printed or emailed
Review the Add to Diary checkbox. Ensure the checkbox is selected if you wish to update all Owner diaries with details of the inspections scheduled during this session
Review the Charge Inspection Fees to Owners checkbox. Ensure the checkbox is selected if you wish to charge owners Inspection Fees for all inspections with a fee saved on the Review & Update tab of Inspection Follow Up
Click on the Finalise button. A summary will display the number of outstanding journals that will be created if the Charge Inspection Fees to Owners checkbox was selected and one or more inspections were saved with an inspection fee.
The Finalise button must be selected to complete the Inspection Follow Up process. In addition to charging Inspection Fees to owners, tenant ledgers will be updated, diary entries of completed inspections will be created, the inspection status of all completed inspection will be reset to pending in the Tenants details, the next inspection date will be advanced and an entry will be added to property inspection history and tenant inspection history tables
We have Online Classroom training on Inspections in Rest Professional which can be found on our website at Rockend Training