How to Add a New User in Strata Master
Overview
This document will take you through the process to create a new user, create a log-in, how to delete users and how to view inactive users for Strata Master.
How to Add a New User
The Strata Master Support Team will not instruct you on what access level to provide for your staff. It is a decision to be made by each individual agency, taking into account the duties and responsibilities of each User.
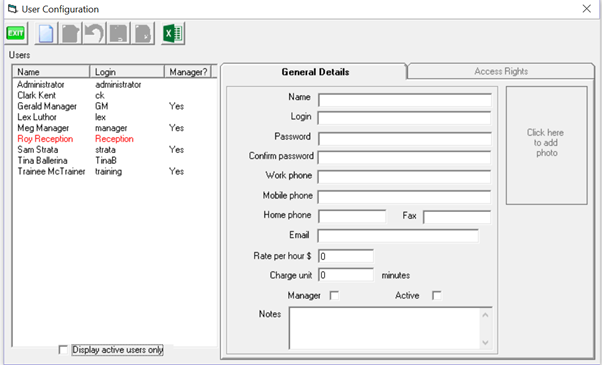
1. In the Configure menu, choose Users to open the User Configuration screen.

2. On the toolbar of the User Configuration screen, click on the New button. A highlighted entry will appear in the Users list, with the words *New Entry displayed in the Name column.
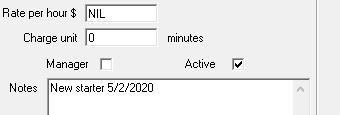
3. Enter the name and other general details of the user on the General Details tab. You can use up to 50 characters for the name, 15 for the login name, 15 for the password, 20 each for the phone and fax numbers, 30 for the email address, and a reasonably large amount of text for the notes. The name, login name and whether the user is a strata manager appears in the Users list as these details are entered. An example is below.

ITEMS TO NOTE:
- Each user must have a name. If you want to create a generic set up for ‘receptionist’ refer point 5 below.
- The password must be exactly the same in both password fields.
- It will be more convenient for users if the login name is the same as their Windows user name, because the currently logged-in Windows user name becomes the default user name each time the login screen is displayed.
- There are character limits in some fields, currently 50 characters for the name, 15 for the login name, 15 for the password, 20 each for the phone and fax numbers, 30 for the email address, and a reasonably large amount of text for the notes. This is subject to change in future versions of Strata Master.
- While you must enter a Login, a password is not required. Setting a password is recommended.
4. Go to the Access Rights tab. The new user will have default access rights of the highest access level available for each function.
5. If you want to base the new users access rights on the access rights of another user, click the Copy button and select another user from the Users list.
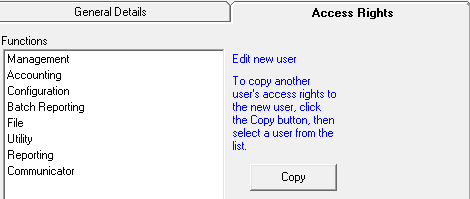
6. Access provides either ‘write’ access, ‘read’ access or ‘none’ access. There will be some selections that do not provide all three of these options.
- Write - User will be able to view and process/save changes
- Read - User will be able to look at the screen but not make/save any changes or processing
- None - User will have no access to the screen at all
NOTE: there is a small variation to this access description for Manage > Creditors
7. Make any other changes to the new users access rights. For example, if you wish to provide unique access to Management functions, click on each function one by one and select required access, double click on Management and the sub folders are visible. You can select varying access for each required sub folder.

8. Once you have completed working through the Management sub folders, double click on Management to close the sub folders. You can then double click on Accounting to work through those sub folders.

9. It is recommended that you click on save as you work through the access for this user. You can then simply click on the edit button to continue, or if you are required to edit the user further, click on the users name > edit.
10. Click the Save button on the toolbar to save the general details and access rights for the new user.
11. Click exit when you wish to close the screen.
How to Delete a User
It is not recommended to delete Users however you can change passwords and make the user inactive. This enables you to make the user active again if required, without having to again set up access rights.
- On the Configure menu, choose Users to open the User Configuration screen.
NOTE: If you wish to delete the user, do so very carefully to ensure that only the relevant user is deleted. Simply highlight the user and click the delete button.
2. Click on the edit button.
3. Select the user that you wish to make inactive.
4. On the General Tab, locate the box that is ticked Active, and untick this box. Check that the box is not ticked.
5. Click the save button and you can exit the screen.
How to View Inactive Users
- On the Configure menu, choose Users to open the User Configuration form.
- Untick the box ‘display active users only’.
- Inactive users will show in red.