How to Archive
When documents are in your Pending Queue, they should be archived promptly so they can be located easily in the future.
Archive a single item in your Pending Queue
Follow these steps to Archive a document:
1. If your Pending Queue is not showing, click the Archive Mode button 
2. Select the required Archive Folder in the top left-hand panel, e.g. Property Management.
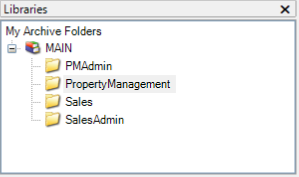
The customised Archiving Labels for the selected folder display in the bottom right-hand panel.
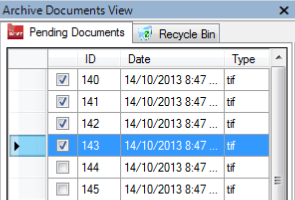
3. Select the item in your Pending Queue that you want to archive.
 Note: To merge and archive multiple documents, select the checkboxes to the left of the required documents. The item showing in the Document View will be archived along with all checked items, even if it is not highlighted itself.
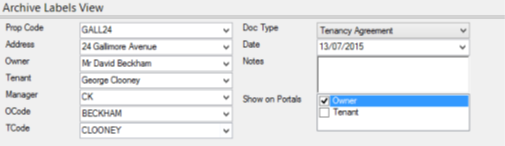
4. Enter required information into the customised Archiving Labels. Select the dropdown list and select from the hint list provided, or type in the property’s alpha code to populate the following fields:
- The more labels you complete, the easier it is to search for the document in the future.
- The information for these labels is provided to fileSMART from your trust program. Any changes to your trust data are updated in fileSMART overnight.
5. Key Archive Label
- The Key Label is the label at the top of the left column i.e. Prop Code.
- Selecting a value in the Key Label, others below it are populated in automatically using data extracted from your Trust program.
- If there is more than one owner or tenant for the property, that label will remain blank. You will need to select appropriated Owner or Tenant the document refers to from the Hint List.
6. Document Type
- The Doc Type label is found at the top of the right column.
- The document type Hint Lists are pre-programmed. If changes are required, they must be made by your fileSMART System Administrator.
- A typical selection of documents for Property Management would be Tenancy Agreement, Breach or Termination Notice and Inspection Report.
7. Date
- Select the date that is relevant to the document.
- For Invoices, use the date they were entered into the trust program.
- Use the drop-down calendar or enter the 2 digits for day, 2 digits for month and 4 digits for year directly.
- Select the checkbox Default Today’s Date at the bottom of the screen to automatically select today’s date.
8. Notes Label
Typing additional information into this label will help you to search for this document. This is often used for the Creditor name when archiving Invoices or the topic of the correspondence.
9. Show on Portals
If you have REST Professional integrated with fileSMART, and you are using the Owner and Tenant Portal feature, you have the ability to display selected documents stored in fileSMART on the Owner or Tenant portals for your clients to view and download.
If you would like the document you are archiving to be displayed on one or both portal sites, select the relevant checkboxes.
10. When all relevant archiving information is entered, click the Archive Selected Documents button in the Control Panel.
You will be prompted if any required fields remain unfilled.
11. The document shown and any selected items are archived and are removed from your pending queue.
12. The archiving information is retained in each label. You can clear the archive labels ready for the next document by:
a) Pressing the F5 button on your keyboard
b) Selecting the Clear Archiving Labels checkbox at the bottom of the screen.
Archiving multiple items in your Pending Queue
Follow these steps to archive multiple items in your Pending Queue:
- Select the relevant documents from your Pending Queue. The item showing in the Document View Panel will also be archived, even if it is not selected.
2. Enter in all of the Archiving Labels as per the steps in Archiving a Document.
3. Select the Archive Selected Documents button.
The message ‘Do you want to merge file’ will display:
- Click Yes to merge them into one multi-page document.
- Click No to archive them separately using the same labels for each.
- Click Cancel to not complete the archive, the documents will remain in your pending queue.
 Note: This only works with TIFF documents, other selected items in different file formats such as JPEG, will be archived separately.