Completing your Cloud Back Up via the Pre Migration Wizard
Completing your Cloud Back Up prior to your Trial Migration
If you are uploading the data for a trial migration you will need to ensure that you have completed all account mapping, you will not need to have completed a files update or Validation Checks.
- Open your Pre Migration Wizard
- Select Backup Rest Professional current & historical data to the Cloud.
- Enter Backup Wizard and follow prompts to back up to cloud.
- Select Next

- Select Current Data and Click Next
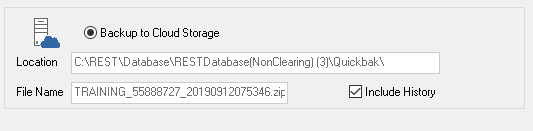
- Select Backup to Cloud Storage, Ensure Include History is ticked
- Select Finish, Yes to the pop up window and then Backup
You will be notified via a pop up that your back up has been successful. Rockend will then commence the remainder of your data migration.
Uploading your Data for your Final Migration
If it is your final migration, after completing your final EOM and Files Update open your Pre Migration Wizard.
- Complete your Final Validation Checks, all checks should be successful (N.B. for Final Migration Only)
- Select Backup Rest Professional current & historical data to the Cloud.
- Enter Backup Wizard and follow prompts to back up to cloud.
- Select Next
- Select Current Data and Click Next
- Select Backup to Cloud Storage, Ensure Include History is ticked
- Select Finish, Yes to the pop up window and then Backup
You will be notified via a pop up that your back up has been successful. Rockend will then commence the remainder of your data migration.
N.B. If you have updated your data for a final migration it is vital you do not enter any new transactions after the Files Update. This will prevent your data from being migrated.