
How to Create your own Customised Portal Brochure
Rockend's designers have put together a generic Portal Brochure that you can use to advise your lot owners about the facilities available in the Owner & Committee Portal, as well as saving a branded link to their phone's home screen.
This brochure should be customised with your company branding to link more effectively with your company and website, below are the recommended steps.
- Download the template and open in MS Word. Strata-portal-brochure-template.docx
- Navigate to the header banner image, right-click on the image and select Change Picture > From a File to update with your company letterhead. Browse to the corresponding banner image and select. Do this on both pages of the brochure.
Note: The image size used for the header is 852 x 120 px.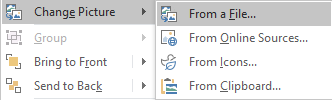
- Repeat step 2 for the footer, or if a footer is not required you may delete the footer by clicking on the image and pressing the delete key. Do this on both pages of the brochure.
Note: The image size used for the footer is 852 x 80 px. - In the Quick Tip text box on page 1, replace [insert web address] with your business' website address.

- On page 2 replace [Insert Web Address] with your business' website address for both the iPhone and Android instructions.

- (Optional) You can edit the text of the brochure, if you do this ensure that it stays within the text frames.
- (Optional) Before further customising the Portals brochure; customise the branding options on the Owner & Committee Portals, as you will be using screenshots of your portal to complete your brochure.
For more information on customising the look of the Portals, see the article on Design & Branding - (Optional) Take and save a screenshot of your Portal from your phone. The screenshot should be 174 x 346 px.
We suggest the following screenshots as options;- Your website homepage, with the Portal log in buttons visible.
- The log in page of the Portal, once your client has clicked the log in button from your company web-page.
- If you're unable to take an appropriate screenshot, the template in Step 2. includes a generic image that you are able to use
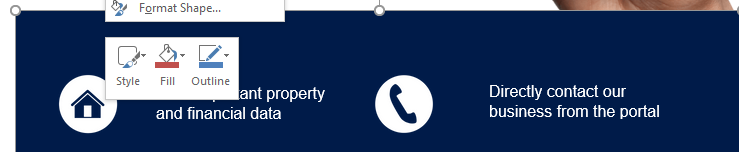
- (Optional) Right-click the blue rectangle and select the Fill option to change the colour of the rectangle to your company branding
- Save your brochure.
- You can now use the brochure to educate existing clients about the benefits of the Portals, or add to your business development presentations to help grow your business.


