Creditor Barcode Template Changes for fileSMART Creditor Disbursements in REST Professional
Overview
In previous versions of REST Professional, the fileSMART Creditor Disbursements functionality was not able to cater for scenarios where multiple strata plan Creditors had the same DEFT payment details and also where multiple Creditors such as councils had generic PostBillPay payment details. This meant these invoices had to be processed manually.
Setting up Barcode Creditor Templates and Biller IDs in REST Professional has been improved to cater for:
- Multiple Strata Plan Creditors to be setup with DEFT payment details
- Multiple Creditors to be setup with the Australia Post PostBillPay Generic (APG) payments details
If you are a REST Professional and fileSMART user and are using the fileSMART Workflow features you should take the following steps:
- Read and action the pre-requisites as required
- Setup each of your barcoded invoice Creditors (such as council, strata etc) with a Biller ID and Barcode Template
Pre-requisites
- Training is required to activate fileSMART Creditor Disbursements. Click here or contact Rockend to book today.
- REST Professional v12.0.07 and fileSMART v5.7.2 must be installed to use all of the integration features. Refer to your fileSMART Help Documentation for installation instructions and instructions on the new invoice workflows in fileSMART.
- REST Professional & fileSMART integration must be setup to use this feature. This integration is available from REST Professional version 10.5. Click here for instructions on setting up the integration.
Setting up a Creditor Biller ID and Barcode Template
In order for fileSMART Barcoded Invoice Workflow to create invoices and send the data to REST Professional, the Creditor Barcode Template and Biller ID in REST Professional must be setup for each Creditor. The correct CRN/Reference must also be saved against the Property as a Regular Payment.
To set up a Creditor Biller ID:
- Select Files > Creditors.
- Search for and select the appropriate Creditor.
- Select the Payment tab.
- Select the Save Reference Numbers checkbox.
Note: If Creditor is paid by BPAY this option is automatically selected.
- Load the Creditor and select the Barcode tab.
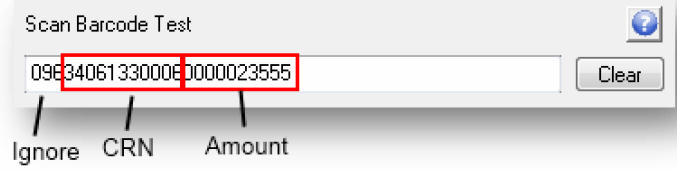
- Place the cursor in the field labelled Scan Barcode Test.
- Scan the Barcode; this can be completed one of two ways:
- Use a Barcode Scanner:
- In REST, scan the barcode of one of the Creditor’s invoices using a hand held barcode scanner. A number displays in the Scan Barcode Test field and the Biller ID is populated.
- Use fileSMART:
- Scan the Invoice into fileSMART.
- Select the Capture Barcode button.
- In REST, place the cursor in the field labelled Scan Barcode Test.
- Right-click and select Paste. The contents of the barcode displays in the Scan Barcode Test field.
- Press Enter on your keyboard. A number displays in the Scan Barcode Test field and the Biller ID is populated.
Note: REST Professional now applies the following additional rules to automatically determine the Biller ID:
- When the first 3 digits of a scanned barcode is 168, the Biller ID now displays as 12 digits. This ID is made up of the DEFT Biller Code (168) and the 9 digit DEFT account code of the Biller.

- When the first 3 digits of a scanned barcode is 083, the Biller ID displays 6 digits. This ID is made up of the Australia Post Generic code 083 and the following 3 digits to uniquely identify the Biller.


When a DEFT barcode is scanned, any additional padding zeros are removed. For a scanned barcode that contains additional padding zeroes in the CRN/Reference, REST will automatically remove these zeroes after the scan is completed or when the Enter key is selected.
For example:
- A barcode scanned as:

- Will present as:

The new CRN/Reference number will now match the BPAY Reference of the Creditor Invoice that has been scanned. This will enable end to end processing of those invoices via fileSMART Workflow.
To set up a Creditor Barcode Template:
- Place the cursor in the Setup Barcode Template field.
- Identify where the CRN/ Reference and Amount of the invoice can be found within the scanned barcode.
- In the Setup Barcode Template field use the legend to define the setup of the barcode as per the following example, entering R for each digit of the CRN, $ for each digit of the Amount, and # for each value that should be ignored.

Tip: All zeroes displayed before the Amount value should be considered part of the amount.
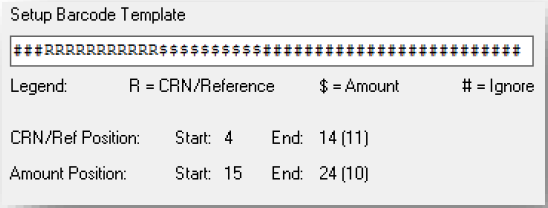
- Confirm the barcode template setup in the Sample Results pane match the CRN/ Reference and the Amount of the invoice you have scanned.

- Select OK to save the Creditor.
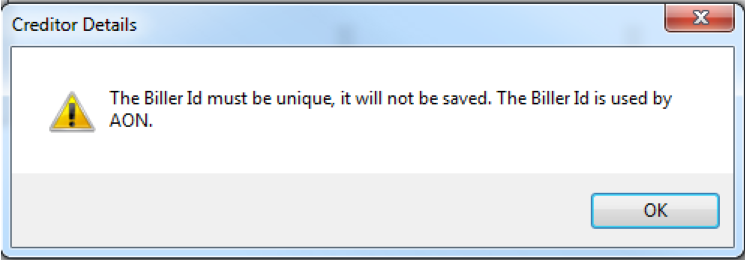
- If the Biller ID is already assigned to another Creditor, the following message displays:

Note: Multiple Creditors configured for DEFT can only be set up if the strata manager has one trust account per strata plan that they manage. If a strata manager uses one ‘pooled or central’ trust account for all the strata plans that they manage, then a REST DEFT Creditor must be set up to process all invoices on the Payment tab of Creditor Details.
- When the Creditor is configured to use DEFT, REST will examine the existing Property Payments and check whether additional zeroes exist in any CRN/References. If existing CRN/Reference numbers need to be updated, a message displays:
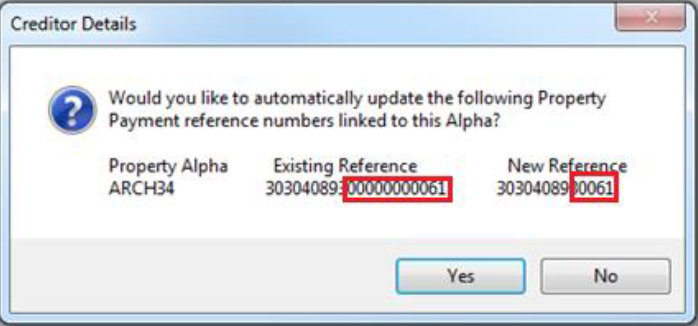
- Select Yes to update existing references with the new reference.
- Select No to leave existing references unchanged.