How to do End of Month with fileSMART PrintMail
Sending your statements to fileSMART
From REST Professional
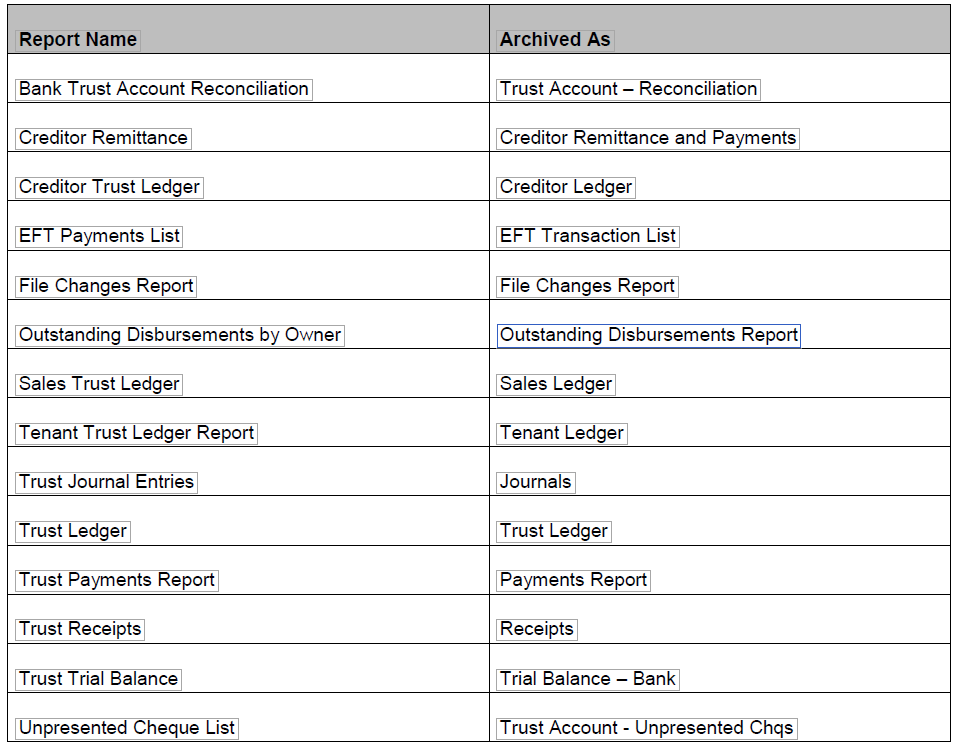
Creditor Remittances can be printed to the fileSMART PrintMail printer and be automatically archived to the individual creditors in the PMAdmin archive folder. A Job Design in fileSMART PrintMail can be created to collate Creditor Remittances for emailing or printing.
Alternatively, you could continue to use REST Professional itself to look after the emailing and the printing of the creditor remittances.
Owner Statements should be printed to the fileSMART PrintMail printer to be automatically archived to the individual owners in the Property Management folder. The default Owner Statement Run is set up to collate the statements once they are archived as Owner Statements (can also be Monthly Statements). If you print cheque-attached statements on pre-printed stationery that has a tear-off cheque at the bottom of the owner statement, print your Owner Statements to the PrintMail Dual Printer.
Please Note:
o Owner Statements must display the text Tax Invoice
o Income and Expenditure Reports must display the text Income and Expenditure Report
o Creditor Remittances must display the text Creditor Remittance
o Tenant Invoices must display the text Tenant Tax Invoice
End of Month Reports can also be printed to the fileSMART PrintMail Printer and will be autoarchived in the PMAdmin folder:
From Console Gateway
Log into Console and start your Statement Run/End-of-Month/Mid-Month procedure on your computer.
- Print the statements from Send Assist to the PrintMail Send Assist printer.
- Click the Preferences button in Send Assist to ensure the PrintMail Send Assist printer is selected.
- If there are any statements listed for emailing in Send Assist, use the Skip button to prevent them being emailed by Send Assist. Emailing is handled by fileSMART PrintMail
NOTE: All owners should have the print option selected for their statements so that they can be sent to fileSMART PrintMail to be printed or emailed.
2.Print any other documents, such as reports and ledgers that you want to keep in the archive system to the fileSMART Archive printer.
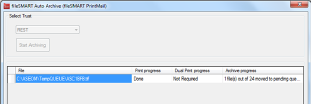
fileSMART Auto Archive
The fileSMART Auto Archive window displays the progress of:
1. Printing in the Print Progress column (this counts the number of pages being produced)
2.The auto-archiving - Archive Progress column (this counts the number of documents being archived. Documents can be more than one page)
- The fileSMART Auto archive function may ask you to log in if this is your first time using it after being installed, or if the auto-archive user is in use on another PC. Please enter valid fileSMART user credentials.
- If you print multiple trusts it is imperative that you print each trust separately and make sure that the fileSMART Auto Archive window is closed in between the two trusts. If it is left open, Auto Archive assumes the second lot of statements etc. belong to the first trust and most will be sent to the pending queue. If there is an identical owner code in both trusts, the second statement will be archived to the first one.
- If you receive the message 1(files) out of (total) moved to the pending queue this means that 1 of your files has not been archived. All the other files have worked correctly. To find the document that was not archived, check the fileSMART username at the bottom left hand corner of the Auto Archive window and log into fileSMART Archive as that user. You will see the file in the Pending Queue.
- If the document is a zero balance statement, you can delete it from the Pending Queue. If the document needs to be sent to an owner, you will need to archive it as the document type Owner Statement with the correct property and owner details and the current date. This will allow it to be collated with the rest of your statements in fileSMART PrintMail.
How to Create Your Collation in PrintMail
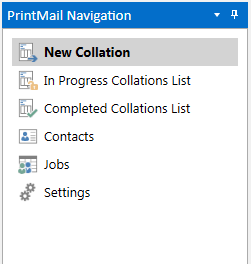
Navigation in PrintMail is via the Menu panel found on the left of the screen:
And a progress bar assists you through your collation process:

The left to right processing steps for a new collation follow each logical step in the process of running and completing a collation job.
Complete the first step of the process and you can move to the next step. You are also able to move back steps if required.
Moving back to Step 2 Select Job will delete a fresh collation. Once you have starting Emailing or Printing you are not able to move back to Step 2 an the collation will need to be deleted by a fileSMART Support Person if necessary.
Start Collation
When you have archived all Owner Statements and any other required documents into fileSMART Archive, follow these steps to collate and send documents to your Owners:
- The Start Collation tab displays a check list of task required for the processing of a collation

- Check the tasks off that you have completed (recommended) or experienced users can check the box at the bottom of the screen.
- Move to the next step. Select the job you require from the drop down list. The default job design for EOM is Owner Statement Run.
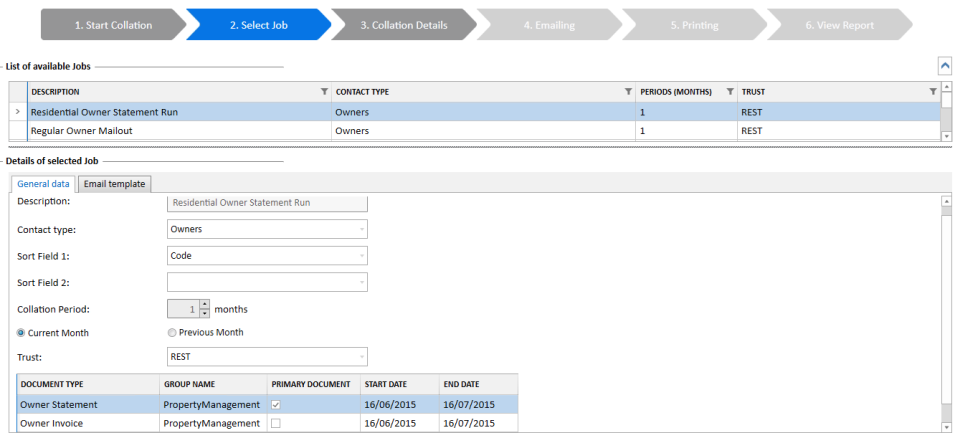
- The documents to be included in the collation display at the bottom of the screen
- The selected jobs’ General data and the Email template can be reviewed
- If you have multiple trust accounts make sure you select the correct job for that trust
- If there are changes required to either the job data or the email template, you can navigate to the Job menu option and make the necessary changes. Changes to the selected job cannot be made on this screen.
- The Select Job step of the collation process also checks to ensure there are no other collations of the same trust and job type. A message displays at the top of the Select Job screen informing you if a collation for the same job type and trust exists. You cannot create another collation until the collation in progress is completed.
- A document will only be collated in an Owner Statement Run if:
- There is an owner statement for the owner
- It is one of the document types in the job list
- The date used when the document was archived – not the date it was archived – is withinthe range of the Start Date and End Date
- It has not been collated previously.
Select Collate Documents Tab
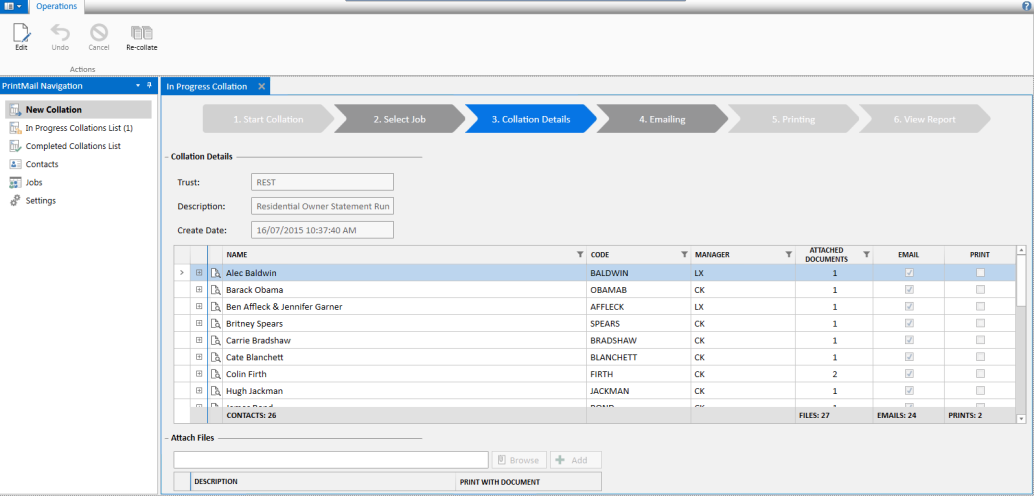
- The Collation screen allows you to:
- Review the recipients of documents in the collation job
- Review the number of documents to be sent
- Review recipients send options - Emailed and/or Printed documents
- Preview the documents collated for each recipient
- Attach files to the collation (follow these instructions)
- Sort & filter by the column headings
- Preview a number of owners to check that the other documents collated are correct. Click the magnifying glass icon next to the owners name to preview.
- Only documents archived as TIFF or PDF will be shown in the preview. Documents archived as Word documents or JPEG won’t show in the preview but will be included as separate attachments in the emails and will be printed.
- As you are checking, if you locate any misfiled documents, take note of the owner code you are currently previewing
- To correct misfiled documents:
- Open fileSMART Archive
- Search for the misfiled documents by Owner Code, Document Type and Date range
- Use the Edit button to correct the Archive Labels of any misfiled documents located
- Minimise fileSMART Archive and return to fileSMART PrintMail
- Click the Recollate button on the Actions tool bar. The documents will be re-collated incorporating any of the corrections you made.
- Edit individual Print and Email selections by hitting the Edit button up the top left and using the tick boxes beside the contacts' names. If you need to change these options permanently, you can do this in the Contact Section.
Select the Emailing tab
- The email screen displays all recipients who will be receiving their documents via email. This screen can also be filtered by the column headings.
- Click the email button on the Actions toolbar to start the email process:

- When the email process has been started, the Pause Operations button becomes available for use.
- As the emails get generated the Contact Status displays Emailed if the sending of the email was successful.
- If you tick the Show Only Not Emailed button on the right hand side, the emails will disappear from the list as they send (recommended).
- The Contact Status displays an error message if the email could not be sent. The error message also advises the reason why the email was unsuccessfully sent.
- Unsent Emails can be dealt with in two ways:
- Input a different email address for that contact and resend. You can do this by clicking on the email error message.
- Print unsent documents using the Print Unsent button. Any unsent documents will be moved to the Printing tab.
Select the Printing tab
- The Printing screen displays all recipients who will be receiving printed documents. This screen can also be filtered by the column headings.
- Click the Print Contacts button on the Actions toolbar to start the printing process:
- When the print process has been started, the Pause Operations button becomes available for use.
- As the documents are printed, the Contact Status displays Printed if successful.
- If you tick the Show Only Not Printed button on the right hand side, the emails will disappear from the list as they print (recommended).
- The Contact Status displays Not Printed if there was an error. The error message also advises the reason why the document was unsuccessful.
Select the View Report tab
- When the collation has been finished the View Report tab becomes available.
- Please note that if you can not click on the View Report tab your collation is not complete. Check your Emailing and Printing tabs to make sure that all your documents have been emailed or printed.
- It is here you can review the statistics of the collation and view the documents that were sent.
- Click the Print Report button to print the report:
