How to Add a New Owner Card in REST Professional
Overview
This document will take you through the steps to create a new Owner Masterfile.
From the owner card you can enquire on owners details and balances including owner payout balances, access the owners’ property, you can also check outstanding disbursements for the owner, as well as print display or email the owner ledger by clicking an icon on the toolbar.
NOTE: From Version 12.5+ there is a “Replicate” button on the Owner card. This function is used when you have an existing owner already set up in REST. To replicate the card, bring up the existing owner details and click the “Replicate-F8”. All the information from this card will be carried over to the new card. It is important that all replicated information is checked thoroughly particular the payment/withheld details.
Steps
- Go to Files > Owner or click on the owner icon

- Click on ADD MODE–F4 ensure the blue “Add Mode” box comes up before you begin entering data, then enter the details for your owner:
- Enter the details on the General Tab:

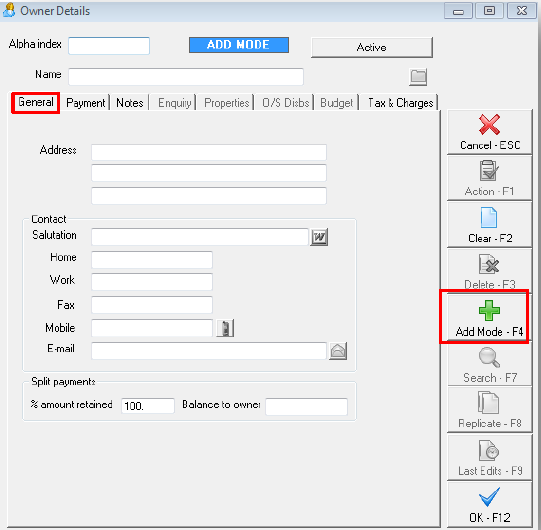
- Alpha index - this can be up to 10 characters of the owner’s surname. This field must start with a letter, not a number, and should not contain any punctuation or embedded blank spaces.
- Name - this can be up to 40 characters and should be entered in the same format that you want them to be printed on the owner statements
- Address - there is space for up to 40 characters on each of the 3 lines to enter the owners address. Any changes made to the name and address is reflected on the File Changes Report.
- Contact Salutation - this field is used for the owner’s salutation.
- Phone Numbers - Enter up to 20 characters for each of Home, Work, Mobile & Fax Numbers.
- E-mail Address - Enter the e-mail address for this owner. If you e-mail statements to this owner, this must contain a valid e-mail address.
- Split payments - The ‘split payment %’ and ‘balance of split owner’ fields are only used if a split payment is required; otherwise leave the default of 100.
- Complete the details on the Payment Tab:

- Payment Method – This will define how the owner is paid. Select the drop down list and select one of the following options:
- Carried Forward – The balance of the owners funds will be held until the payment method is changed. The owner statement will show a narration of “Carried Forward” to show the funds have not been paid out.
- Comments: Any payment information that was previously setup i.e. banking details will remain here whilst the payment method is set to carried forward. You may like to setup additional information here as to why the payment method is set to carried forward. This will print on the Owner Detail Report.
- Cheque – Select this option if you wish to produce a cheque made payable to the Payee name. The owners statement will show a narration of “Cheque herewith”
- Payee Name & Address: The payee details will print on the cheque. Press enter on the blank payee name and the owner name & address will be populated as a default.
- Manual Bank Deposit – This is not often used and will enable a cheque to be written with the account name. The owner statement will show a narration of “Deposit to your bank account”
- Deposit Account Name: enter the payee account name or press enter on the blank field and the owner name will populate.
- Account Number: Enter the owner’s bank account number. This must be no longer than 9 digits and must be numbers only with no spaces, hyphens or alpha’s.
- Account Suffix (New Zealand only): New Zealander users only, enter the account suffix.
- BSB Number: Enter the owner’s BSB. The Australian users, the BSB must be entered as 3 digits, a dash and another three digits e.g. 018-062. For New Zealand users the BSB is entered as two digits, a dash and four digits e.g. 42-1234.
- Comments: Enter up to 40 characters of any comments you may want to record e.g. the bank name and branch.
- Auto Bank Deposit – this option will allow the payment of the owner electronically. The owners statement will show “Funds transferred to your Bank Account”
- Deposit Account Name: enter the payee account name or press enter on the blank field and the owner name will populate.
- Account Number: Enter the owner’s bank account number. This must be no longer than 9 digits and must be numbers only with no spaces or hyphens. - Account Suffix (New Zealand only): New Zealander users only, enter the account suffix.
- BSB Number: Enter the owner’s BSB. The Australian users, the BSB must be entered as 3 digits, a dash and another three digits e.g. 018-062. For New Zealand users the BSB is entered as two digits, a dash and four digits e.g. 42-1234.
- Comments: Enter up to 40 characters of any comments you may want to record e.g. the bank name and branch.
- Carried Forward – The balance of the owners funds will be held until the payment method is changed. The owner statement will show a narration of “Carried Forward” to show the funds have not been paid out.
- Flat Payment Amount – Enter an amount that you wish to pay the owner every payment run or as a one off. This amount will be paid to the owners and any balance will be carried forward to the next month or payment run. The flat payment amount remains on the owner details until removed.
Note: If you add a flat payment amount for an owner who already has a Withhold Funds amount entered the Withhold funds will override the Flat Payment amount setting. You must only have one or the other set against an owner at any one time. - Withhold Funds Amount – Enter the amount that you wish to withhold from the owner. This amount will be carried forward to the following month and any balance paid out to the owner. This amount is not cleared automatically and will need to be cleared after you have completed the payment.
Note: If you add a withhold funds amount for an owner who already has a Flat Payment Amount the Withhold Funds will override the Flat Payment amount setting. You must only have one or the other set against an owner at any one time. - Withhold Funds Comment - Enter a comment that will appear on the owner’s statement and the Owner Withheld Funds Report to explain why the funds have been withheld.
- Permanent - If this option is not ticked, REST will remove the comment and amount when your next Files Update is run at the end of the month. Otherwise the comment and amount will be kept until you remove it.
- Groups – This field is used to place your owners into groups. All reports and statements may be printed for all owners or a group e.g. you may have a group of owners that require mid-month statements. Enter group ‘M’ for these owners and then run statements, cheques and auto deposits for group ‘M’ only. Suggested groups are:
- Group A – Owners will default to this group which is ALL owners that are not grouped otherwise. (i.e. this group excludes any other groups created)
- Group M for Owners paid out at mid month or anytime during the month other then end of month
- Group I for Internal Accounts. Group I may only be used to pay out internal accounts (i.e. management fees, letting fees etc.)
- Statement Style – Enter the statement format you wish to choose for this owner. Some statement samples are available in your REST Word folder to preview. NOTE: When you enter a new owner, the style will default to the default style set in Company Details, but can be changed. You may set different styles for individual owners. If you would like to see each statement type, you may change the statement format for one owner and preview statement for that owner.
- Number of Statements – Enter the number of copies you would like REST to produce when you are printing the owner statements. NOTE: if you are using fileSMART, the number of copies will not feed through to fileSMART and you will need to enter this information into fileSMART separately.
- Send Statement by E-mail – You will see this checkbox on the screen if you have set the global option that enables you to send owner statements by e-mail. If this box is checked, when you run the owner statements and tick the e-mail checkbox on the Statement Print form, the owner will receive a statement via e-mail. You must have a valid e-mail address in the General Tab and be using Microsoft Outlook or a valid SMTP. To setup e-mail statements and to choose the format required, go to Other > Utilities > System Options > Statement Tab.
- Additional Address Details – if you have selected more than one statement to be printed in the “Number of Statements” field, clicking on the ‘Modify’ button will allow you to enter the name and postal or e-mail address you would like the additional statements to go to. Up to three additional addresses may be entered to be printed or e-mailed. If the additional statements are being emailed, you don’t need to enter the address, just the name and the e-mail are required. If you chose more than three additional statements, the owner address will be used on the fourth and subsequent statements. NOTE: if fileSMART is used this will not be applicable and will need to be set up in fileSMART

- Complete the details on the Notes Tab:
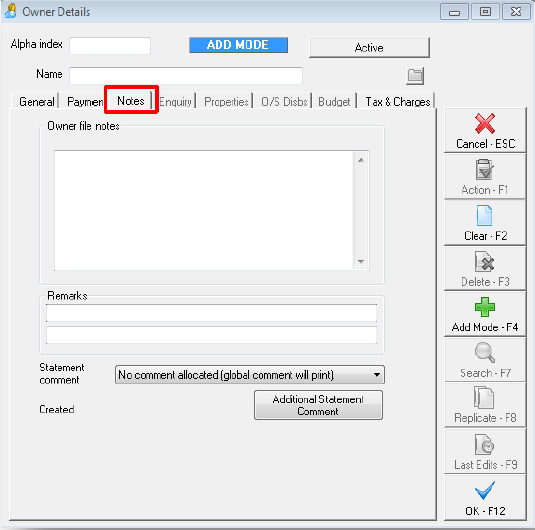
- Owner Payment Notes – Enter any notes you want to keep about the owner.
- Remarks line 1 & 2 – These fields can be used for any important notes for an owner e.g. “Owner does own maintenance”. You may choose to have these remarks “pop up” when you open the owner card. This can be setup by going to Other > Utilities > System Options and tick/untick the checkbox in the Owner Defaults section.
- Statement Comment – Select a statement comment if required. These can be setup in Files > Descriptors and Comments > Master File and Transaction Comments > Owner Statement and add in comments. This will be cleared after Files Update for this owner only.
- Created – This will display the date and time the owner card was created after you create it.
- Additional Statement Comment – Enter up to 400 characters that will be printed on the bottom of the owner statement when “Print Comment” is selected at time of printing statements. This will appear on the owner statement that the additional statement comment was added to, along with any global comments. The comment will be deleted with Files Update is run at the end of the month for this owner only.
- Enquiry Tab - This tab will be greyed out, and will display the current balances for the owners account once you have entered transactions for the property. There is nothing to complete on the enquiry tab.
- Property Tab - This tab will be greyed out, and will display a list of the owner’s active properties once the property is connected to the owner card. There is nothing to complete on the Property Tab.
- Outstanding Disbursements Tab - This tab will be greyed out until an outstanding disbursement is entered against the property. There is nothing to complete on the Outstanding Disbursements Tab
- Budget Tab - Budgets are only available with the Advanced Commercial Module. Only complete this if it is applicable.
- Complete the details on the Taxes and Charges Tab:
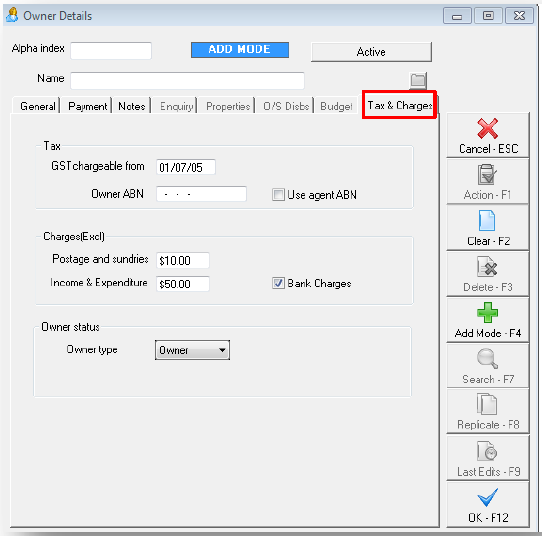
- GST Chargeable from – This is the date that REST will start charging the Owner GST on Owner fees. The date will default to 01/07/05
- Owner ABN - If the property is a commercial property and is registered for GST, enter the ABN here. The ABN will be printed on the Tenant Invoice and the Tenant Receipt when any GST is collected.
- Use Agent ABN - If this box is checked, the Agent ABN will be used instead of the owner ABN on Tax Invoices.
- Postage & Sundries – This amount will be pre-filled depending on the amount you have set in your Company Details, but can be changed for an individual owner if required. The amount is GST exclusive and will be charged each time the owner cheque printing process is run.
- Income & Expenditure Charge – This amount will be pre-filled depending on the amount you have set in your Company Details, but can be changed for an individual owner if required. The amount is GST exclusive and will be charged when you process Owner One off charge. This is generally the fee the agent will charge for providing the owner with an Income & Expenditure Report.
- Bank Charges (Y/N) – Tick this box if you want to recover Bank Charges on receipts. The tax and bank charges are calculated using the rates which are entered into Company Details.
- Owner Type (Owner/Internal) – This will default to Owner so it can be left as Owner unless you are setting up an Internal Account, if this is the case refer to document “How to Create an Internal Owner Account in REST”.