How to Setup a Commercial Tenancy in Rest Professional
Overview
You have the ability to setup a commercial tenancy in Rest Professional. This will give you the option to charge GST on the rent and/or outgoings.
This document will cover:
Setting up the Property Card
Setting up the Tenant card
Setting up the Property Card
Go to Files > Property
Click on Add Mode-F4
Enter the required property information
Class – from the drop down menu, select Commercial. Once you change the class to commercial, you will note that the previously greyed out commercial tab can now be populated
Commercial tab - Enter the details as required:
- Building - Enter the alpha code of the building and press enter to populate the field. If the Building is unknown, you can press enter and search through the list of buildings.
NOTE: Buildings need to be set up prior to this step by going to Files > Building (see document "How to Setup Buildings in REST Professional"
- Building area used in % - Enter the percentage of the building used by this property
- Floor number – Enter the building floor number for this property.
- Shop/Suite – Enter the shop or suite number. This is used in the Commercial Statement or Income report, Commercial Tenancy Schedule and the Critical Information report.
- CPI rent increase – Tick this box if the lease agreement allows for a rent increase according to CPI (Consumer Price Index)
- Non CPI increase % - If you left the above unticked, enter the percentage rate by which the rent will increase
- Option term – Enter the term of the lease option e.g. 2 years.
- Option review – Enter the type of rental review for the lease option e.g. market, stepped etc
- Floor Area sq metres & sq feet – Enter the dimensions as required
- Price per sq. metres & feet $ - This will be automatically calculated for you.
- Complete all other tabs of the Property card. For more in depth information, please see document "How to Add a New Property Card in REST Professional"
- Click OK-F12

Setting up the Tenant Card
Go to Files > Tenant
Click on Add Mode-F4
Enter the details on the General Tab. For further information please see document "How to Add a New Tenant Card in Rest Professional"
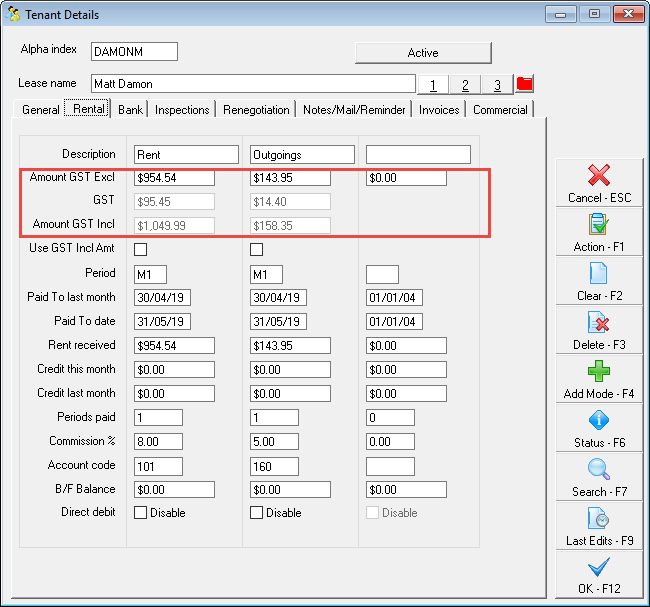
- Enter the details on the Rental tab.You can use the 2nd and 3rd columns on this tab to charge outgoings, management fees, car parking or any outgoings field required using the relevant account codes
NOTE: You will note there is a tick box to Use GST incl amount. If left unselected, this will add the GST component on top of the base rental amount. If selected, it will use the GST inclusive amount to generate the rent amount. This is generally used where rounding has been used to calculate the amount payable by the tenant. For more information please see document "GST Inclusive rent for Commercial Tenants"
If you have the Advanced Commercial Module and you wish to use statement style 9, 12 or 13, the tenants belonging to the owner must have an opening balance created and entered in Rest Professional. Arrears or credits must be entered in the .B/Fwd balance on the Rental Tab. For more information please see document "How to Setup Tenant Bought Forward Balances in Rest Professional"
Enter the details on the Bank Tab.For further information please see document "How to Add a New Tenant Card in Rest Professional"
Enter the details on the Inspection tab.For further information please see document above
Enter the details on the Renegotiation tab.For further information please see document above
Enter the details on the Notes/Mail/Reminder tab.For further information please see document above
Enter the details on the Invoices Tab.For further information please see document above
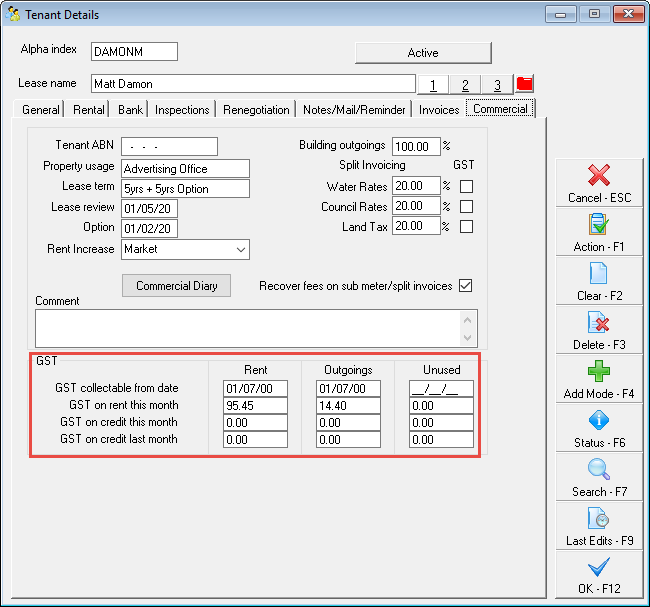
Enter the details on the Commercial tab:
- Tenant ABN – If the tenants ABN is entered here, it will be displayed on all tenant rent receipts & invoices
- Property usage – Enter the usage of this property e.g. Retail, industrial etc.
- Lease term – Enter the term or length of lease e.g. 5 years
- Lease Review & Option Date – these dates may be entered from the information on the Lease Agreement and are used to produce the Lease Expiry/review Report
- Rent Increase – Select from the drop down list the method of increase to be used e.g. CPI, market, stepped or none.
NOTE: All of the above information is shown in the Building Tenancy Schedule.
- Building outgoings % - Enter the percentage of the building outgoings that this tenant pays.
- Split Invoicing – Invoices for building expenses such as water rates, council rates etc. may be entered against an owner and then split between all the tenants in properties attached to that owner. For more information see document "How to Setup Split Invoicing in REST Professional"
- Recover fees on sub meter/split invoices – select this box if you wish to automatically recover the management fee charged to the owner, from the tenant. For more information see document "How to Setup Split Invoicing in REST Professional"
NOTE: REST charges the owner the management fee and only recovers it from the tenant if you check this option.
Comment – The first line of these is printed on the Building Tenancy Schedule, the second line is printed on the Critical Information report. Both lines are printed on the Tenancy Schedule
GST Collectable from date – If the owner is registered for GST, GST is charged on commercial rent and outgoings from this date entered into this field, and is generally set to the Lease commencement date.
- Click OK-F12