Owner and Tenant Portals with Rest Communicator
Overview
Rest Communicator delivers the ability to offer branded and customisable Owner & Tenant Portals via the internet to your client base. Owner and Tenant Portals with Rest Communicator allow you to differentiate your service at no additional cost.
Owners are provided with the ability to:
|
|
|
|
|
|
|
|
|
|
|
|
|
|
|
Tenants are provided with the ability to:
|
|
|
|
|
|
|
Note: * indicates the feature is optional on your Portals.
You must complete the installation of Rest Communicator using the Installation Guide before using this guide to setup Owner and Tenant Portals.
Rest Communicator Configuration
The Rest Communicator Configuration screen allows you to configure and customise access to your Owner & Tenant Portals. There are four steps; Activation, Branding, Customisation and Logins. The Rest Communicator Configuration screen can be accessed from any workstation with Rest Professional installed. Each time the configuration screen is used, Rest Professional checks for updates via the internet. If a newer version is found you are prompted and the installation will launch automatically.
The Rest Communicator Configuration Tool can only be used by a user with the highest Rest Professional security level (Statistics/Company Details/Passwords & Above) and you will need to be at the server where Rest Professional is installed to in order to apply any changes.
Activation
- Select Other > Utilities > Communicator Configuration Tool. The Rest Communicator Configuration Tool home page is displayed.
- Click Owner & Tenant Portals. The Owner & Tenant Portal Activation page displays your Rest Professional databases.
- Check the Active checkbox against your Rest Professional database.
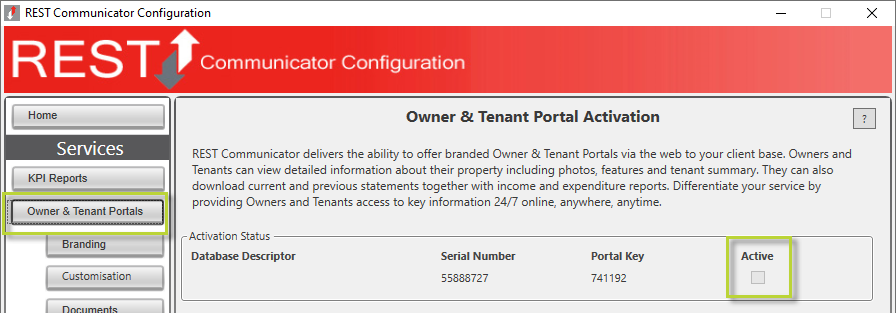
- Click Save Changes.
Branding
The branding section in the Rest Communicator Configuration screen allows you to customise your portal web page with your agency’s branding to provide a seamless transition from your agency website to your Owner and Tenant Portals.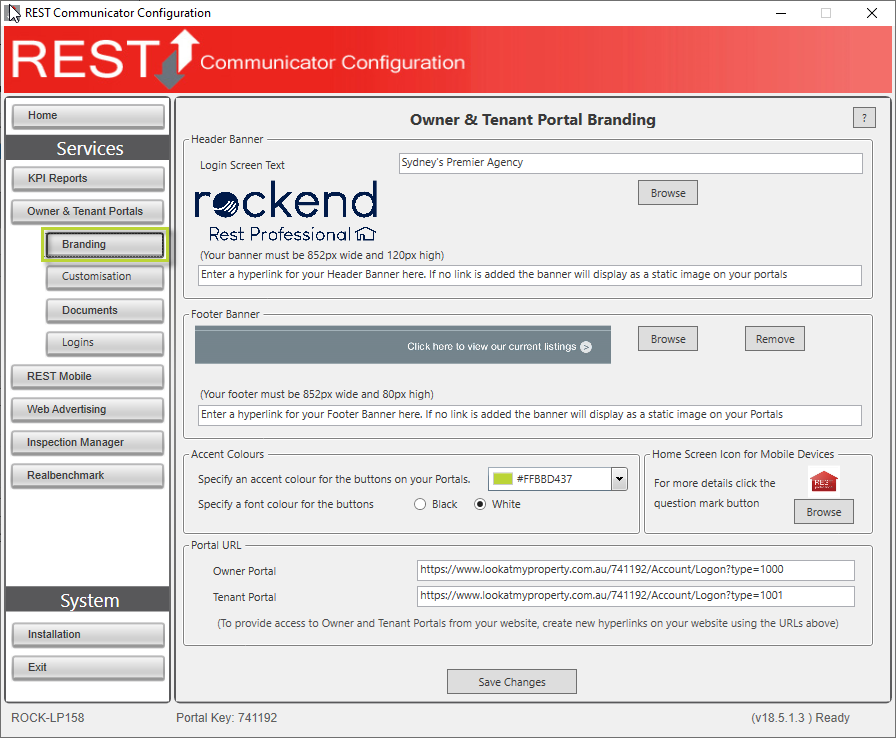
To access the branding page:
- Click Branding, the Owner & Tenant Portal Setup page displays.
Banners & Login Screen Text
The Header and Banner display on all pages of the portal, so ensure you take the time get them right. The Login Screen text displays underneath the Header Banner on your Owner and Tenant Portals and can be used to display a slogan or agency tagline.
To edit the Login Screen Text:
- Click in the Login Screen Text field, and remove the default text.
- Enter the text you would like to display underneath your banner on your Owner & Tenant Portal web page.
To set your Custom Header Banner:
- Create your banner with the following specifications:
Height: 120 pixels
Width: 852 pixels
File Format: JPEG, PNG or GIF
File Size: Recommended size is 100KB, not exceeding 900KB
- Click the Browse button.
- Browse for and select your header banner file.
- Click Open, your selected header banner displays in the branding section.
- Enter a Hyperlink that can be accessed when your banner is clicked; for example you could enter you website URL so when users click the banner they are taken back to your website.
- Click Save Changes.
To set your Custom Footer Banner:
- Create your banner with the following specifications:
Height: 80 pixels
Width: 852 pixels
File Format: JPEG, PNG or GIF
File Size: Recommended size is 100KB, not exceeding 900KB
- Click the Browse button.
- Browse for and select your footer banner file.
- Click Open. Your selected footer banner displays in the branding section.
- Enter a Hyperlink that can be accessed when your banner is clicked, for example your footer banner could be an advertisement of your properties for sale, with a hyperlink to your agency’s For Sale listings.
- Click Save Changes.
Accent Colours
The accent colours section allows you to set a custom colour for all buttons displayed on your portals.
To set Button Accent Colours:
- Select a colour for your website buttons from the drop down list.
- Select Black or White for the colour of the text on your website buttons.
- Click Save Changes.
Home Screen Icon for Mobile Devices
The Home Screen icon for mobile devices allows you to specify an image that displays on your clients mobile devices when they add a link to your Owner or Tenant Portals.
To set your Home Screen Icon:
- Create your icon with the following specifications:
Height: 128 pixels
Width: 128 pixels
File Format: JPEG or PNG
File Size: Not exceeding 100KB
- Click the Browse button
- Browse for and select your home screen icon file
- Click Open. Your selected home screen icon displays.
Portal URL
The Portal URL section displays the URLs / internet addresses that need to be used to access the Owner and Tenant Portals.
To integrate the portals onto your own web page, copy the addresses and paste them as links into your web site. Alternatively you can issue these addresses directly to your owners and tenants to give them access to your branded portals.
You will also require your Portal URL addresses when notifying your Owners and Tenants that they can view their property details online.
Customisation
The Customisation page allows you to specify the information and reports that will be available to your owners and tenants. Each option has a brief description of where the information is obtained from your Rest Professional database.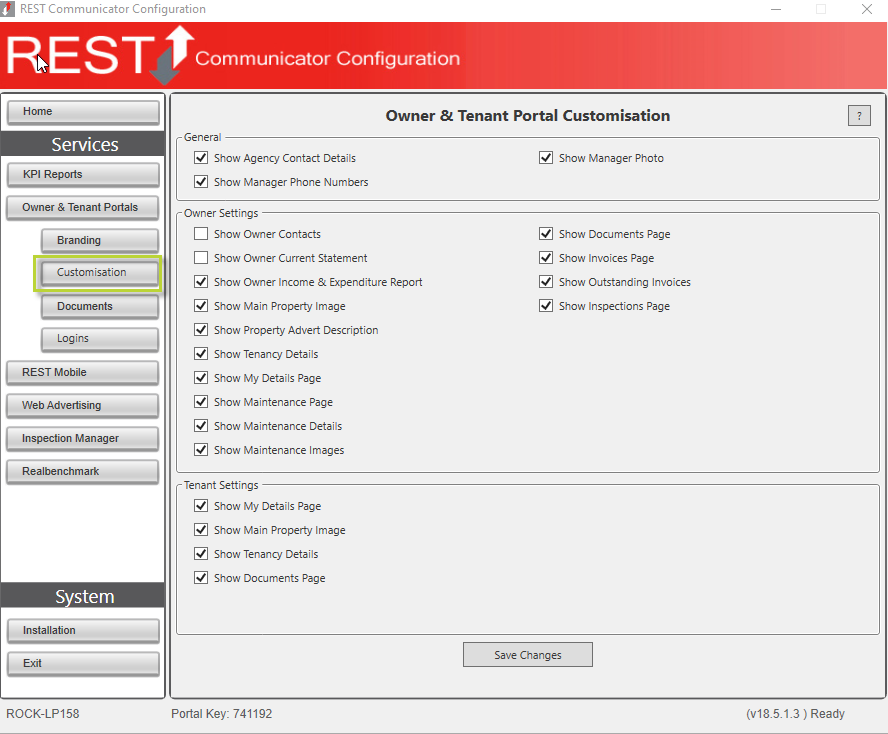
To customise your owner and tenant portals:
- Click Customisation, the Portals Customisation page is displayed.
- Check the options you would like to make available to your owners and tenants.
General Settings
General Settings affect your Owner and Tenant Portals.
- Show Agency Contact Details creates a Contact link on your Owner and Tenant Portals that displays your Agency’s Details from Company Details in Rest Professional.
- Show Property Manager Phone Numbers displays property managers Direct Phone and Mobile numbers from Files > User / Password in Rest Professional.
- Show Manager Photo displays the property manager photo from Files > User / Password in Rest Professional.
Owner Settings
Owner Settings affect only your Owner Portal.
- Show Owner Current Statement provides the Owners Current period Statement for download on the Reports Page
- Show Owner Income & Expenditure Report provides the Owners Current and Previous Year Financial Statement on the Reports Page
- Show Main Property Image displays the main photo from each of the owner’s properties on the Portfolio page.
- Show Property Advert Description displays the advert heading and description from each of the owner’s properties in Rest Professional, on the Portfolio page.
- Show Tenancy Details displays Tenancy Information for the Tenant. Details include, Lease Name, Rent Amount & Period, Paid to Date, Last Paid Date, Original Lease Date, Lease Start and End Dates, and Vacate date.
- Show My Details Page displays the Owner’s address, email and contact numbers from Owner Details in Rest Professional.
- Show Maintenance Page displays a summary of Current and Finalised Maintenance Jobs for the Owners Properties including the Date, Status, Job Summary, Property Alpha and Job Number.
- Show Maintenance Details displays detailed information of Current and Finalised Maintenance Jobs, including Property Address, Job Summary & Description, Creditor Name, Amount Quoted & Invoiced, Invoice Description & Number, Job Status, Job Number, Job Manager, Reported By, and Created Date.
- Show Maintenance Images displays Job images. Available when Show Maintenance Details is selected.
- Show Documents Page displays documents that are selected to Show on Portals for Owners in File Smart (available with File Smart enhanced integration).
- Show Invoices Page displays processed Creditor Disbursements details, including the Date, Creditor, Description, Property and Amount. Disbursements where the funds have been debited from the owner’s ledger.
- Show Outstanding Invoices displays Outstanding Creditor Disbursements details, including the Date, Creditor, Description, Property and Amount. Disbursements that have been posted to the owner’s account but not yet debited.
- Show Inspections Page displays inspections history. If you are using the advanced integration with File Smart you can configure inspection reports to be displayed as a part of the Documents on Portals. Further information is below in the article.
Tenant Settings
Tenant Settings affect only your Tenant Portal.
- Show My Details Page displays Tenancy Information including Lease Name, Property and Mailing addresses, Primary Contacts name, email and contact numbers, and all tenant contacts’ names and contact types from Tenant Details in Rest Professional.
- Show Main Property Image displays the main photo for the tenant’s property on the Property page.
- Show Tenancy Details displays the tenant’s Tenancy Information on the Property Page. Details include, Lease Name, Rent Amount & Period, Paid to Date, Inhand Amount, Invoices Outstanding Amount, Last Paid Date and Amount, Bond Collected, Bond Number, Lease Start and End Dates and Vacate date.
- Show Documents Page displays documents that are selected to “Show on Portals” for Tenants in File Smart (available with File Smart enhanced integration)
- Click Save Changes, to save your portal customisations.
Setting up Owner and Tenant Access to the Portal
The first step in allowing your owners and tenants access to the portal is importing their details from Rest Professional into the Rest Communicator server using the Rest Communicator Configuration screen; this is a one-off task. New owners and tenants added to Rest Professional are imported overnight. Manual updates to passwords in the configuration tool are immediate.
Importing Owners and Tenants from Rest
When your Owners and Tenants are imported their alpha indexes are imported as their usernames and passwords are automatically generated.
- In Rest Professional select Other > Utilities > Communicator Configuration Tool.
- Click Logins; the Owner and Tenant Login details page displays.
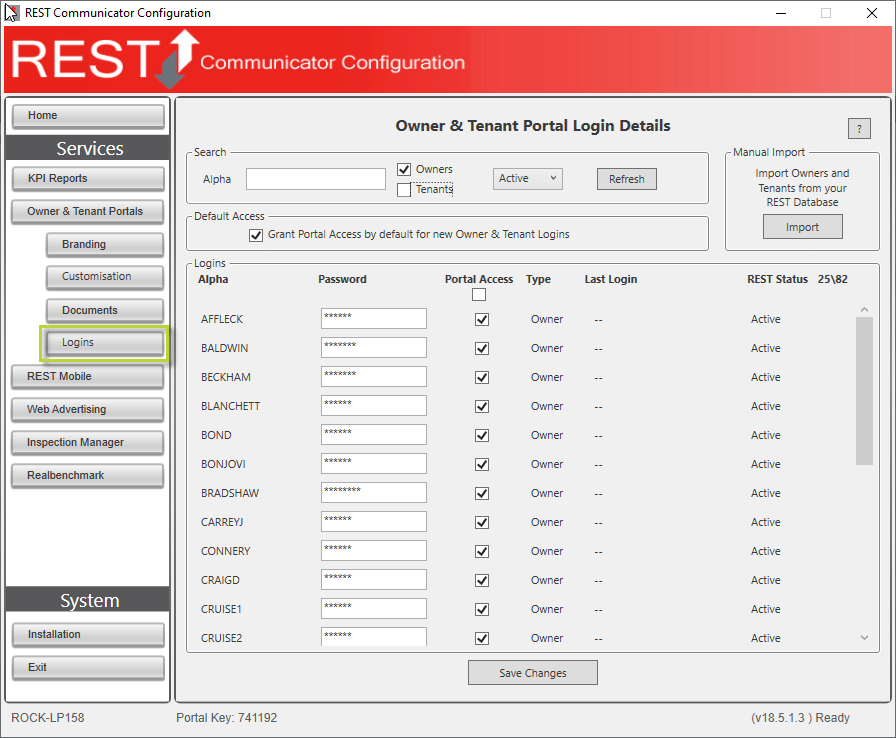
- Check Grant Portal Access by default for new Owner & Tenant Logins and click Save Changes if you would like all of your owners and tenants to be given access to their portal.
- Click Import in the Manual Import section. A summary of Owner and Tenants to import displays.
- Click Import.
- Click Logins to view your list of Owners and Tenants
The import process may take several minutes depending on the speed of your internet connection. A notification is displayed when the import is complete.
Adding New Owners and Tenants to the Portals
New owners and tenants added to Rest Professional will have login details added to Owner & Tenant Portals overnight. Should they require access sooner you can import their details manually. To manually import Owner or Tenant Details:
- In Rest Professional, select Other > Utilities > Communicator Configuration Tool.
- Click Logins; the Owner and Tenant Login Details page is displayed.
- Click Import from the Manual Import section. A summary of Owner and Tenants to import is displayed.
- Click Import.
- Click Logins to view your list of Owners and Tenants
Managing Owner and Tenant Access to the Portals
The Rest Communicator Configuration screen allows you to manage access to the Owner and Tenant Portal website for individual owners and tenants.
Owners and tenants gain access to the portal using their alpha code as stored in Rest Professional as well as a unique password.
Owners and Tenants can manage their own passwords after the first time they log into the Portal website. Owners and Tenants who forget their password will be able to request a new password on the Portal. An email will be sent to them with a one time temporary password, whereby they will then be redirected to the reset password screen to set their new password.
Note: You will not be able to view or edit Owner and Tenant Passwords in Rest Communicator. Password updates or resets must be done by the Owner or Tenant through the Portal.
Important: The email address that is used to send all contacts reset password emails is 'notifications@lookatmyproperty.com.au' this email could be seen as spam for your contacts, if they try and reset their passwords and do not receive any emails, it is very likely because the email either gets blocked or goes into your contacts junk folders. They must add this email address to their mail safe senders list so that their mail will accept and receive any emails trying to be delivered from this email.
To view Owner and Tenant login details in the Rest Communicator Configuration screen:
- Select Other > Utilities > Communicator Configuration Tool
- Click Logins; the Owner and Tenant Login Details page displays.
- Use the Search section to search for specific Owners and Tenants using their Rest Professional alpha. You can filter to view only Owners or Tenants and Active and Inactive logins or show all logins.
- Each Owner and Tenant’s Alpha, Portal Access Status, Record Type, Last Login Date and Time and Rest Professional status is displayed.
- To remove an Owner or Tenant’s access to the portal, uncheck Portal Access against their login details. Owner and Tenant default access is set using the checkbox Grant Portal Access by default for new owner & tenant logins.
- Click Save Changes to keep changes made.
Inactive Owners and Tenants
Marking an owner or tenant as Inactive or Archived in Rest Professional will not remove their access to Owner and Tenant Portals. Should you wish remove their access, you will need to load the Rest Communicator Configuration screen in Rest Professional and uncheck their access.
- Select Other > Utilities > Communicator Configuration Tool
- Click Logins
- Use the Search section to find the inactive records
- Uncheck Portal Access against the appropriate record
- Click Save Changes
Display File Smart Documents on your Owner and Tenant Portals
The Enhanced Integration between Rest Professional and File Smart now allows you to publish you File Smart files to your Owner and Tenant Portals. This feature is only available if you have Rest Professional v10.5 and File Smart v4.7 enhanced integration activated, click here for detailed notes on setting up and using Enhanced Integration between Rest Professional and File Smart .
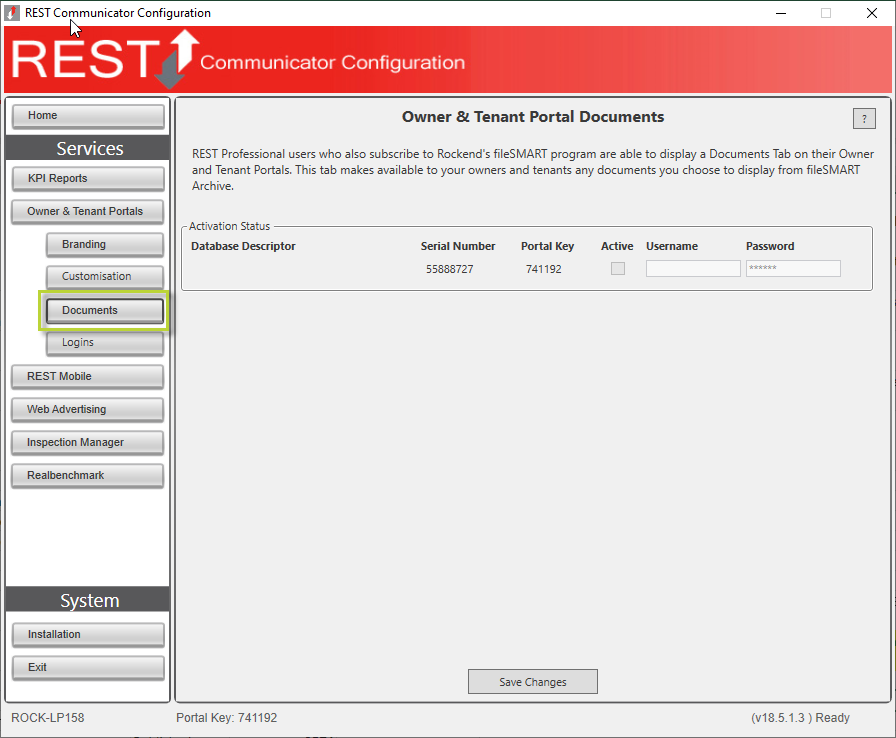
Activate Documents on Portals
To activate Documents on Portals:
- Click the Documents button, the Documents on Portal Activation page is displayed.
- Select the Active checkbox against your Rest Professional database.
- Enter the File Smart username and password created for RESTPortal.
- Click Save Changes.
Display Documents Tab on Owner and Tenant Portals
You can choose to display the Documents tab on the Owner and or Tenant Portal. Documents you have selected to Show on Portals in File Smart or when merging from Rest Professional are displayed on the Documents tab
To show Documents for Owners:
- Click the Customisation button, the Portals Customisation page displays.
- In Owner Settings, select the Show Documents Page checkbox.
- Click Save Changes.
To show Documents for Tenants:
- Click the Customisation button, the Portals Customisation page displays.
- In Tenant Settings, select the Show Documents Page checkbox.
- Click Save Changes.
NOTE: Split Owners must be given the same login and password as the Primary Owner. They cannot be given individual logins and passwords as the documents are associated with the Primary Owner, therefore requiring the same login to access these documents.
Notify your Owners and Tenants that they can view their property details online
Now that your owners and tenants are set up in Rest Communicator with usernames and passwords you are ready to send a communication to inform them of the new service you are providing. Rest Professional mail merge letter and email templates have been included in Rest Professional for both owners and tenants.
You will need to customise these letters with your Portal URL Owner and Tenant addresses from Rest Communicator Configuration. The Rest Professional mail merge templates can be found in your Rest Word folder named:
- Communicator Portal_Owner_Letter.doc
- Communicator Portal_Owner_Email.doc
- Communicator Portal_Tenant_Letter.doc
- Communicator Portal_Tenant_Email.doc
For more information, click the links below to view other articles about Communicator: