How to Add a New Tenant Card in Rest Professional
Overview
This document will take you through the steps to create a new Tenant Master File.
From the Tenant card you can Add, modify, archive or delete tenants, record the contact details for all tenants on the lease, enter vacate dates, rent renegotiation detail and inspection details. You can view the tenant status screen; access the tenant's property and owner directly from the card. You can also Print, display or e-mail the tenant ledger by clicking on the printer icon on the Rest toolbar.
This document will cover the following:
- Add a new Tenant
- General Tab
- Rental Tab
- Bank Tab
- Inspection Tab
- Renegotiation Tab
- Notes/Mail/Reminder Tab
- Invoices Tab
- Commercial Tab
Add a new Tenant
- To create a Tenant Card, you must firstly have an Owner and Property card to attach the tenant card
- Go to Files > Tenant or click on the tenant icon

- Click on Add Mode-F4 ensure the blue “Add Mode” box comes up before you begin entering data

General Tab

- Alpha Index - This can be up to 10 characters of the tenant’s name. This field must start with a letter, not a number, and should not contain any punctuation or embedded blank spaces
- Lease Name – Enter up to 100 characters for the lease name. If the lease name is too long to fit on the owner statements and reports, you can enter the shortened name in the ‘Short Name’ field below
- Property – Enter the alpha index for the property for this tenant and press Enter to link the property to this tenant. If the alpha code is not unique, the Owner Alpha Lookup screen displays the owners that match the entered Alpha. Double click on the required owner to select
- Name - Enter up to 40 characters for the contact name.
- Add Contact - If there is more than one contact on the lease, you can enter the contact details for all the tenants by clicking on the ‘Add Contact’ button and filling out the details for additional tenants. To view the details of the additional contacts, you can drop down the list and select the additional tenants
- Remove Contact - Select this if you wish to remove one of the contacts from the tenancy once the card has already been created
- Salutation - Enter up to 30 characters of the tenant’s name. This is the name that will display on the tenants letters after the greeting.
- Date of Birth – Enter the contacts date of birth. Will be sent to the configured Moving Services provider, Direct Connect or On the Move.
- When the Moving Services provider has been configured in Company Details, utility connection requests can be sent directly to Direct Connect
 or On the Move
  from the Tenant Detail screen. Visit www.rockend.com.au/directconnect or www.rockend.com.au/onthemove for more details.
 - Phone Numbers – Enter up to 20 characters for each of the home, work, mobile and fax numbers. It is recommended that there is no spaces between the numbers and only one number in each field
- Email Address – Enter the contacts email address. It is recommended that only one email be entered in this field.
- Consented to the electronic service of notices - there is a drop-down box to select Not Recorded (default)Yes and No
- A valid email address must be saved before a tenant’s status can be changed to Yes.
- The email address must match the tenant’s nominated email address as per the signed consent form.
- When the Electronic Consent System Option is enabled:
- When selecting the Email icon next to the tenant’s nominated email address the email function will only be available for tenants who have consented to the electronic service of notices.
- When the tenant has not consented, a prompt will display, and the email screen will not load.
- View the article or video - Consent for Electronic Service of Notices and Documents
- Contact Type – The contact type controls which contacts are used for different functions in Rest. You do not have to flag any contacts on Accounts, Lease or Repairs because the primary contact will be used if the particular type does not exist.
- Primary Contact – One of the contacts must be selected as the primary contact. The details for this contact will always be displayed first when you enquire on a tenant. The primary contact will be used if there are no contacts entered as accounts, lease or repairs.
- Lease Contact – Only one contact can be selected as the lease contact. This contact is used when merging lease expiry information. If there is no lease contact, the primary contact will be used.
- Accounts Contact – Only one contact can be selected as the accounts contact. This contact is used for reporting and merging arrears information. Tenant receipts and invoices will be emailed to the accounts contact if it exists, otherwise it will be sent to the primary contact.
- Repairs Contact – The repairs contact if used as a default contact when entering property maintenance jobs but all the contacts will be displayed. Multiple contacts may be setup as the repairs contact. If there is no repairs contact, the primary contact will be used as the default.
- Short Name – The short lease name is printed on the owner statements and other reports where there is insufficient space to fit the whole lease name. This will be created automatically from the first 40 characters of the lease name, but can be amended if required.
- Original Lease Date – Enter start date of the first agreement signed by the tenant. The original lease start date should record the start of the tenancy and the Lease start date should be used to record the start of a new agreement executed. You may print a list of new added tenants in a month by running the Tenant Lease Dates Report
- Lease Start Date – Enter the start date for the lease. When entering a new tenant, this date will be the same date as the original lease date, for renewals this will be the date of the new lease
- Lease Expiry Date – Enter the expiry date of the lease. This date is used to produce the Tenant Lease Expiry Report and Lease Expiry letters in Mail Merge.
- Periodic Lease Date - From version 19, you are able to record the date the owner and tenant have either consented to a periodic lease or the fixed term lease expires and is now a periodic tenancy. The date recommended to be entered here, will usually be the lease expiry of the fixed term tenancy.
- Vacating Date – When a tenant gives notice, enter the vacating date here. The Property Vacancy report uses this date to produce a list of vacant/vacating properties. You may also use this date to send a vacating letter in mail merge. Rest uses this date to calculate the arrears to vacate amount. See Tenant Status for details.
- Termination Date – Enter the date a termination notice has been issued; this date is recorded in the tenant ledger and may be used as a merge field in mail merge. Rest does not treat this date as a vacating date
- Lease Break Date - The lease break date can be entered when the tenant is breaking the lease and you don’t have a definite vacate date. The property will be shown on the Vacancy Reports and may be uploaded to the web using Web Upload. Rest does not treat this date as a vacating date, so once the vacate date is established this must be entered in the vacate date field
- Bond Required – Enter the amount of bond required from the tenant for this property
- Bond Number – Enter the reference number issued by the Bond Board, or if it’s a commercial tenant – the location of the bond.
- Bond Collected – Leave this field blank if you are setting up a new tenant, the amount will be pre-filled when you receipt the bond to the tenant. If the tenant is paying the bond directly to the bond board, or if it’s an existing tenant you are setting up, you can enter the amount in here manually
- Bond Held – If you use Automatic Bond Payments, this will show the amount of bond currently held in the trust account for this tenant. When the bond is disbursed the amount will be zeroed out.
 or On the Move
  from the Tenant Detail screen. Visit
 Rental Tab

Rest Professional can hold and track up to three concurrent rental amounts paid by each tenant, which can be used for rent, outgoings, car parking or any regular and periodic additional charges. Dates, arrears and rent receipts are tracked separately however you can receipt all amounts to one receipt. The first column will default as rent and this is the column you must use for residential rent. The remaining columns will remain unused if you do not enter anything.
NOTE: when you add a new tenant, the rent amount, period and commission are copied from the property file into the tenant file as defaults. You can amend them if required.
- Description – Enter the description of what the tenant is paying e.g. rent, car parking. The first column will default to rent.
- Amount GST Excl $ - Enter the amount paid per period. NOTE: If you are setting up a commercial tenant, there will be additional fields as follows:
- Important: You should must always set a tenants rent amount to be their genuine rent amount. You cannot enter 0.00 or 0.01c as a tenants rent as this will cause several issues for reporting of arrears and management reporting.
- GST – The GST portion of the rent will be entered here when a GST collectable from date is entered in the commercial tab.
- Amount GST Incl $ - This field is available when Use GST Amount is selected. Enter the amount paid per period inclusive of GST, the GST and Amount GST Excl is automatically calculated.
- Use GST Incl Amount - tick this box the enter rent inclusive of GST; untick to enter the rent exclusive of GST. NOTE: Details of the GST collectable from date must be entered onto the Commercial tab prior to the “Use GST Incl Amount” being available
- Period – Enter the code for the rental period e.g. D1 = daily, W1 = weekly, W2 = fortnightly, M1 = Monthly. NOTE: if you change the amount and period, when you click OK to save the tenant Rest will ask if you wish to update the property file with the new amount and period.
- Paid to Last Month – When adding a new tenant, this will default to the day before the lease start date, which is the correct date.
- Paid to date – When adding a new tenant, this will default to the day before the lease start date. NOTE: If the tenants move in date changes from the original dates entered, you will need to manually change the paid to date to the day before the new lease start date
- Rent received – When entering a new tenant, leave this amount as zero. One an existing tenant, this shows the amount of amount paid in the current accounting month.
- Credit this month – When entering a new tenant, lease this amount as zero. On an existing tenant, this shows the amount of the part-payment received in the current month. NOTE: Rest pays the owner all rents received amounts including credits this month paid in that accounting month. These credit amounts are not withheld from the owner
- Credit last month – This is the amount of the part payment already paid to the owner in a previous month. When entering a new tenant that has been taken over from a previous agency, enter any credits or part payments here
- Periods paid – This is the number of full periods paid in the current month, and is only filled out when a full period is paid. You don’t need to enter anything in this field when adding a new tenant, as it will be pre-filled when receipting funds from the tenant
- Commission % - This is the commission percentage the owner is charged on rent collected when a receipt is processed. When entering a new tenant, this is copied from the Property Details; however this can differ from amount on the Property Details. Rest will generate the commission based on what is held on the tenant card.
- Account Code – Enter the account code to which all rent amounts will be totalled for the owners Income & Expenditure Reports. The default account code for rent is 101.
- Direct Debit – This only appears if you have the Tenant Direct Debit enabled. If you wish to disable the rental charge from direct debit, tick this box.
- B/F Balance (if applicable) – This field is used in the Commercial Owner Statements to calculate the amount owing from the previous period. To use Commercial Owner Statements, you must have the Advanced Commercial Module.
Bank Tab

- Drawer, branch & bank – If the tenant pays cheques regularly you can enter their cheque details in here. When receipting the tenants rent, the payment method will default to cheque and it will automatically populate the drawer/branch/bank details for you.
- Tenant/Contact Banking Details – If you have multiple tenants’ setup on the tenant card, you can drop down this list and setup that particular tenants banking details for direct debit (if multiple groups for direct debit are set up). You can allocate a code number & direct debit instructions to each of the tenants.
- Code Number – This is the tenant’s direct payment reference number. If your tenants pay directly to the bank, the bank issues a Reference, Bpay or DEFT number. REST uses the number to identify this to the tenant to allow automatic receipting. Press Allocate to allocate a number for this tenant. For more information please see document ‘How to Setup and Process Tenant Download Files in Rest’
- Code Number Search – Enter a Code number in the code number field, and then press search. This will bring up the tenants details that are allocated to that number.
- Tenant Direct Debit Info - Tenant direct debit allows you to raise direct debit instructions on tenant’s bank accounts for rental and invoices due. Rest Creates a file that is uploaded to the bank and the funds are transferred from the tenant bank account to the agent’s trust account. Tenant direct debit account details may be set up for more than one contact in a tenancy if multiple groups are used.
- Active for this tenant – Tick this box to activate or deactivate direct debit for this tenant.
- Debit Account Name, number & BSB – Enter the account name, number and BSB as provided by the tenant
- Comments – Enter up to 40 characters of any comments you may want to record, e.g. bank name
- Max Debit Amount – Enter the maximum debit amount allowed for this tenant per debit run. This is a safeguard to prevent debiting too much from the tenants account, particularly where arrears is prevalent. When first activated, this will default as the rental amount from the rental tab. This can be amended if required.
- Debit Amount – If you have switched on multiple debit groups, you will see Debit Amount on the screen instead of Maximum Debit Amount. This option will allow you to enter direct debit details for multiple contacts in a tenancy, so you must enter the amount to be debited for each contact.
- Debit Start/end date – If dates are entered in these fields, Rest will not raise debits before the start or after the end date.
- Debit Invoices – Tick this box if you would like to debit funds from the tenant’s bank account for tenant invoices for this tenant.
- Debit Group – This field is only visible if you have switched on the system option to enable multiple direct debit groups.
Inspection Tab
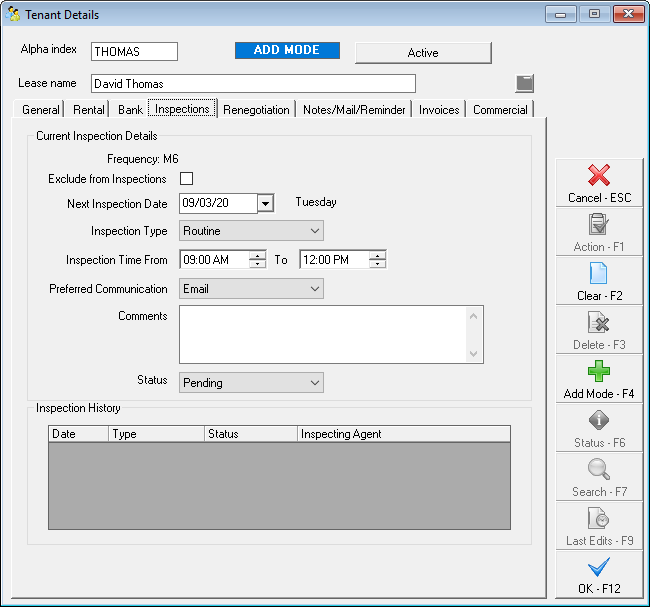
- Frequency - The inspection frequency saved on the tenant's property displays here.
- Exclude from Inspections - Select Exclude from Inspections to prevent the tenant's inspections being included in Inspection Planner and Follow Up. To exclude the property from Inspection Planner and Follow Up, an Exclude from Inspections option is also available on the Inspections tab of Property Details.
- Next Inspection Date - Enter the next inspection due date. This date is used to produce the Tenant Inspection Report and to produce inspection letters in the mail merge/inspection planner feature
- Inspection Type - The various Inspection Types available are Routine, Ingoing, Outgoing, Owner Request, Follow Up and One off Inspections. The Inspection type for all tenants will default to Routine. This field is also available as a merge field for creation of document templates.
- Inspection Time From and To - These fields are new and offer the ability to select a range of times for the user to schedule their inspections. These fields are also available as merge fields for creation of document templates.
- Preferred Communication - The default Preferred Communication method will be Letter. Additional communication methods available are Email and SMS
- Comments - The Comments field will accept up to 200 characters and displays in the Inspection Planner as a read only field on the Schedule tab.
- Status - Inspection status selections available are Pending, Send Notice, Scheduled, Rescheduled, Complete and Cancel. The Inspection Status for all tenants will be set to Pending.
- Inspection History - Property inspections scheduled through Inspection Planner and completed through Inspection Follow Up will automatically create entries in the Tenant Inspection History grid.
Renegotiation tab

- New Amount GST Excl - Enter the Rent increase/decrease amount as a GST Inclusive amount
- Change date - Enter the date the new rent will take effect. The date should be on the anniversary of the Paid From date i.e. if the tenancy is monthly and the Paid From date is 15/10/19, the Rent Change Date must be the 15th of the month. If the date is not on the anniversary, a message will display:
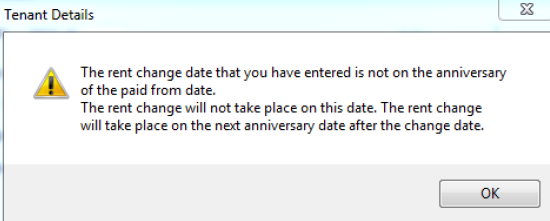
Select OK to proceed, and correct the date if necessary. When the Renegotiation details are saved an additional prompt will display to enable you to generate a tenant invoice for increased rent if there is a difference in the Change date and the Anniversary date.
- New period - Enter the tenant's rent period i.e.W1. If the rent has also been renegotiated, enter the new period
- New GST - This field is automatically calculated for commercial tenants with a GST Collectable From date entered
- Reneg Approved - This field is used when a renegotiation of rent has been agreed upon by the tenant and approved by the owner. For example, on the 5th of May both parties agreed on a rent increase to take effect on the 1st of June. The Reneg Approved date should be entered as 05/05/15
- Last Amount GST Excl, Last GST, Last Amount GST Incl, Date, & Period - The details of the previous rent change display in these fields
- Financial Hardship - From version 18.5, you have the ability to record if a rent renegotiation was due to Financial Hardship. This date is usually the same date as the rent renegotiation entered
- Rent Review Date - Enter the rent review date. The Tenant Rent Review Report is based on this date
- Last Rent Review Date - When a tenant's rent has been reviewed, remove the Rent Review Date. If another Rent Review is due during the tenancy, enter the new Rent Review Date. A prompt will display to move the previous date to the Last Rent Review Date field
Notes/Mail/Reminder Tab

- Tenant Note Files – Enter any tenant information you wish to record
- Postal Address, Suburb, State & Postcode – If the tenant has a postal address different to the property address, this can be entered here and this will be used as the postal address on all correspondence sent to the tenant. If the postal address is left blank then the property address will be used.
- Last Letter/Form Sent Dates – These dates can be used to track the last letters that have been sent to the tenant for arrears, rent increase or vacating. You may manually enter these dates otherwise Rest Professional will automatically change these dates as letters are sent using the Letter Printing option.
- Operator receipting reminder – Any information entered here will appear on the screen when a rent receipt is issued to alert the operator e.g. do not accept cheques.
- Receipt printing comment – Select the comment from the drop down list which will apply to this tenant, the comment will be printed on the bottom of the rent receipt for this tenant only and can be used to remind the tenant e.g. Pet Bond Due. These can be setup by going to Files > Descriptors and Comments > Master File and Transaction Comments > Tenant Receipts.
Invoices Tab
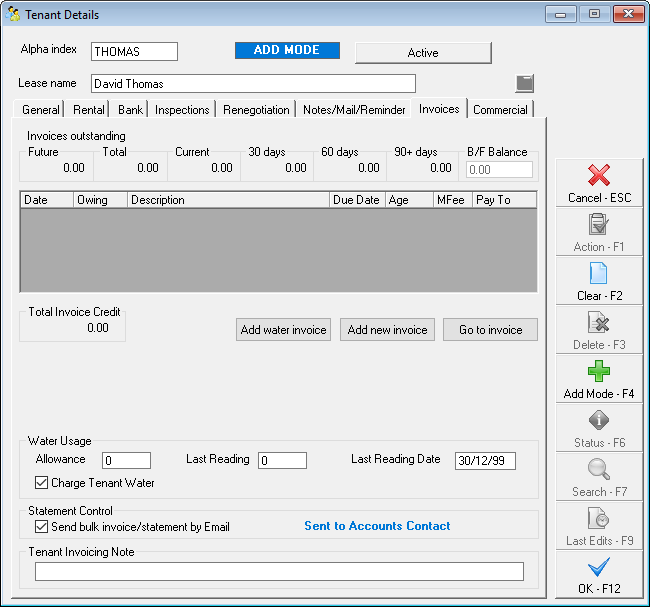
- Add New Invoice – Select this button to add a new tenant invoice
- Go to Invoice – If there are invoices listed on this tab, you can highlight one of the invoices and select go to invoice to open the invoice. You can also open the invoice by double clicking on the invoice.
- Total Invoice Credit – This will reflect the amount held in tenant invoice credit at any given time and will always be self-populated
- Residential Water Usage (if applicable) – When you create a tenant invoice from the Water Usage Invoicing function, Rest stores the water meter reading details for the tenant. When you create the next water usage invoice, the old readings are used to calculate the new water usage amount. When you change these, Rest will offer to update the property. These fields can also be manually changed at any time (i.e. if a water meter is replaced and the reading therefore requires changing)
- Charge Tenant Water - The flag to record whether a tenant is liable for water charges will display when creating a Tenant Water Invoice.
- Send bulk invoice/statement by Email – Tick this box if you would like to email the invoices and statements to the tenant. This only applies to bulk invoice printing, and will not apply when you are creating a new tenant invoice and select “Send email”. This must be setup in the System Options prior to this option being available.
- Note: When the Electronic Consent System Option is enabled:
- When selecting the Email invoice checkbox on the Tenant Invoice to the tenant’s nominated email address, the email function will only be available for tenants who have consented to the electronic service of notices.
- When the tenant has not consented, a prompt will display, and the email screen will not load.
- View the article or video - Consent for Electronic Service of Notices and Documents
- Tenant Invoicing Note - When a Tenant Invoicing Note has been added for a tenant, up to 75 characters of detail will display on the following screens underneath the tenant's details:
- The rent receipt screen
- The Tenant Invoices screen
- The Tenant Water Invoicing screen
- The Tenant Invoice Credit Allocation screen
- The File Smart Tenant Invoices screen
- The Tenant tab in File Smart Owner and Tenant Invoicing Workflow
Commercial Tab (if applicable)
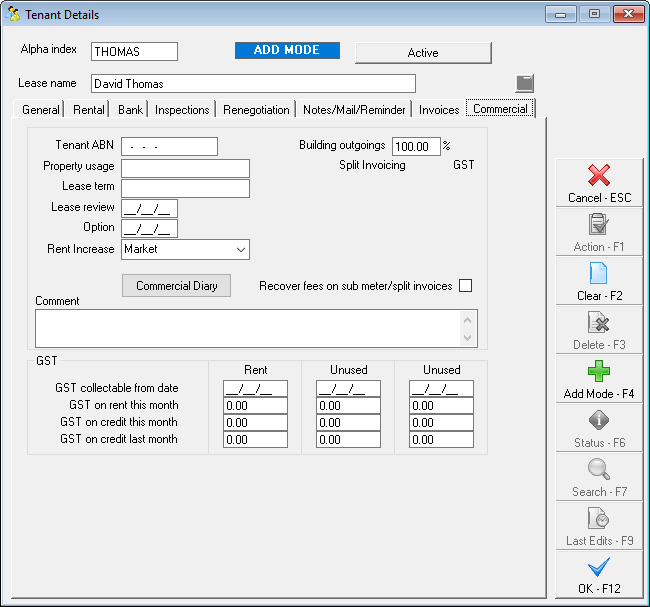
- Tenant ABN – If the tenants ABN is entered here, it will be displayed on all tenant rent receipts & invoices
- Property usage – Enter the usage of this property e.g. Retail, industrial etc.
- Lease term – Enter the term or length of lease e.g. 5 years
- Lease Review & Option Date – these dates may be entered from the information on the Lease Agreement and are used to produce the Lease Expiry/review Report
- Rent Increase – Select from the drop down list the method of increase to be used e.g. CPI, market, stepped or none. NOTE: All of the above information is shown in the Building Tenancy Schedule.
- Building outgoings % - Enter the percentage of the building outgoings that this tenant pays.
- Split Invoicing – Invoices for building expenses such as water rates, council rates etc. may be entered against an owner and then split between all the tenants in properties attached to that owner. For more information see document “How to Setup Split Invoicing in REST”.
- Recover fees on sub meter/split invoices – select this box if you wish to automatically recover the management fee charged to the owner, from the tenant. For more information see document “How to Setup Split Invoicing in REST”. NOTE: REST charges the owner the management fee and only recovers it from the tenant if you check this option.
- Comment – The first line of these is printed on the Building Tenancy Schedule, the second line is printed on the Critical Information report. Both lines are printed on the Tenancy Schedule
- GST Collectable from date – If the owner is registered for GST, GST is charged on commercial rent and outgoings from this date entered into this field, and is generally set to the Lease commencement date or the date GST start date of 01/07/00 is often used (When GST was implemented in Australia)
- GST on rent this month – No amounts need to be entered upon setting up a new card, as this auto generates GST if GST collectable from date is ticked and monies receipted
- GST on credit this month – No amounts need to be entered upon setting up a new card, as this auto generates GST if GST collectable from date is ticked and monies receipted
- GST on credit last month – No amounts need to be entered upon setting up a new card, as this auto generates GST if GST collectable from date is ticked and monies receipted
Press OK–F12 to save the tenant card.