How to Create and Edit a Mail Merge Template in REST Professional
Overview
The following instructions will guide you through the process to setup a new mail merge template in Word, which can then be used to merge letters or emails.
This can either be done by creating a brand new mail merge template, or editing an existing template.
This document will cover:
- How to Setup a Mail Merge template
- Saving your Finished Merge Document
- How to Edit an Existing Document
How to Setup a Mail Merge Template
Go to Other > Print Letters / Mail Merge
- Merge with - Select Tenant
NOTE: We recommend that all mail merge templates be saved as a tenant merge, this way you will get full range of the merge fields available. If you creating an email template to send to the owner, this will need to be setup as merge with Owner or Property, so the email will be sent to the Owner not the Tenant
- Type of Letter, Contact Manager, Property Type & Area Code – Leave these as they are, as you are not sending an actual merge letter these don’t need to be selected
- Selection – Select any tenant (the tenant you select isn’t important, as it’s just used as a sample)
- Output – Select Mail Merge
- Tick the New Document box
- Document Management – Select None
- Update tenant history – Do not tick this box
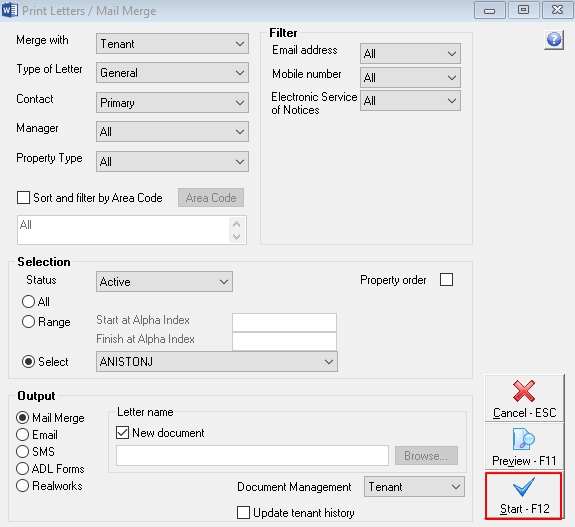
Click on Start-F12 and this will generate a blank Word Document
To insert the date, click on Insert > Date & Time > Select required format for the date and click OK

Type the letter as required.To insert merge fields in your letter, put the cursor where you would like the first merge field to go and then go to the top of Word > select the Mailings Tab > click on Insert Merge Field. You can select the text “Insert Merge Field” for a drop down list, or click on the icon above for a box to enter multiple merge fields. Continue to add all merge fields.

Saving your Finished Mail Merge Template
Once you have created your letter this must be saved into the REST word folder to be able to successfully merge to it. To check the location of the Word folder go to Help > About REST > Rest Info > File Locations. The Path is on the right hand side of the screen under Word Merge Documents. Ensure your templates are saved to this location.

Save your template as a Word Document with the required file name to the above location by going to File > Save As > Browse to the Word folder > Save
Once saved, close out of Word and say no to save to document management if prompted.
You can now merge to your new template in the usual manner
How to Edit an Existing Mail Merge Template
Go to Other > Print Letters / Mail Merge
- Merge with - Select Tenant
- Type of Letter, Contact Manager, Property Type & Area Code – leave these as they are, as you are not sending an actual merge letter these don’t need to be selected
- Selection – Select any tenant (the tenant you select isn’t important, as it’s just used as a sample)
- Output – Select Mail Merge
- Click on Browse and select the required merge document that requires editing
- Document Management – Select None or untick as required
- Update tenant history – Ensure this box is unticked
- Click on Start-F12 to generate the template
- Edit the template as required
NOTE: To insert new merge fields, go to Mailings > Insert Merge Field > select required merge fields
- Click on File > Save As >Browse to the Word Folder and save the document with the same name to replace the existing document
- You can now merge to your edited template in the usual manner
For more information, click the links below to view other articles about Mail Merge: