How to Backup in Rest Professional
Backing up in Rest Professional is very important & cannot be stressed enough. If your computer/server were to fail or your office destroyed by fire or flood, Rockend support staff can get the program installed on a computer in a short space of time. What we can’t do is get your data back into the program unless you have the correct backups in your possession.
The more backups you perform & store, the less inconvenience you face in a crisis event. Ensure you have a disaster recovery plan and that person/s are made responsible for not only performing the backups in Rest but understanding what is being backed up, where it is being backed up to and why it is being backed up. If the responsible person leaves or goes on holiday who will take over this task? If you are ever unsure or need clarification do not hesitate to contact Rockend support to discuss the best process for backing up.
- Go to Files > Archive > Backup or click on the Wizard hat icon in the top tool bar.
- Click Next to proceed to the next screen

- Select what you wish to backup i.e. Current Data

NOTE: There are a number of backup options that you may select: If performing a daily backup during, or at the end of the day the Current Data backup is the one to select. You would also select Current data backup prior to processing a tenant download file, change of ownership wizard, prior to any type of payment run, tenant direct debit and before any global change.
This backup backs up all the current data and transactions as they are at that time you perform the backup.
- Click on the Next button to proceed to the next screen.
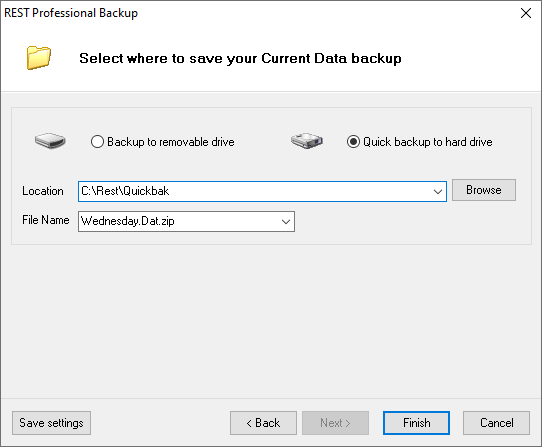
This screen allows you to select where the backup file will be saved to.
- Our recommendation is to backup to the hard drive, this will backup to the default server location where the Rest database is installed to.
- For extra assurance, we recommend to then make a copy of this backup (both files, .zip & .zID) to your chosen external backup location such as an external hard drive or USB that is stored separately and somewhere safe outside of business hours should anything happen to your office or computer/s.
- If you are unsure how to copy the backup files, you can simply complete an additional backup to the external location by selecting "Backup to removable drive"
- An important point to remember about a ‘Quick backup to hard drive’ is that if the backup is saved on the server and if your server computer was to fail and the data was unrecoverable then you would not be able to retrieve your data backup which could potentially result in a rebuild process which can not only be very timely, but also an expensive process for the business.
Important: Due to potential issues relating to reading data back, saving a backup to a floppy diskette or CD/DVD RW should be avoided if possible. The price of memory sticks and removable drives is not expensive compared to the cost of rekeying data.
You will notice that Rest Professional puts in a default name for the backup depending on the day of the week eg. Friday.Dat.zip. It is strongly advised that you change the name of the backup file if you are not carrying out your regular daily backup i.e. if you are backing up prior to a creditor payment run, you would rename it before.creditor.run.Dat.zip. If you were to change the name to the date (e.g. 15May2021 for instance) you would then have incremental backups. The advantage of this is that your backup will not be overwritten every day. In some rare cases, problems with the data may be present for days before detection. Having backups that span a period of time gives you more options in these rare cases.
Rest will not allow you to use characters such as ‘\’ or ‘/’ in the file name, instead you can use full stops or an underscore.
This example screen shows that a quick backup to hard drive has been selected and the file name has been changed to before_creditor_run190521.Dat.zip
- If you wish to backup to an external hard drive or USB, change to "Backup to removable drive" and browse to the required location.

- Click on Finish
Rest adds .Dat.zip onto the end of the file name you typed in as per the screen shot above.
This screen also informs you where the backup file is going to be created/saved. In this case it is going to be created in the C:\Rest\Quickbak\ folder.
- Click on the Backup button & you will be prompted to perform a system recovery as seen below.

You should never press the “Skip system recovery” button to allow the System Recovery to run. The System Recovery performs an integrity check of the data as well as other functions. If the system recovery passes then you can be assured that the backup being created will be suitable for restoring, if ever required.
If the system recovery fails then leave the message on screen and contact Rockend Support immediately in order to have the problem rectified.
If you skip the system recovery process prior to the backup there is a possibility that you may be backing up data that is not suitable for restoring. If this is the case you will have to find old backups that pass a system recovery. There have been cases where months of work has been lost and had to be rekeyed by operators because valid backups were not kept or system recoveries skipped.
When the system recovery is complete, the backup file will be created and you will be returned to the main screen of the Rest Professional program.
Tip: When creating backups the ‘3-2-1 backup’ strategy (google for more info) is a robust system that has allowed customers who use it to recover their data after two of their backup systems failed.
For further assistance, please access our Customer Lounge where you will find our Live Chat in the bottom right hand corner, or you can register/login to the myMRI Portal to log a support case instead.