
Changing from Exclusive to Inclusive Paid to Dates
Overview
You may wish to change your system from using exclusive dates (ie/ 01/10 – 01/11) to inclusive dates (ie/ 01/10 – 31/10) which is the most common system setup for your rent paid to dates.
Before changing from exclusive to inclusive paid to dates there are a few things to take into consideration before changing your system setup.
There must be no transactions in the current period to change your system from Exclusive dates to Inclusive dates. You therefore must have just done a files update and no file changes or transactions processed since files update in order to activate inclusive dates.
Please refer to the below procedure to ensure you are making an informed and correct decision about how to make the change.
Questions to ask before making the change
-
When entering a new tenant, do you go into the rental tab and manually amend paid from and to date to 1 day before the lease start date?
Some offices do this in order to treat their paid to dates as inclusive when REST is set to exclusive.
If the answer is yes: When turning on inclusive dates DO NOT tick option to decrease paid to dates. Also, you will no longer need to do this once changed to inclusive paid to dates.
If the answer is no (most common answer): If you do not manually change paid from & to dates in the initial setup of the tenant (i.e. leaves the dates as is) then DO tick the option to decrease paid to dates.
-
How do you interpret the tenant paid to dates at present? Do you understand that the paid to date does not include that day?
Some offices are on exclusive but interpret their paid to dates as inclusive. If you are unsure, you will need to check this and verify as this will depend on whether you decrease the paid to dates when making the change in the system options.
If you have ascertained that the paid to date does not include that day and your office interprets it that way: Then you will need to decrease paid to dates by one day when making the change in your system options.
If you have ascertained that the paid to date does include that day and your office interprets it that way: Then you will not decrease paid to dates by one day
NOTE: If this option is taken, your owners will lose 1 day rent.
-
Have you recently converted from another software program?
If the answer is yes: Was your previous software on inclusive dates? If so, then DO NOT tick the option to decrease paid to dates. If there is some variation to this then it may be best to discuss with Rockend Support prior to the change. If your previous software was exclusive then DO tick the option to decrease paid to dates.
If the answer is no: Then this question will not factor in the decision.
Steps
You will need to contact Rockend Support to proceed to changing the system from Exclusive to Inclusive dates as a response code will be required.
- Do a current data backup & rename the backup “before.system.change.dat.zip”
- Log all users out of REST
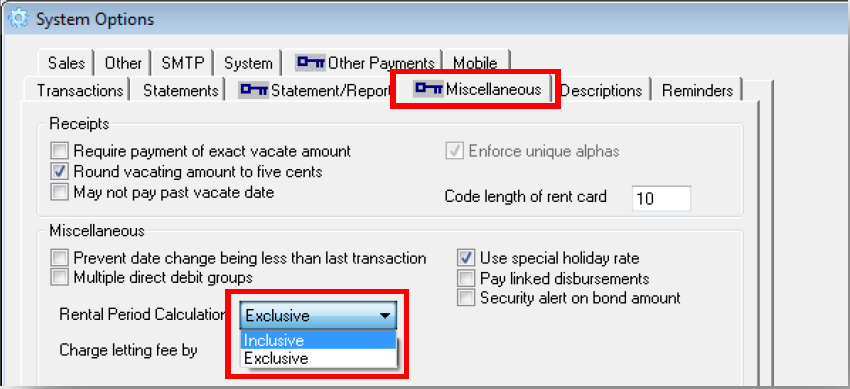
- Go to Other > Utilities > System Options > Miscellaneous Tab and click on the Rental Period Calculation drop down box which will currently show as Exclusive > Select Inclusive (As shown below)
- Next you will get a screen explaining what this process requires & what the process will do. Click NEXT

- The next screen is where REST will give examples of what the current paid to dates are and what REST will change them to.
- The following screen will appear if you tick “decrease paid to dates”
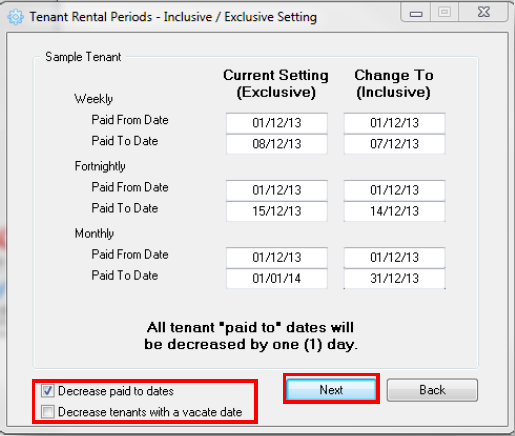
NOTE: This is very important and you will need to refer back to page 1 & 2 of this document to ensure this change is done correctly.
- If the paid to dates need to be decreased you will need to ensure the box is ticked.
- Click on Next to continue.
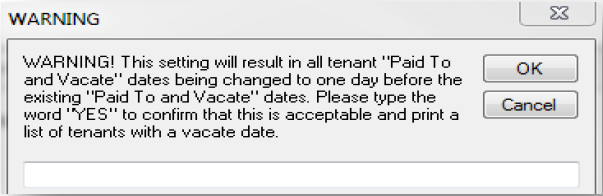
- This is an additional box for you to again be sure about proceeding at this point and happy with the options you have selected. If you wish to proceed type in YES and click on OK.
NOTE: If you previously selected to “Decrease tenants with a vacate date” the next screen will prompt you to print the Vacating Tenant List. Click Print.
- The following message will appear to confirm you want to proceed with the change. Click YES.
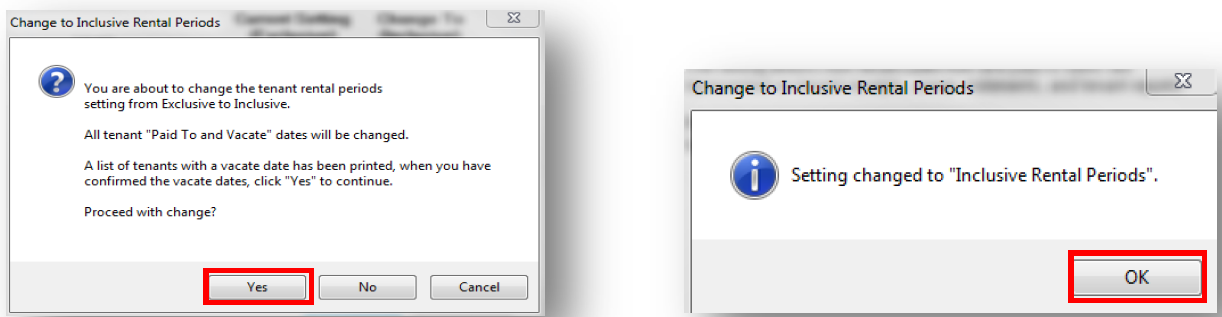
NOTE: Check a tenant ledger for the current period – you should see a notation of the changes to paid to dates (as per below)

Things to check after making the change
-
When you receive a vacate notice from tenants do you enter the vacate date as the day after the actual vacate date?
You may have previously entered a vacate date as a day later in order to actually collect rent for the day of vacating and to avoid owners missing out on a day’s rent. Note: You can print the Tenants Vacating List to assist you if you do not already have it. Reports > Tenant > Vacating Tenant List.
If the answer is yes: You will need to go into each vacating tenant file and amend vacate date one day back. Although from now on, you can just enter actual vacate date as vacating date.
If the answer is no: You are not required to make any changes.
-
Check a tenant ledger to ensure the change has processed correctly. If you have ticked to decrease the paid to date by one day, then check that the ledger says:
“Paid to date decreased 1 day” If this does not show up on ledger then it is likely that you did not tick to decrease the paid to date and a restore and reprocessing of the system change will need to be carried out.