REST Professional Network Troubleshooting Guide
This guide is designed to be carried out by an experienced IT Technician on all server and workstations
The recommendations listed here are designed to help facilitate an optimal environment for REST Professional software.
Some of these recommendations may interfere with other software.
Please visit www.rockend.com.au to ensure the environment meets our Minimum System Requirements.
Note: We assume that regular maintenance is carried out on all computers, including regular reviews of items such as CPU, memory, disk space and windows event logs
Additional supplements included:
- Monitoring processes using Windows Sysinternals - Process Monitor
- Monitoring network stability
- Installing REST Professional / connecting a second database / relocating a database
- The REST database must be located on a supported Windows operating system. REST now incorporates features that use .net technologies as well as Windows Services.
Support for other file locking protocols running on systems such as NAS, Linux and Macintosh (for example) have proven to be restrictive and time consuming to support. In many instances we are not able to run our support tools.
We may also ask for the REST Database to be relocated to a supported Windows operating system before providing support.
- Antivirus software should be up to date and may need to be disabled or uninstalled when troubleshooting.
We recommend disabling aggressive modes such as Heuristic Scanning, it is important that you understand how your Antivirus effects your environment.
The following areas should be excluded from Real time scanning on all servers and workstations using REST Professional, to ensure this has taken effect we highly recommend checking the REST Database folders, refer to the section “Monitoring processes using Windows Sysinternals - Process Monitor”.
- REST Database Share on the server and workstations, disable scanning of mapped drives or network shares.
- REST Program folder (IE: C:\REST), as well as excluding C:\REST\RESTPro.exe.
- Windows Print Spool directory may also need to be excluded.
- Windows configuration recommendations
- Sufficient windows user permissions (MODIFY) to the REST Database Share and local Program folder (IE: C:\REST). Ensure adequate permissions are setup on the Share tab as well as the Security tab.
- Exclude the REST Share from Windows Indexing (Windows Search Service)
- Ensure Windows Sync Centre (Windows Offline Folders) is disabled. Being enabled by default it may direct REST to an offline version of a data file. We recommend to Reconfigure the REST Database Share to ensure that no files or programs are available offline. (Share Properties > Advanced Sharing > Caching)
- User Account Control (UAC) may need to be disabled temporarily for troubleshooting
- Exclude RESTpro.exe in the Data Execution Prevention (DEP) List.
- Check the computers network card and configuration
- Ensure the connection is wired using Cat5 / Cat6 cabling standards, connections over WIFI or VPN are not supported by Rockend.
- Disable QOS.
- Ensure the link speed is at least 1000Mbit and that TCP/IPv4 is the only protocol in use (IE: Disable TCP/IP v6). **For Domain Controllers or Exchange Servers we recommend TCP/IP v6 is left as default.
- Ensure the computer is only connected to one physical network.
- Check the type of network card installed on the computer, confirm the correct drivers are installed.
- Under connection properties, disable all power management options to remove control from other programs.
- If running DHCP check how often new TCP/IP addresses are allocated.
- Review all screen saver and power saving plans
- Optimise for High Performance.
- Disable items such as hibernation, powering off HDD and Network cards etc.
- Confirm the computer clocks are synchronised to the same time source and within a few seconds of each other.
- Confirm the computer has all of the current Microsoft Updates installed.
- Turn off Disk Compression to optimise disk I/O performance.
- Disable Outlook Security Warnings for example in Outlook 2007 / 2010 this is located under: File > Options > Trust Centre > Trust Centre Settings > Programmatic Access > Never warn me about suspicious activity
- Ensure the user’s TEMP folder is cleared (IE: c:\users\LogggedOnUser\AppData\Local\Temp). Windows will query this location and excessive files or folders can cause delays running REST, particularly running reports.
We recommend scheduling a regular cleanout using Windows Task Scheduler and Disk Cleanup.
- REST SMTP Settings are setup under Other > Utilities > Company Details.
- At this stage there is no provisioning for authentication, the email server needs to be setup to Relay, generally by allowing all of the REST Workstations by Hostname or IP.
- Sent Items Email Address is essentially a BCC address, enter an external email address when testing to ensure Relay is allowed externally.
- Many REST users will use their ISP’s SMTP server (IE: smtp.telstrabusiness.com), please ensure any 3rd party SMTP servers are setup to allow bulk email, some REST users send out 100’s of emails at once which can be halted by SMTP spam filters.
- Suggestions for isolating issues, try to identify a user process in REST that can be used to replicate the fault.
- Confirm how many workstations are affected, run REST as a different user, or a local administrator to isolate a windows user based issue.
- Uninstall REST, rename the REST program folder (IE: c:\REST) and install REST again.
- Use the Run as Administrator option for launching or installing REST.
- Locked or open REST database files on the server, check for open files on the server. A definitive test is to close REST on all workstations and temporarily rename the Databases \Data folder
- Further steps can be taken to block isolate some areas, for example the REST Database can be temporarily relocated to another stable workstation.
- Additional notes
- Consider any 3rd party software that may be running throughout the day. For example backup software, scheduled tasks, group policy settings etc. We have seen pre-loaded HP security / protection tools interrupt REST so recommend that these are uninstalled during testing.
- REST Professional requires a highly stable network connection between the workstations and server.
- Review the grade of network equipment, we recommend a single managed layer-3 switch with sufficient ports and professional bandwidth management. We do not recommend cascading switches together.
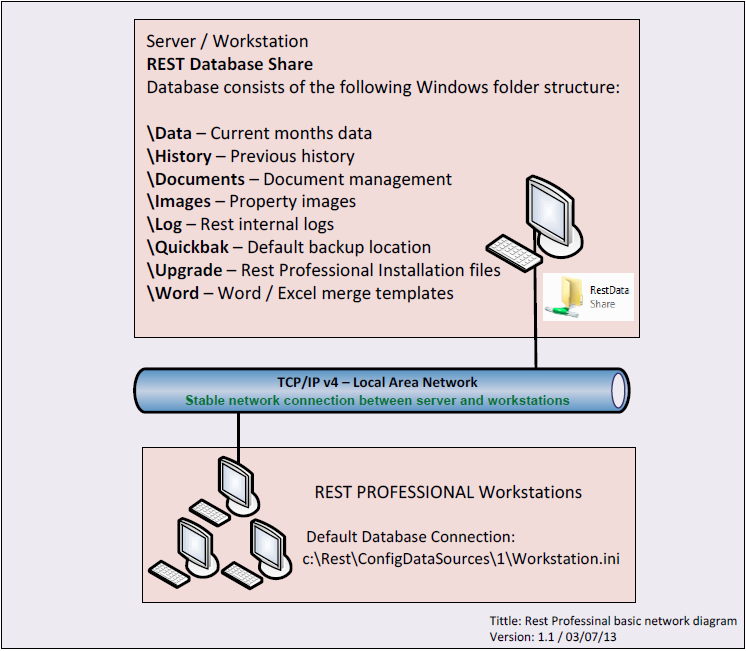
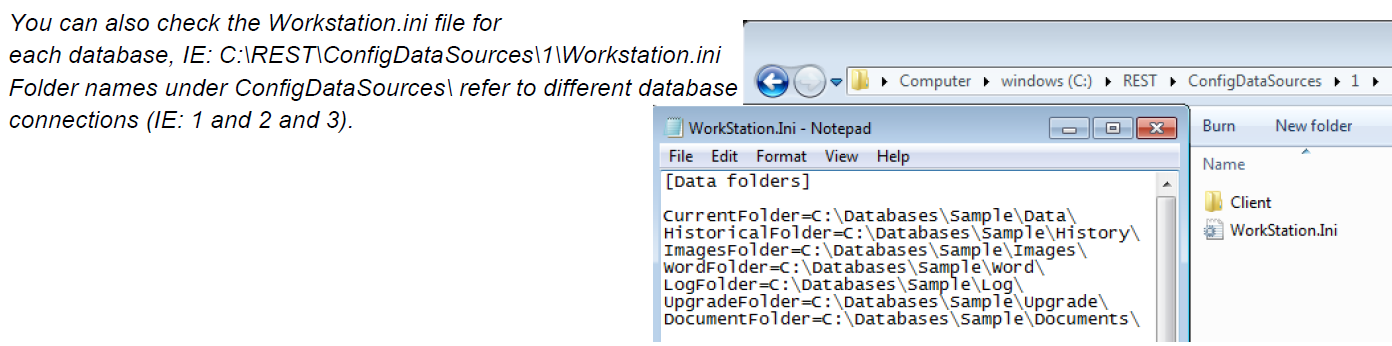
- Review the workstation.ini file(s) (Refer diagram on first page), connecting via a UNC path is preferred over a mapped drive. Ensure there are no full stops in the path’s, this can cause some issues in REST.
- REST can require a high amount of Disk I/O, SSD Hard Drives have been known to improve performance in some environments.
- In a Terminal Server environment, redirected printers appear in Windows with an extension their name (EI: Redirected from PC01), REST does not display this extension so be conscious of any printers on the local Terminal Server with the same printer name as there may be two in the list with the same name.
- Ensure that all REST Professional workstations connect to the REST Database over a stable local LAN, you may need to restrict users who connect over WAN or WIFI to the REST Database share.
- REST relies on iexplore.exe (Internet Explorer) for certain web based features. Ensure Internet Explorer is running efficiently, it may require a Reset from the Internet Options menu.
Monitoring processes using Windows Sysinternals - Process Monitor
Purpose:
- To identify 3rd party processes effecting REST database files. Examples include Antivirus, Windows search service etc.
- To monitor the REST Professional process when experiencing errors.
Requirements:
- ProcMon.exe - http://technet.microsoft.com/en-au/sysinternals/bb896645.aspx
- Location of the REST Data folder on the local hard drive.
Procedure:
Process Monitor can be used to monitor processes on the local computer.
Monitoring REST Database files must be performed on the server or workstation where the REST Database resides, the REST Database location can be found by following the instructions for installing REST Professional on the proceeding pages.
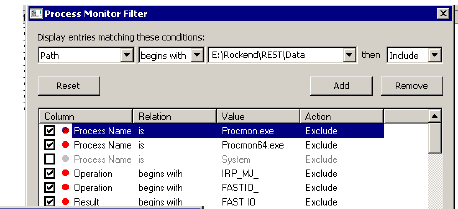
- Setup the filter for the REST Data folder
- Select Filter, Filter, click on Reset (Reset any current filters).
- Deselect the SYSTEM process from the list to capture remote processes. IE: RESTPro.exe processes from other workstations will run as the local SYSTEM process.
- Create a new filter using Path > Begins With > REST Data folder location IE: e:\Rockend\REST\Data, select Add and then OK.
- Setup the filter for the REST Professional Process
- Select Filter, Filter, click on Reset (Reset any current filters).
- Create a new filter using Process > is > RestPro.exe
Note: On a terminal server we recommend to use the PID (ProcessID), identify your RestPro.exe PID in task manager and filter using PID
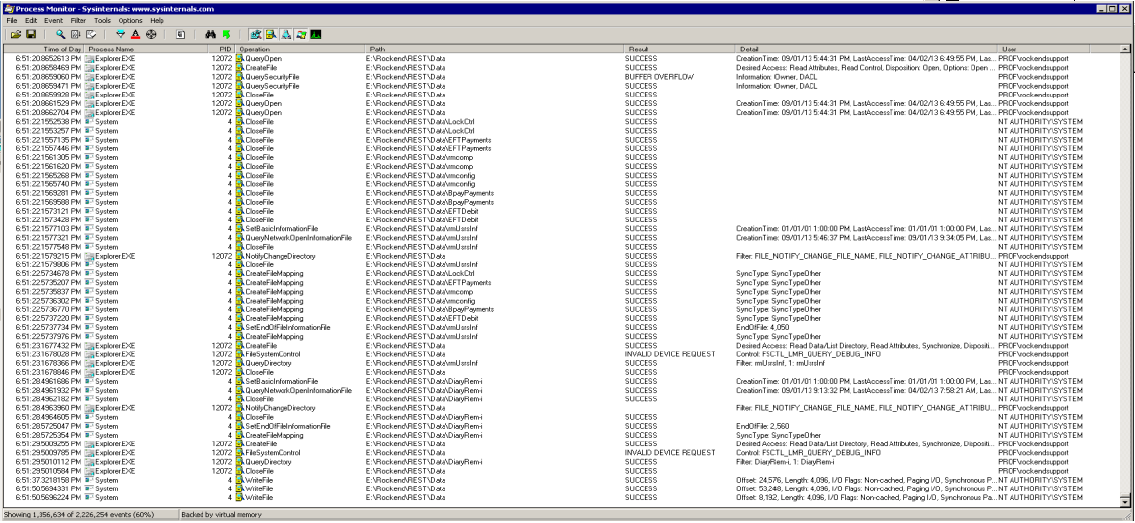
- Items to consider when reviewing the trace results will depend on the symptoms, for example
- Any processes affecting the REST Database files that are not SYSTEM or RestRro.exe processes are considered 3rd party processes.
- Results indicating ACCESS DENIED or SHARING VIOLATIONS can be caused by insufficient windows permissions or Antivirus, for example.
- Start and stop the monitoring by clicking on the Magnify Glass

- Right click on a process to view the properties.
- Results can be cleared by clicking on the Eraser

- Running results can be auto scrolled by clicking on the Scroll


Monitoring network stability
Purpose:
To monitor network stability between server and workstations, for an extended duration of time.
We recommend that the connections are tested every 5 seconds, all ping response times should be <1ms.
This can be achieved using a number of professional software products, if you don’t have a preference we can recommend Ping Info View.
Requirements:
- PingInfoView.exe - http://www.nirsoft.net/utils/pinginfoview.zip
- List of all workstation hostnames or IP’s.
Procedure:
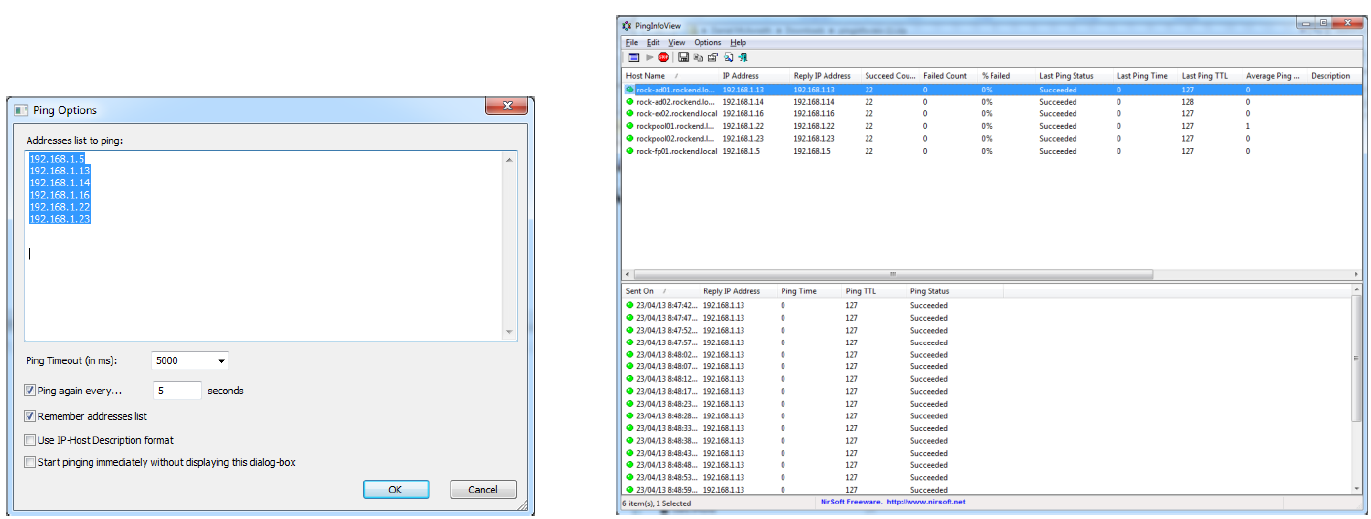
- From the server, run PingInfoView.exe
- Enter all Host Names or IP addresses, ensure there are no spaces before or after the addresses.
- Recommended configuration from default:
- Configure timeout response to 5000ms.
- Ping every 5 seconds, or every 1 second for smaller monitoring durations.
- Press the green Play button to start.
- If required save a copy of the results by highlighting all results from each IP and click Save Selected Items.
- Ping results can be reset under File \ Reset.
- We recommend monitoring the network over a period of days, depending on the nature of the issues.
Installing REST Professional / connecting a second database / relocating a database
Requirements:
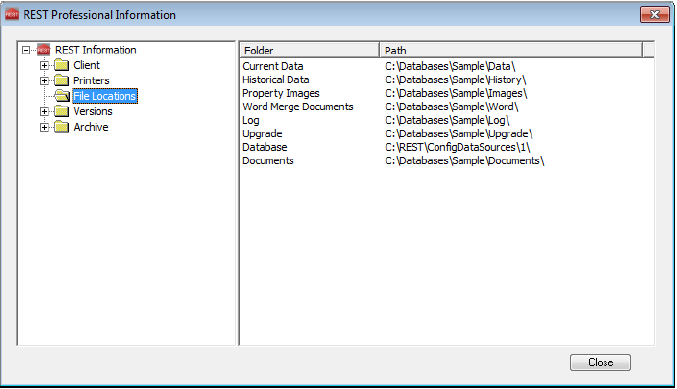
- Location of the REST database(s) on the network. Repeat these steps if multiple databases are in use. From a working client, open REST and select Help > About REST > REST Info > File Locations.
- REST Professional installation is also required on the server for certain server side processing as well as support
Installation files are located in the Databases Upgrade folder or by contacting Rockend Support.
There is one set of install files that covers both new installations and upgrades.
Installing REST Professional
- Launch the Setup.exe file and follow the default prompts, we recommend that REST is installed to C:\REST.
- Once installed, launch REST and follow the Database Connection Wizard to Connect and Browse to the database location.
Note: If you do not receive the Database Connection Wizard, this can be manually invoked by renaming the existing ConfigDataSources folder in the REST program folder (IE: C:\REST\ConfigDataSources).
This will recreate a new ConfigDataSources folder.
- Ensure a printer is configured in REST Professional to avoid potential issues previewing data, Other > Utilities > Printer Setup.
Connecting a second REST Professional database
Additional databases can be connected from within REST, click Files > New Database > Database Wizard to launch the Database Connection Wizard, select Connect and Browse to the database location.
Relocating a REST Professional database
- Ensure REST Professional has been closed on all workstations.
- Create a new Windows Share on the new location
- Ensure Caching is disabled
- Confirm the appropriate Windows User Permissions have been configured (IE: Full Control for Everyone)
- Using explorer copy and paste all database folders to the new location.
- Rename the BackupLog file under Log\BackupLog (previous backup paths may slow the REST backup wizard)
- Reconfigure the REST workstations using the Database Connection Wizard (refer to above steps under “Installing REST Professional”).
We strongly recommend disabling the old share and relocating the contents of the previous database.
This will avoid issues in the event a REST workstation is left out and the user key’s data into the old database.
- Open REST and change any required file paths that the client has setup, for example:
- SMTP Server: Other > Utilities > System Options > SMTP
- 1Forms: Other > Utilities > System Options > System
- Custom Logo’s: Other > Utilities > Company Details > Defaults
- Tenant Direct Debit and Bpay: Other > Utilities > Company Details > General
- Bank Downloads: Other > Utilities > Company Details > Charges/Taxes > Configure / View
- Check if the REST Messenger is installed (check Programs & Features for REST Messenger), contact REST Technical Support for more information on this product.
- Check if the REST Communicator is installed (check Programs & Features for Rockend Web Access) ensure it is uninstalled from the old server. Intermittent issues can occur if it continues to report through to Rockend alongside another installation.
- Uninstall the program Rockend Web Access
- Reinstall on the new server following the installation instructions which can be obtained from the Rockend Client Lounge at www.rockend.com.au